How to Screen Record in Windows 10 or Windows 11
(Image credit: Future)
If a picture is worth a thousand words, then a video is worth a million. Whether you’re showing someone how to perform a task in an important application or you want to show off your gaming process, screen recording in Windows is a great way to do it.
Windows 10 and Windows 11 both have screen recording capability built-in as part of the Xbox Game Bar tool, and using it is extremely easy, even if you want to capture your activity in a non-gaming app. However, Game Bar has some limitations, including the fact that it can only screen record one app at a time and not the whole screen, so use another method such as OBS for screen recording if you’re doing something more complex than just capturing one application at a time.
Below, we’ll show you how to record your screen in Windows 10 or Windows 11, using both the Xbox Game Bar and OBS. If all you need is a still image, see our article on how to take a screenshot in Windows 11.
Record the Windows Screen with Xbox Game Bar
Built into both Windows 11 and Windows 10, the Xbox Game Bar has a number of features, including CPU and GPU monitoring. However, its most useful feature is its ability to screen record in Windows, outputting to MP4 format.
XBox Gme Bar works as well in other applications such as Chrome as it does in Games, but it only works within a single application at a time and cannot capture the Windows desktop or File Explorer. So, if you want to show someone how to do a task involving multiple programs — for example, programming a web page in a code editor and then viewing it in a browser — you would need to grab multiple videos. And if you want to show them how to do anything in the Windows 11 or 10 UI, such as using the Start menu, you can’t. For those activities, you should use another tool such as OBS, which we’ll show you how to screen record with later in this article.
1. Click into the app you wish to record.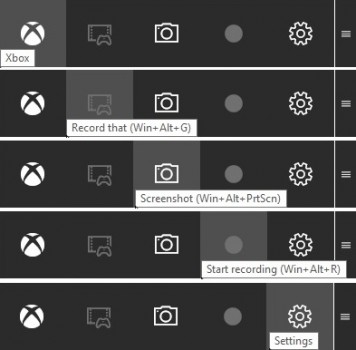
2. Hit the Windows Key + Alt + R to start screen recording. A small recording widget showing how long you’ve been recording appears somewhere on the screen, most likely in a corner. You can also get here by launching the Xbox Gamebar (Windows Key + G) and then finding the capture widget, but the keyboard shortcut is much simpler.
(Image credit: Future)
3. Perform whatever actions you want and use your microphone to record audio. You can also mute the mic if you don’t want to capture any sound.
4. Hit the Windows Key + Alt + R again to stop screen recording. You can also hit the stop button on the widget You will get an alert that says «Game clip recorded. If you click on it, you will go into the Gallery section of the Gamebar app and be able to preview the video you captured. You can also find the MP4 file you recorded under your Videos/Captures folder.
(Image credit: Future)
Configuring Xbox Gamebar Screen Recording
While the default settings are probably fine for most people, there are a few options you can change.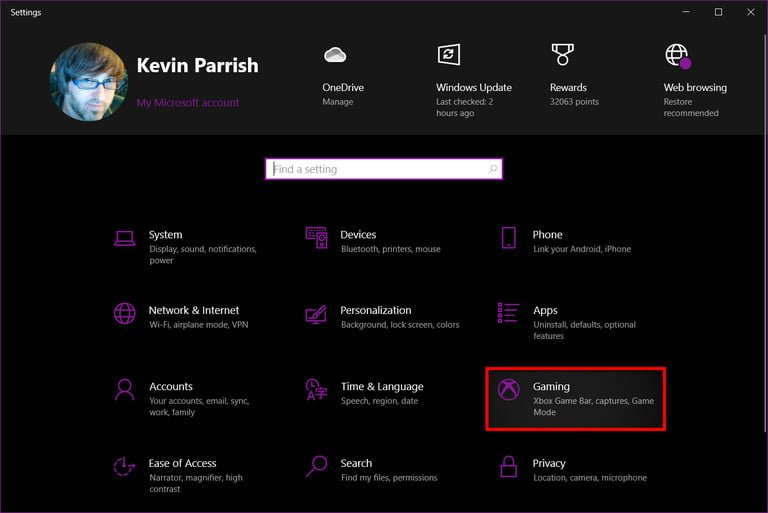
1. Navigate to Settings->Gaming->Captures.
(Image credit: Future)
2. Change any of the following settings. Note that though they use the word «game,» the settings should apply to any app you record whether it’s a game or not.
- Record what happened (Win 11) / Background Recording (Win 10): this creates a 30-second (or greater if you change the settings) buffer of automatically recorded content. So if you are playing a game and just had an epic kill, you can hit Windows key + G to launch game bar and you can save the 30 seconds that just passed, even though you weren’t actively screen recording it. Note that the name of this setting is different in Windows 11 than 10, but the feature is the same.
(Image credit: Future)
- Max recording length: The amount of time after which screen recording will automatically shut off. I recommend leaving this at the default two hours.

- Capture audio when recording a game: By default, this records the sounds from your mic and the game itself, but excludes background sounds from Windows or your other apps. You can disable the audio recording entirely or enable it to record system sounds or change the balance.
(Image credit: Future)
- Video frame rate: defaults to 30 fps, but you can change it to 60 fps.
- Video quality: choose standard or high.
- Capture mouse cursor when recording a game: I recommend leaving this enabled, particularly if you are recording an app that is not a game.
Recording the Whole Screen with OBS Studio
The biggest drawback to using the Xbox Gamebar to screen record Windows is that it can only work with one app at a time and will not show the desktop or File Explorer. To capture your entire desktop and all the windows on it, you need a third-party app and, while there are many, we like OBS Studio for this purpose.
OBS Studio is very popular in the game streaming community because it’s free and great at broadcasting games out to Twitch and other sites. However, you can also use OBS to record the entire screen in Windows 11 and save it as an MP4 file, without ever streaming what you do.
1. Download, install and launch OBS Studio. When you launch OBS for the first time, if you haven’t already, you will be asked whether you want to optimize it for streaming or recording only. If you don’t plan to stream, choose «Optimize just for recording.»
(Image credit: Future)
You will also be asked for the base resolution (aka canvas resolution) and frame rate. We recommend choosing the resolution of the screen you plan to capture (it may default to 1080p). If you use a higher resolution screen to capture from than your canvas size, you will not be capturing the full screen.
If, like me, you have a multimonitor set up with different screens of different resolutions, you can always change the canvas size again later.
(Image credit: Tom’s Hardware)
2. Click the Plus icon under Sources to add a new source.
(Image credit: Tom’s Hardware)
3. Select Display Capture.
(Image credit: Future)
4. Click Ok on the dialog box that pops up. You can give the source a name other than Display Capture if you’d like.
(Image credit: Future)
5. Choose a display and click Ok. If you have more than one monitor, this would allow you to have OBS on one screen while recording the activity on another. If you have only one monitor, there’s only one choice.
(Image credit: Future)
If the display exceeds the bounds of your OBS canvas — for example, you are capturing a 4K display but you have a 1920 x 1080 base resolution — your capture will be cut off. Fix the problem, by going to File->Settings->Video and changing the base resolution there. You can also set the output resolution here. If the base resolution is higher than the output (a 1080p output of a 4K screen), OBS will scale the output down but still keep everything in the frame.
(Image credit: Tom’s Hardware)
6. Mute the desktop and / or microphone audio if you don’t want either or both of those sounds captured. By default, OBS will capture audio from any applications running on your computer and from your default audio input device. To quiet those, you just click on the speaker icons in the audio mixer.
(Image credit: Tom’s Hardware)
7. Click the Start Recording button in the lower right corner of the screen. Remember that if you didn’t mute the microphone or desktop audio, it will record whatever noise you or the computer makes.
(Image credit: Future)
8. Minimize OBS if you are screen recording from the same monitor that OBS is on.
9. Click Stop Recording in OBS when you are finished.
(Image credit: Future)
By default, your screen recording videos will be located in the Windows 11 (or 10) Videos folder. They are stored, by default, in the .mkv file format. However, you can change the output to MP4 or MOV files by going to the Settings->Output menu in OBS.
Avram Piltch is Tom’s Hardware’s editor-in-chief. When he’s not playing with the latest gadgets at work or putting on VR helmets at trade shows, you’ll find him rooting his phone, taking apart his PC or coding plugins. With his technical knowledge and passion for testing, Avram developed many real-world benchmarks, including our laptop battery test.
Topics
Windows
Operating Systems
How to record your screen in Windows 10
Skip to main content
Laptop Mag is supported by its audience. When you purchase through links on our site, we may earn an affiliate commission. Here’s why you can trust us.
(Image credit: Xbox)
Did you know Windows 10 has a screen recording utility called the Xbox Game Bar? With it, you can record a video of your actions in just about any Windows app on your laptop, whether you want to capture gameplay or create a tutorial for someone using Microsoft Office. To make it easier for you, we’ve outlined a few simple steps on how to record your screen in Windows 10.
The screen recording tool is part of the Xbox app that comes installed by default in Windows 10. Xbox Game Bar received some major updates to make it more useful, so you can now take screenshots and even make memes.
Wondering how to record your screen in Windows 11? We’ve got you covered. You can also check out the best Windows 10 keyboard shortcuts, how to speed up Windows 10 boot time, and how to mirror your screen to a TV or monitor.
1. Open the app you want to record. Unfortunately, the screen recorder tool can’t capture some programs — such as File Manager, or the entire desktop — but it does work in regular desktop apps (and those from the Windows Store).
2. Press the Windows key + G at the same time to open the Game Bar dialog.
3. Check the «Yes, this is a game» checkbox to load the Game Bar. This is the procedure whether you are screen recording a game or another kind of app.
4. Click on the Start Recording button (or Win + Alt + R) to begin capturing video.
5. Stop the recording by clicking on the red recording bar that will be on the top right of the program window. (If it disappears on you, press Win + G again to bring the Game Bar back.)
That’s it! You’ll find your recorded videos, which are MP4 files, under the Videos folder in a subfolder called Captures. You’ll also find them in the Xbox app under the Game DVR menu, where you can trim a video and share it on Xbox live (if it’s a game).
Note that you can also use the Xbox screen recording tool to take screenshots. Instead of clicking the recording button, click the camera icon on the Game Bar or Win + Alt + PrtScn.
Today’s best Laptops deals
£699.97
View
£899
View
£1,458. 66
66
View
Show More Deals
Laptop Mag is part of Future plc, an international media group and leading digital publisher. Visit our corporate site .
©
Future Publishing Limited Quay House, The Ambury,
Bath
BA1 1UA. All rights reserved. England and Wales company registration number 2008885.
Create a screen recording from your desktop — Microsoft Stream
E-mail address
- Article
- Reading takes 3 minutes
Warning
The following is information about Microsoft Stream (classic) being discontinued and replaced by Stream (in SharePoint). We highly recommend getting started with the new video solution today by uploading your videos to SharePoint, Teams, or OneDrive. Videos stored in Microsoft 365, like any other file, are the basis for Microsoft Stream (in SharePoint). Read more…
Important!
Screen recording requires the latest version of Microsoft Edge or Google Chrome on Windows 10 or macOS. Information about supported browsers and limitations.
-
In Microsoft Stream, select New > Entry .
-
When prompted in the browser, select Allow Microsoft Stream (classic) to use the camera and microphone.
-
If you select block , the camera and microphone will be disabled. To enable them, click the lock icon in your browser’s address bar and select Allow next to the device in question.
-
Select or to set the camera and microphone.
 If you are using a USB camera or microphone, make sure they are connected and select it from the menu. You can also disable your camera and microphone if you don’t want to include them in your recording.
 -
Now everything is ready for recording!
Screen Recording
-
Click to start recording.
-
Select the screen content you want to share (full screen, application window, or browser tab) and then press the 9 button0019 Share . To include audio from your computer in the recording, select the Share audio check box.
-
If you are using macOS Catalina, you may need to adjust screen recording permissions in System Preferences . Learn more about Catalina permissions for macOS.
-
Wait until the recording countdown starts. Once started, you will see a timer and a time limit.
-
You can now switch to the application or window you want to record.

-
When you’re done recording or want to take a break, return to the Microsoft Stream (classic) tab of your browser’s screen recorder.
-
Select To pause screen, audio, and camera recording at any time. Click to resume .
-
When finished, click Next to view the entry.
View entry
-
On this page, click to view the entry. Select Write again if you are not satisfied and want to try again.
-
If you are satisfied with the recording, select Send to Stream to proceed to the next step.
Important!
If you want to trim the video, you can do so after sending and processing the recording.
Send screen recording
-
This page will start uploading the video to Stream. While waiting, you can:
-
Dispatch progress monitoring
-
Enter a name, description, and language for the video in the details section.

-
Once published, all users in your company will be allowed to view the video. To make the video visible only to yourself, uncheck the box: Allow everyone in your company to watch this video
-
To set custom permissions, groups, channels, and other options, click Update Video Details .
-
-
After the upload is completed, you can publish or save as shown below.
A. Click the Publish button. Now your video is ready! Select Go to video to go to the video page on Stream (classic) and watch or share the video. After processing is complete, you can also trim the video by clicking and then clicking Trim video .
B. Click the Save as Draft button if you are not yet ready to publish the video. The video will be saved in «My videos with content >» in Stream where it can be posted at any time.

Supported browsers and limitations
The screen recorder works with the following browsers:
-
Microsoft Edge for Windows 10 Microsoft Edge version 79and above on Windows 10 and macOS
-
Google Chrome version 74 and higher on Windows 10 and macOS
-
Safari is not supported on MacOS
-
Microsoft Stream (Desktop) Mobile on iOS and Android is not supported on mobile browsers
Other restrictions
-
System audio recording is only available on Windows, not macOS
-
Including the camera in recording is only available when recording the entire screen, not when recording an application window or browser tab.
-
The maximum duration of screen recordings is 15 minutes. For longer content, break the video into shorter segments.
We’d love to hear from you
Use the top right corner of the website to let us know how screen recording works.
See also
Screen recording permissions in macOS Catalina
How to enable screen recording on a Windows 10 9 computer0001
Windows 10 has a built-in screen recording tool on your computer, but we recommend third-party webcam video recording software. One of the most notable features released in the Windows 10 May 2019 Update was the Xbox Game Bar. Designed to create a more immersive PC gaming experience, it makes various tools available to all users with a quick keyboard shortcut.
Among them is the screen recording feature, which works well in all Windows 10 apps. However, you’ll still need third-party software if you want to take a screenshot at the same time.
How to record your screen on Windows 10
The Xbox Game Bar is technically available on all Windows 10 PCs, but doesn’t work on some devices. This includes those with a specific type of graphics card, but it’s still worth a try if you’re unsure.
It is also important to note that the Game Bar will not be able to record in File Explorer or directly on the desktop. When using these applications, the recording option will not be available and you will see a message saying «Gaming features are not available for Windows desktop or File Explorer».
Before you begin, it’s important to make sure the game bar is turned on. Go to Settings > Games > Game bar and make sure the toggle is set to On.
Windows 10 Game Bar
- You can also set keyboard shortcuts for various operations from here, but for the purposes of this tutorial, we’ll use the default values:
- Open the application or program whose recording you want to view. The option will not be available if you start on the desktop.
- Launch Game Bar with Windows Key + G
- You will now be presented with various options.
- In the «Capture» menu in the upper left corner, find the recording option, indicated by a white spot in a gray circle. You can also jump straight to this step by pressing Win + Alt + R.
- If this is your first screen recording, you may need to accept some permissions before you start.
 While recording, you should see a window like this.
- Here you can turn the microphone on and off at any time or press the Stop button.
- After recording is complete, you will receive the message «Game clip recorded». Click it to see the file in explorer.
- To change the default location for saving snapshots, go to Settings > Games > Captures. Click «Open Folder» and select a different area of File Explorer.
There is also a handy feature that allows you to record your screen in the background. This is especially useful for in-game highlighting, but can also be an effective way to diagnose issues with your device:0003
- Open the same snapshot menu as above by going to Options > Games. Make sure the toggle under «Background Recording» is enabled.
- Again, you may have to accept some permissions.
- Here you can also choose how you want the device to record, from 30 seconds to 10 minutes. Now when you enter the game bar (Win + G), press the button to the left of the entry to grab the recent footage.
 If it’s greyed out, click it and check the «Enable gaming features for this app to record gameplay» checkbox.
How to record your screen and webcam at the same time on Windows 10
This method works great if you just want to record your voice and what’s on your display, but what if you want to capture footage from the web at the same time -cameras. For this we recommend OBS Studio. Once you’ve downloaded the free software from the OBS website and installed it on your computer, follow these steps:
- Open OBS Studio, select «Optimize for recording only, I won’t stream» and click next.
- On the next screen, select the desired resolution and frame rate. If you’re not sure what to choose, leave the default options and click Next.
- On the next summary screen, click Apply Settings.
- You will now be on the main screen. In the Sources section at the bottom of the screen, click the + icon to add a source.
- Select «Display Capture» and click «OK» on the next screen.
