How To Manage Virtual Memory (Pagefile) In Windows 10
This tutorial was written by Tom’s Hardware Community member viveknayyar007. You can find a list of all their tutorials here.
Pagefile in Windows 10 is a hidden system file with the .SYS extension that is stored on your computer’s system drive (usually C:\). The Pagefile allows the computer to perform smoothly by reducing the workload of the physical memory, or RAM.
Simply put, every time you open more applications than the RAM on your PC can accommodate, the programs already present in the RAM are automatically transferred to the Pagefile. This process is technically called Paging. Because the Pagefile works as a secondary RAM, many times it is also referred to as Virtual Memory.
The minimum and maximum size of the Pagefile can be up to 1.5 times and 4 times of the physical memory that your computer has, respectively. For example, if your computer has 1GB of RAM, the minimum Pagefile size can be 1. 5GB, and the maximum size of the file can be 4GB.
By default, Windows 10 automatically manages the Pagefile according to your computer’s configuration and the RAM present in it. However, if you ever face lagging while working on Windows 10, or you start getting the PAGE_FAULT_IN_NONPAGED_AREA or KERNEL_DATA_INPAGE_ERROR Blue Screen of Death (BSOD), managing the size of the Pagefile manually is the first thing you should look for.
Managing the Pagefile size manually in Windows 10 is simple. Here is how:
- Use an administrator account to log on to Windows 10.
- From the desktop screen, right-click the Start button to open its context menu.
- Click System.
- From the left pane of the System window, click Advanced system settings.
- On the System Properties box, ensure that you are on the Advanced tab.
- Click the Settings button from under the Performance section.

- On the Performance Options box, go to the Advanced tab.
- Click the Change button from under the Virtual memory section.
- On the Virtual Memory box, uncheck the Automatically manage paging file size for all drives checkbox.
- From the available list, click to select the drive on which Windows 10 is installed. (C: in most cases.)
- From below the list, click to select the Custom size radio button.
- In the now-enabled fields, type the minimum and maximum size of the Pagefile in megabytes (MB) according to the physical memory present in your computer.
- Click Set and then click OK.
- Restart your computer when you’re done.
The Tom’s Hardware forum community is a powerful source of tech support and discussion on all the topics we cover from 3D printers, single-board computers, SSDs, and GPUs to high-end gaming rigs.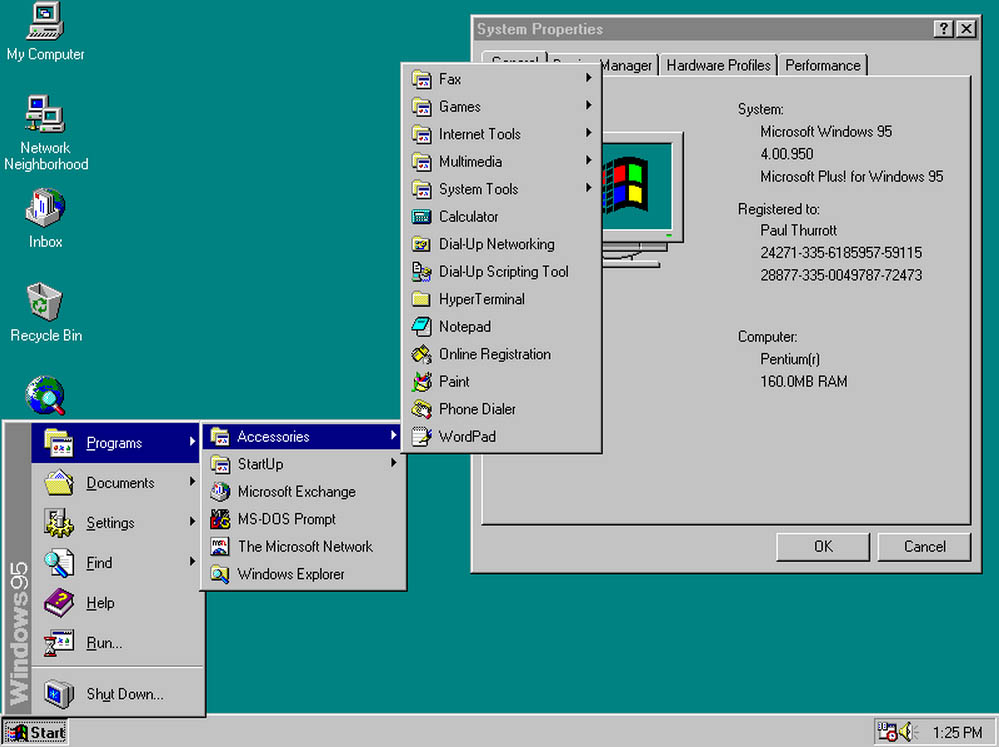 Articles written by the Tom’s Hardware Community are either written by the forum staff or one of our moderators.
Introduction to the page file — Windows Client
Edit
Twitter
LinkedIn
Facebook
Email
-
Article -
- 3 minutes to read
-
A page file (also known as a «paging file») is an optional, hidden system file on a hard disk.
Applies to: Windows 10
Functionality
Page files have the following functionalities.
Physical extension of RAM
Page files enable the system to remove infrequently accessed modified pages from physical memory to let the system use physical memory more efficiently for more frequently accessed pages.
Application requirements
Some products or services require a page file for various reasons. For specific information, check the product documentation.
For example, the following Windows servers require page files:
- Windows Server domain controllers (DCs)
- DFS Replication (DFS-R) servers
- Certificate servers
- ADAM/LDS servers
This requirement is because the algorithm of the database cache for Extensible Storage Engine (ESENT, or ESE for Microsoft Exchange Server) depends on the «\Memory\Transition Pages RePurposed/sec» performance monitor counter. A page file is required to ensure that the database cache can release memory if other services or applications request memory.
For Windows Server 2012 Hyper-V and Windows Server 2012 R2 Hyper-V, the page file of the management OS (commonly called the host OS) should be left at the default of setting of «System Managed».
Support for system crash dumps
Page files can be used to «back» (or support) system crash dumps and extend how much system-committed memory (also known as «virtual memory») a system can support.
For more information about system crash dumps, see system crash dump options.
Page files in Windows with large physical memory
When large physical memory is installed, a page file might not be required to support the system commit charge during peak usage. For example, 64-bit versions of Windows and Windows Server support more physical memory (RAM) than 32-bit versions support. The available physical memory alone might be large enough.
However, the reason to configure the page file size hasn’t changed. It has always been about supporting a system crash dump, if it’s necessary, or extending the system commit limit, if it’s necessary. For example, when a lot of physical memory is installed, a page file might not be required to back the system commit charge during peak usage. The available physical memory alone might be large enough to do this. However, a page file or a dedicated dump file might still be required to back a system crash dump.
System committed memory
Page files extend how much «committed memory» (also known as «virtual memory») is used to store modified data.
The system commit memory limit is the sum of physical memory and all page files combined. It represents the maximum system-committed memory (also known as the «system commit charge») that the system can support.
Note
In the screenshot, the committed bytes (RAM+Pagefile in use currently) is 6.8 GB and the commit limit (RAM+Pagefile total) is 37.7 GB.
The system commit charge is the total committed or «promised» memory of all committed virtual memory in the system. If the system commit charge reaches the system commit limit, the system and processes might not get committed memory. This condition can cause freezing, crashing, and other malfunctions. Therefore, make sure that you set the system commit limit high enough to support the system commit charge during peak usage.
The system committed charge and system committed limit can be measured on the Performance tab in Task Manager or by using the «\Memory\Committed Bytes» and «\Memory\Commit Limit» performance counters. The \Memory\% Committed Bytes In Use counter is a ratio of \Memory\Committed Bytes to \Memory\Commit Limit values.
Note
System-managed page files automatically grow up to three times the physical memory or 4 GB (whichever is larger, but no more than one-eighth of the volume size) when the system commit charge reaches 90 percent of the system commit limit. This assumes that enough free disk space is available to accommodate the growth.
What is a paging file and why is it needed
- Computer store
- Blog
- Articles on the topic: General information
Author of the article: Sergey Koval
(koval@andpro. ru)
ru)
Published: 21 April 2022
If there is not enough RAM to store information in quick access, then the swap file comes to the rescue. What is it and why is it required? Consider in this article.
Swap file is
The hidden pagefile system file is called the swap file. It is located on the computer’s hard drive and is used by the Windows operating system on the principle of RAM. It is necessary for the OS to offload the PC RAM when too much load is placed on it. In other words, if there is a simultaneous launch of several resource-intensive software, then in fact only one will be used. All the rest at this moment are in a collapsed state, or simply inactive. Windows at this time unloads program data not into RAM, but already into the paging file. If there is a switch between programs, then their data will be moved from the paging file to the RAM automatically.
This method of storing information contributes to a significant acceleration of all computer processes. Often there are situations when the amount of PC RAM is not enough for the efficient operation of the OS. In this case, the paging file plays the role of an additional storage of information and active software.
Where is the correct location of the paging file
There are many ways to store the swap file. To date, there are the following options:
- Install a partitioned hard disk on a PC. In this case, the paging file must be stored in a place where the operating system itself is not located. If it is located on the boot partition, then a conflict may occur between writing and reading data. When working with a specific program, the OS reads all information from the Program Files folder, if the software was previously installed there. In parallel, the system writes temporary data to the Windows folder, where the paging file is located directly.
- Install two (or more) hard drives on the PC. In this case, it is recommended to place the file on a second hard disk, where the OS is also not installed.
 This storage allows you to increase the speed of processing multiple simultaneous input and output requests.
 - Install two or more hard drives of different types on a PC . Varieties of disks in this case are HDD and SSD. Accordingly, it is better to store paging files on a disk such as HDD. Arrangement in this way will reduce the number of operations with an SSD type hard disk, which will ensure its significantly longer use if the SSD is small and the amount of work with programs is large.
What is the optimal swap file size
There are several opinions regarding this issue. Based on most of the observations and experience of specialists, we can say that if the PC has more than 16GB of memory, a paging file is not required in principle. And in some cases, its presence can slow down the computer. If the RAM is less than 16GB, then it is better to increase the additional amount of virtual memory.
To set the correct size of the paging file, you need to adhere to this principle: «the minimum size must match the maximum. » For example: 2048-2048, 1024-1024 — this is how the correct dimensional ratio looks like. And filling in 1024-2048, 512-1024 should be avoided.
Similar numbers for the minimum and maximum size of the paging file can reduce the fragmentation of this file. Therefore, it will speed up the process of reading its data.
It is necessary to set the optimal size (OR) of the paging file relative to the amount of RAM (RAM). Here are some examples:
- OD less than 4 GB — RR 6144-8192 MB;
- OP 4 GB — OP 4096-6144 MB;
- OP 6 GB — OP 4096 MB;
- OP 8 GB — OP 2048-4096 MB;
- OP 12 GB — OP 1024-2048 MB;
- OP 16 GB or more — possible without swap or 512 MB.
In practice, these indicators give a significant effect. Of course, you can experiment and find the best ratio for PC, but in this case we recommend that you take into account two points:
- Some applications have a constant need for a paging file, and if you disable it, you may experience an error in its immediate operation.
 It will also become impossible to write a memory dump when a “blue screen of death” (BSOD`ax) occurs.
 - If the system often leaves some running applications minimized and switches to other programs, then in this case it is necessary to have a sufficiently large size of the paging file. Data in minimized software will continue to be written to it. True, there is also a dependence on the amount of RAM.
How to set up the paging file manually
To change the amount of virtual memory by configuring paging files, you must do the following:
- Press the Win+R key combination and click OK.
- Switch to the Advanced tab and click Options.
- In this section, find the «Advanced» item and select «Change».
- Uncheck the option «Automatically choose the size of the paging file» and click «Specify size».
- Enter the minimum and maximum size in MB and click «Set».
After the manipulations, the system will prompt you to restart the computer — click “OK”. After rebooting the device, all the specified changes will take effect.
Note that it is better not to disable the swap file. If the RAM is full without using files, some errors will occur. Applications will crash or simply stop running.
If the amount of RAM is large enough and you want to disable paging files, this can be done using the switch, which must be set to “No paging file”.
Conclusion
At the end of the article, we note that the swap file in its definition is a system file that is created by the operating system on the PC hard drive in order to reserve free space and then use it if necessary.
- All posts
- KVM equipment (equipment)
- Powerline adapters
- security
- Wireless adapters
- Power supplies
- Video cards (videocard)
- Video surveillance (CCTV)
- HDDs and Solid State SSDs
- Disk shelves (JBOD)
- Sound cards
- Instruments
- Uninterruptible power supplies (UPS, UPS)
- Cables and patch cords
- Switches
- Computer peripherals (computer peripherals)
- Computers (PC)
- Controllers (RAID, HBA, Expander)
- PC Cases
- PC Motherboards
- Multifunction devices (MFPs)
- Memory modules for PCs, laptops and servers
- Monitors
- Monoblocks (All-in-one PC)
- Desktop storage systems (NAS)
- Notebooks (notebook, laptop)
- General help
- Cooling
- Tablets
- Plotters
- Printers
- Software
- Software for corporate consumer
- Projectors
- Processors for PCs and servers
- Workstations (workstation)
- Power Distribution Unit (PDU)
- Consumables for office equipment
- Wi-Fi extenders (repeaters, repeaters)
- Routers (routers)
- Servers and server hardware
- Network cards
- Scanners
- Telecommunication cabinets and racks
- Telephony (phone)
- Thin Clients
- Transceivers
- Smart watch
Setting up the paging file in Windows 10: how to increase, change, disable?
Top
04/14/2022
Author: Lyubov Kasyanova
1 star2 stars3 stars4 stars5 stars
Windows 10 paging file setup: how to increase, change, disable?
3
5
1
57
7
The paging file in Windows is used to expand the RAM in the event that it is not enough. We wrote a cheat sheet for you on manipulating the swap: how to manage it?
The paging file, or virtual memory, is a system file on the computer’s hard drive that Windows uses to compensate for the lack of RAM when applications run out of it. What is this file, how it works, what you need to know about it, how to increase the paging file in Windows 10, or, conversely, how to disable the paging file in Windows 10, read our cheat sheet. At the end of the article there is a short video showing everything.
The paging file in Windows: why is it needed and how does it work?
Everyone knows that running applications on a computer run in RAM (RAM). Figuratively speaking, at startup, applications are read from the hard disk and temporarily “rewritten” into RAM. All information in applications is also stored in RAM until you close them.
When the amount of RAM fills up, the so-called «paging file» comes into play. This is a hidden system file on the hard drive that can act as RAM. Instead of closing an application that lacks RAM, Windows dumps it into the swap file and returns it if necessary.
The system decides which applications to send to the paging file. For example, an application that has been minimized for a long time may be marked as out of date by the system. If there is not enough RAM, it will go to a file on the hard drive to clean up the memory a little.
Modern computers have a lot of RAM installed, so the paging file is rarely used. But if you notice that the application lags a little when you open it, and the hard drive indicator on the PC is blinking, then Windows has returned it to RAM from the swap file. If this happens often, you should think about buying more memory.
-
Operation
How to disable sleep and hibernation in Windows 10
Windows 10 swap file: what are pagefile.
 sys and swapfile.sys?
Unlike older versions of Windows, Windows 10 uses two swap files: pagefile.sys and swapfile.sys. They are stored in the root of the C:\ drive and can be found if you enable the display of hidden and system files on your computer.
Normal applications that you install from various sources are sent to the pagefile.sys file when there is not enough memory — a browser, a graphics editor, instant messengers, and so on. And in the swapfile.sys file — built-in Windows 10 applications and applications installed from the Windows Store.
Swapfile and Pagefile always work in pairs. The volume of swapfile.sys does not exceed a couple of tens of megabytes, but pagefile.sys can «bloat» up to several gigabytes during operation. Because of this, some are looking for a way to disable the paging file in Windows 10 to free up disk space. But if you do this, swapfile.sys will also be disabled — and without it, many built-in Windows 10 applications will simply stop running.
-
Operation
How to increase the system partition of a disk in Windows 10
Windows 10 paging file: the optimal size
Actually, your Windows decides how much paging file it needs, and the standard size is enough in most cases. In addition, on computers with a large amount of RAM, it is generally rarely used.
But you can calculate how much is the optimal size of the paging file in Windows 10 and on your own. We’ll tell you how to do it right.
- Open all the applications you need. Then run Task Manager (Ctrl+Alt+Delete) and look at the used amount of RAM on the tab Performance .
- Multiply the amount of used memory by 2. For example, 3 GB out of 4 GB is occupied, which means 6 GB.
- Subtract the amount of your RAM from the received value.
 6 minus 4 is 2 GB. This is the optimal swap file size for your PC. If you get a negative size, then you do not need to increase, decrease, or even somehow change the standard size of the swap file.
It is not recommended to increase and increase the size of the paging file more than three times the actual amount of RAM.
How to increase the paging file in Windows 10?
Let’s tell you how to set the paging file on Windows 10 to the optimal value.
- Open the Start menu , find and run the application « View Adjustment and System Performance «.
- Go to tab Advanced and under Virtual Memory click Edit .
- Uncheck Automatically select paging file size.
- Highlight the system drive from the list, and then click Specify size.
- In line Initial size (MB) , specify the minimum size of the paging file — it must not be less than 800 MB , and in line Maximum size (MB) , enter the desired amount that you allow the system to take away.
 Values must be specified in megabytes (1 GB = 1024 MB).
 - After entering the new parameters, press Set, and then Ok.
How do I disable the paging file in Windows 10?
In general, disabling the paging file is not recommended. Firstly, applications will start to «fly out» (spontaneously reboot), and some will not be able to start at all. But if you have a lot of RAM, and there is little hard disk space left, then disabling the paging file will free up a couple of GB. The main thing is not to regret your decision later. Maybe Disk Cleanup can help, or do you need to clear your browser cache more often?
Use the instructions below at your own risk!
Disable pagefile.sys
- Open File Explorer, right click on This Computer and select Properties.
- Click on the left menu Advanced system settings.
- On the Advanced tab, find the section Performance and press Parameters.
- A new window will open again. On it, open the Advanced tab. Under Virtual memory , click Edit .
- Uncheck Automatically select paging file size . Set the checkbox to No paging file and click Set and OK.
Disable swapfile.sys
- Be sure to make a system restore point .
- Click Win + R and type regedit to enter the registry editor.
- Copy the following address into the address bar of the registry editor: Computer\HKEY_LOCAL_MACHINE\SYSTEM\CurrentControlSet\Control\Session Manager\Memory Management
- On the right side of the Registry Editor window, right-click, select New — DWORD (32-bit) Value.
- Name it SwapfileControl and restart your computer.
- After that swapfile will be disabled. You can enable the paging file in Windows 10 back by deleting the created setting.
How do I move the paging file?
There is a little trick to setting up a paging file on Windows 10. If your computer has multiple drives, you can move the paging file from the system drive ( not a partition! ) to another drive.
- To do this, in the already familiar application View settings and system performance > Advanced > Virtual memory click Edit .
- Uncheck Automatically select paging file size . Then highlight your system drive and press No paging file . Click Set > OK .
- Select the drive on which you want to store the paging file from the same list.
