Windows Update troubleshooting — Windows Deployment
-
Article -
- 12 minutes to read
-
Applies to
- Windows 10
- Windows 11
Try our Virtual Agent — It can help you quickly identify and fix common Windows Update issues
If you run into problems when using Windows Update, start with the following steps:
-
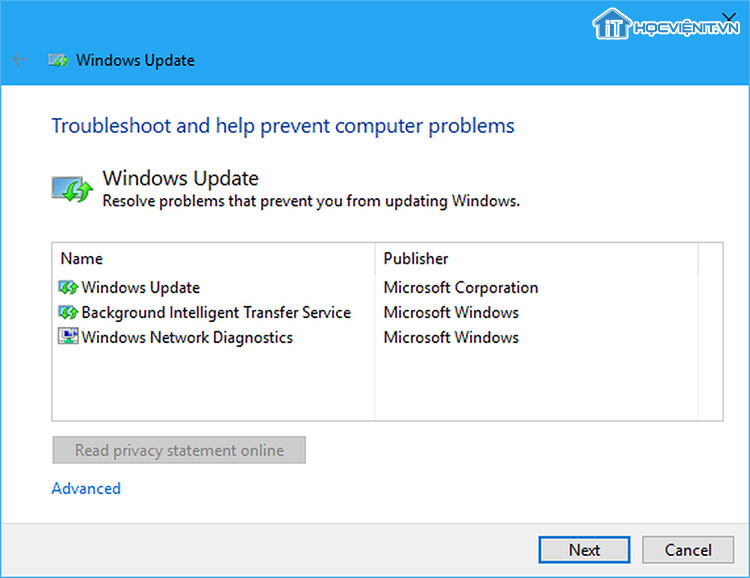
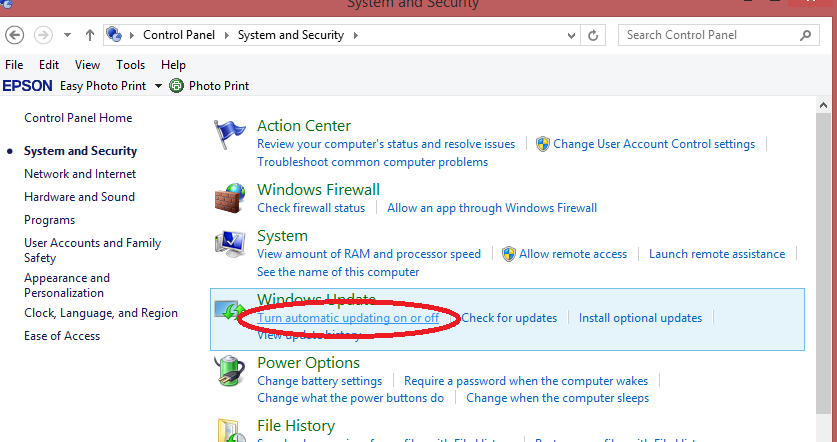
Run the built-in Windows Update troubleshooter to fix common issues. Navigate to Settings > Update & Security > Troubleshoot > Windows Update.
-
Install the most recent Servicing Stack Update that matches your version of Windows from the Microsoft Update Catalog.
See Servicing stack updates for more details on servicing stack updates.
-
Make sure that you install the latest Windows updates, cumulative updates, and rollup updates. To verify the update status, refer to the appropriate update history for your system:
- Windows 10, version 2004 and Windows Server, version 2004
- Windows 10, version 1909 and Windows Server, version 1909
- Windows 10, version 1903 and Windows Server, version 1903
- Windows 10, version 1809 and Windows Server 2019
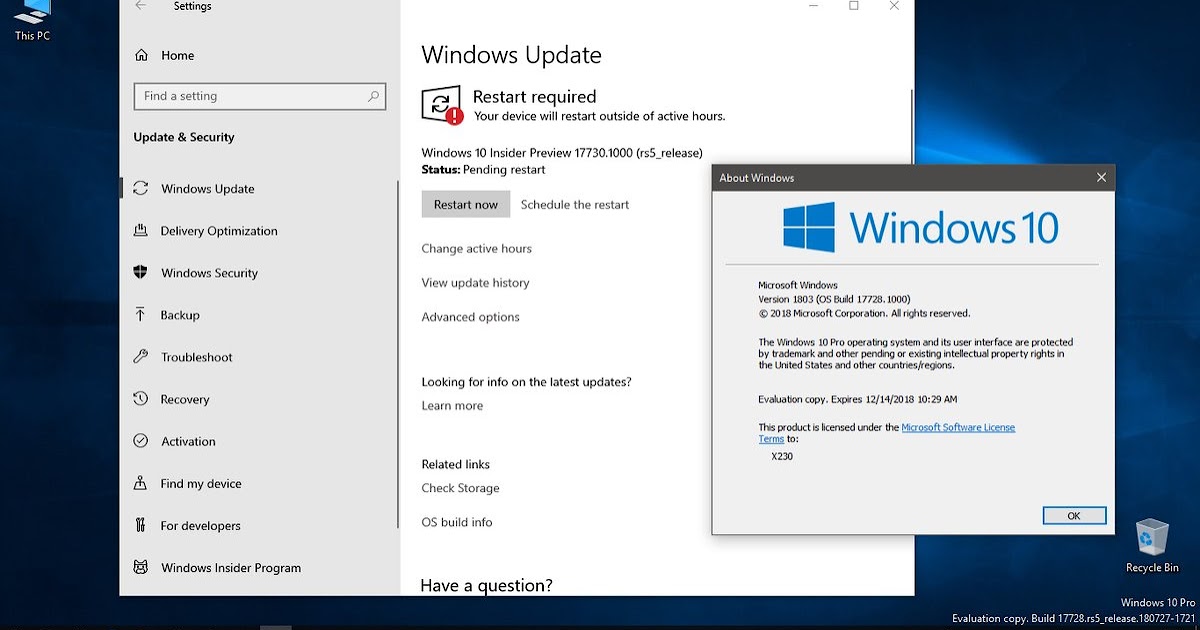
- Windows 10, version 1803
- Windows 10, version 1709
- Windows 10, version 1703
- Windows 10 and Windows Server 2016
- Windows 8.1 and Windows Server 2012 R2
- Windows Server 2012
- Windows 7 SP1 and Windows Server 2008 R2 SP1
Advanced users can also refer to the log generated by Windows Update for further investigation.
You might encounter the following scenarios when using Windows Update.
Why am I offered an older update?
The update that is offered to a device depends on several factors. The following are some of the most common attributes:
- OS Build
- OS Branch
- OS Locale
- OS Architecture
- Device update management configuration
If the update you’re offered isn’t the most current available, it might be because your device is being managed by a WSUS server, and you’re being offered the updates available on that server. It’s also possible, if your device is part of a deployment group, that your admin is intentionally slowing the rollout of updates. Since the deployment is slow and measured to begin with, all devices will not receive the update on the same day.
My device is frozen at scan. Why?
The Settings UI communicates with the Update Orchestrator service that in turn communicates with to Windows Update service. If these services stop unexpectedly, then you might see this behavior. In such cases, follow these steps:
-
Close the Settings app and reopen it.
-
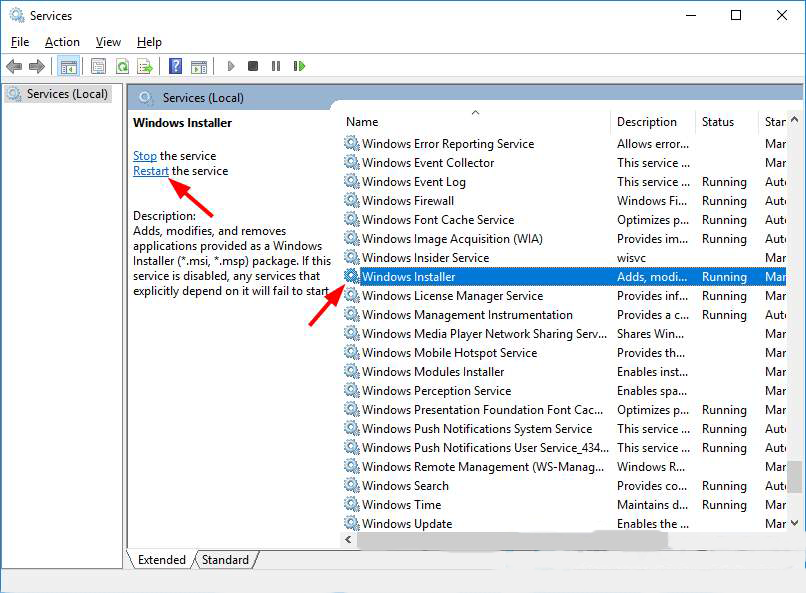
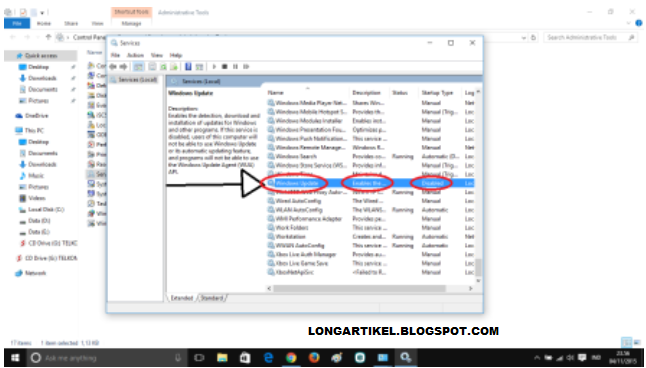
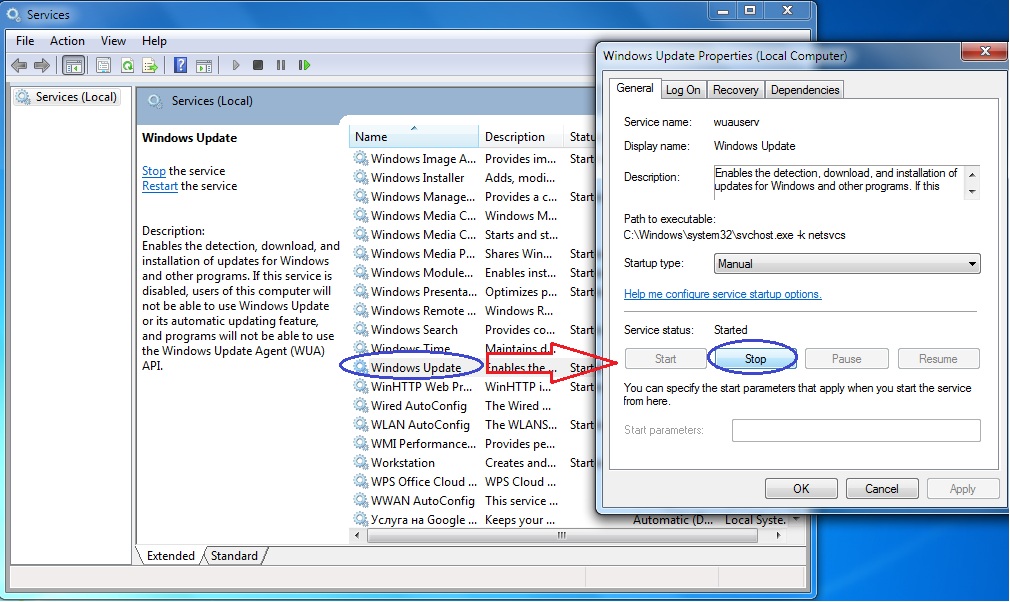
Start Services.msc and check if the following services are running:
- Update State Orchestrator
- Windows Update
Feature updates are not being offered while other updates are
Devices running Windows 10, version 1709 through Windows 10, version 1803 that are configured to update from Windows Update (including Windows Update for Business) are able to install servicing and definition updates but are never offered feature updates.
Checking the WindowsUpdate.log reveals the following error:
YYYY/MM/DD HH:mm:ss:SSS PID  TID  Agent           * START * Finding updates CallerId = Update;taskhostw  Id = 25
YYYY/MM/DD HH:mm:ss:SSS PID  TID  Agent           Online = Yes; Interactive = No; AllowCachedResults = No; Ignore download priority = No
YYYY/MM/DD HH:mm:ss:SSS PID  TID  Agent           ServiceID = {855E8A7C-ECB4-4CA3-B045-1DFA50104289} Third party service
YYYY/MM/DD HH:mm:ss:SSS PID  TID  Agent           Search Scope = {Current User}
YYYY/MM/DD HH:mm:ss:SSS PID  TID  Agent           Caller SID for Applicability: S-1-12-1-2933642503-1247987907-1399130510-4207851353
YYYY/MM/DD HH:mm:ss:SSS PID  TID  Misc            Got 855E8A7C-ECB4-4CA3-B045-1DFA50104289 redir Client/Server URL: https://fe3. delivery.mp.microsoft.com/ClientWebService/client.asmx""
YYYY/MM/DD HH:mm:ss:SSS PID  TID  Misc            Token Requested with 0 category IDs.
YYYY/MM/DD HH:mm:ss:SSS PID  TID  Misc            GetUserTickets: No user tickets found. Returning WU_E_NO_USERTOKEN.
YYYY/MM/DD HH:mm:ss:SSS PID  TID  Misc            *FAILED* [80070426] Method failed [AuthTicketHelper::GetDeviceTickets:570]
YYYY/MM/DD HH:mm:ss:SSS PID  TID  Misc            *FAILED* [80070426] Method failed [AuthTicketHelper::GetDeviceTickets:570]
YYYY/MM/DD HH:mm:ss:SSS PID  TID  Misc            *FAILED* [80070426] GetDeviceTickets
YYYY/MM/DD HH:mm:ss:SSS PID  TID  Misc            *FAILED* [80070426] Method failed [AuthTicketHelper::AddTickets:1092]
YYYY/MM/DD HH:mm:ss:SSS PID  TID  Misc            *FAILED* [80070426] Method failed [CUpdateEndpointProvider::GenerateSecurityTokenWithAuthTickets:1587]
YYYY/MM/DD HH:mm:ss:SSS PID  TID  Misc            *FAILED* [80070426] GetAgentTokenFromServer
YYYY/MM/DD HH:mm:ss:SSS PID  TID  Misc            *FAILED* [80070426] GetAgentToken
YYYY/MM/DD HH:mm:ss:SSS PID  TID  Misc            *FAILED* [80070426] EP:Call to GetEndpointToken
YYYY/MM/DD HH:mm:ss:SSS PID  TID  Misc            *FAILED* [80070426] Failed to obtain service 855E8A7C-ECB4-4CA3-B045-1DFA50104289 plugin Client/Server auth token of type 0x00000001
YYYY/MM/DD HH:mm:ss:SSS PID  TID  ProtocolTalker  *FAILED* [80070426] Method failed [CAgentProtocolTalkerContext::DetermineServiceEndpoint:377]
YYYY/MM/DD HH:mm:ss:SSS PID  TID  ProtocolTalker  *FAILED* [80070426] Initialization failed for Protocol Talker Context
YYYY/MM/DD HH:mm:ss:SSS PID  TID  Agent           Exit code = 0x80070426
YYYY/MM/DD HH:mm:ss:SSS PID  TID  Agent           * END * Finding updates CallerId = Update;taskhostw  Id = 25
delivery.mp.microsoft.com/ClientWebService/client.asmx""
YYYY/MM/DD HH:mm:ss:SSS PID TID Misc Token Requested with 0 category IDs.
YYYY/MM/DD HH:mm:ss:SSS PID TID Misc GetUserTickets: No user tickets found. Returning WU_E_NO_USERTOKEN.
YYYY/MM/DD HH:mm:ss:SSS PID TID Misc *FAILED* [80070426] Method failed [AuthTicketHelper::GetDeviceTickets:570]
YYYY/MM/DD HH:mm:ss:SSS PID TID Misc *FAILED* [80070426] Method failed [AuthTicketHelper::GetDeviceTickets:570]
YYYY/MM/DD HH:mm:ss:SSS PID TID Misc *FAILED* [80070426] GetDeviceTickets
YYYY/MM/DD HH:mm:ss:SSS PID TID Misc *FAILED* [80070426] Method failed [AuthTicketHelper::AddTickets:1092]
YYYY/MM/DD HH:mm:ss:SSS PID TID Misc *FAILED* [80070426] Method failed [CUpdateEndpointProvider::GenerateSecurityTokenWithAuthTickets:1587]
YYYY/MM/DD HH:mm:ss:SSS PID TID Misc *FAILED* [80070426] GetAgentTokenFromServer
YYYY/MM/DD HH:mm:ss:SSS PID TID Misc *FAILED* [80070426] GetAgentToken
YYYY/MM/DD HH:mm:ss:SSS PID TID Misc *FAILED* [80070426] EP:Call to GetEndpointToken
YYYY/MM/DD HH:mm:ss:SSS PID TID Misc *FAILED* [80070426] Failed to obtain service 855E8A7C-ECB4-4CA3-B045-1DFA50104289 plugin Client/Server auth token of type 0x00000001
YYYY/MM/DD HH:mm:ss:SSS PID TID ProtocolTalker *FAILED* [80070426] Method failed [CAgentProtocolTalkerContext::DetermineServiceEndpoint:377]
YYYY/MM/DD HH:mm:ss:SSS PID TID ProtocolTalker *FAILED* [80070426] Initialization failed for Protocol Talker Context
YYYY/MM/DD HH:mm:ss:SSS PID TID Agent Exit code = 0x80070426
YYYY/MM/DD HH:mm:ss:SSS PID TID Agent * END * Finding updates CallerId = Update;taskhostw Id = 25
The 0x80070426 error code translates to:
ERROR_SERVICE_NOT_ACTIVE - # The service has not been started.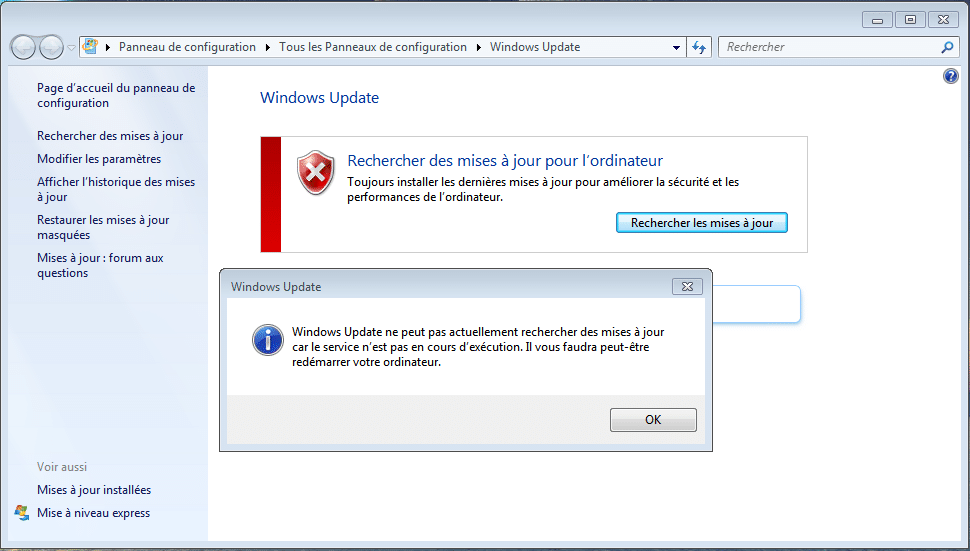
Microsoft Account Sign In Assistant (MSA or wlidsvc) is the service in question. The DCAT Flighting service (ServiceId: 855E8A7C-ECB4-4CA3-B045-1DFA50104289) relies on MSA to get the global device ID for the device. Without the MSA service running, the global device ID won’t be generated and sent by the client and the search for feature updates never completes successfully.
To resolve this issue, reset the MSA service to the default StartType of «manual.»
Windows Update uses WinHttp with Partial Range requests (RFC 7233) to download updates and applications from Windows Update servers or on-premises WSUS servers. Therefore proxy servers on the network must support HTTP RANGE requests. If a proxy was configured in Internet Explorer (User level) but not in WinHTTP (System level), connections to Windows Update will fail.
To fix this issue, configure a proxy in WinHTTP by using the following netsh command:
netsh winhttp set proxy ProxyServerName:PortNumber
Note
You can also import the proxy settings from Internet Explorer by using the following command: netsh winhttp import proxy source=ie
If downloads through a proxy server fail with a 0x80d05001 DO_E_HTTP_BLOCKSIZE_MISMATCH error, or if you notice high CPU usage while updates are downloading, check the proxy configuration to permit HTTP RANGE requests to run.
You might choose to apply a rule to permit HTTP RANGE requests for the following URLs:
*.download.windowsupdate.com*.dl.delivery.mp.microsoft.com
*.delivery.mp.microsoft.com
If you can’t allow RANGE requests, you’ll be downloading more content than needed in updates (as delta patching will not work).
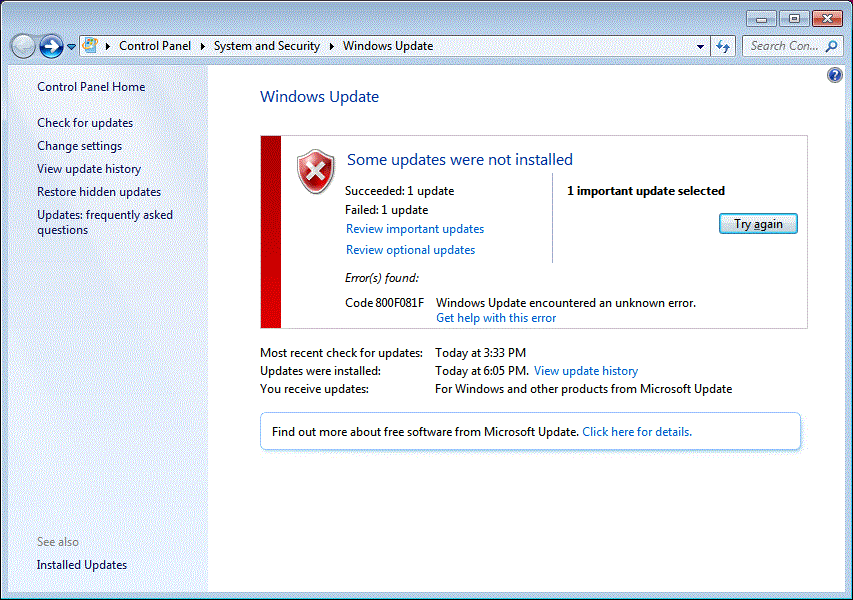
The update is not applicable to your computer
The most common reasons for this error are described in the following table:
| Cause | Explanation | Resolution |
|---|---|---|
| Update is superseded | As updates for a component are released, the updated component will supersede an older component that is already on the system. When this occurs, the previous update is marked as superseded. If the update that you’re trying to install already has a newer version of the payload on your system, you might receive this error message. | Check that the package that you are installing contains newer versions of the binaries.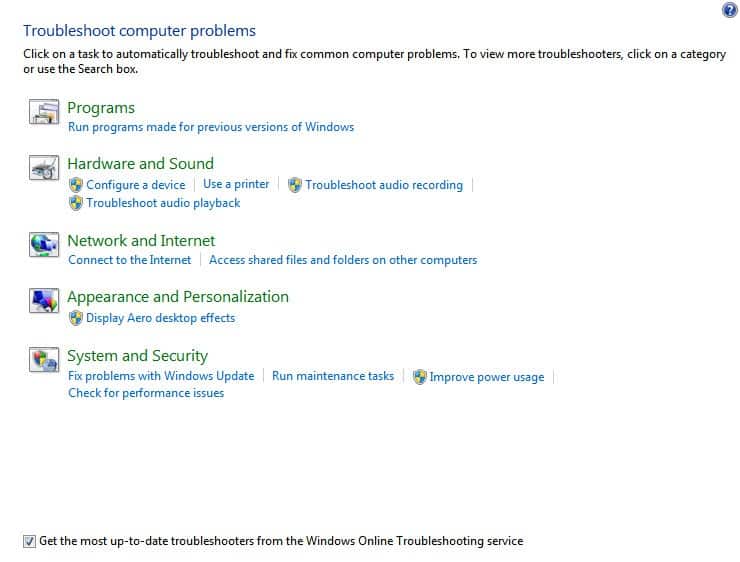 Or, check that the package is superseded by another new package. Or, check that the package is superseded by another new package. |
| Update is already installed | If the update that you’re trying to install was previously installed, for example, by another update that carried the same payload, you may encounter this error message. | Verify that the package that you are trying to install was not previously installed. |
| Wrong update for architecture | Updates are published by CPU architecture. If the update that you’re trying to install does not match the architecture for your CPU, you may encounter this error message. | Verify that the package that you’re trying to install matches the Windows version that you are using. The Windows version information can be found in the «Applies To» section of the article for each update. For example, Windows Server 2012-only updates cannot be installed on Windows Server 2012 R2-based computers. Also, verify that the package that you are installing matches the processor architecture of the Windows version that you are using. 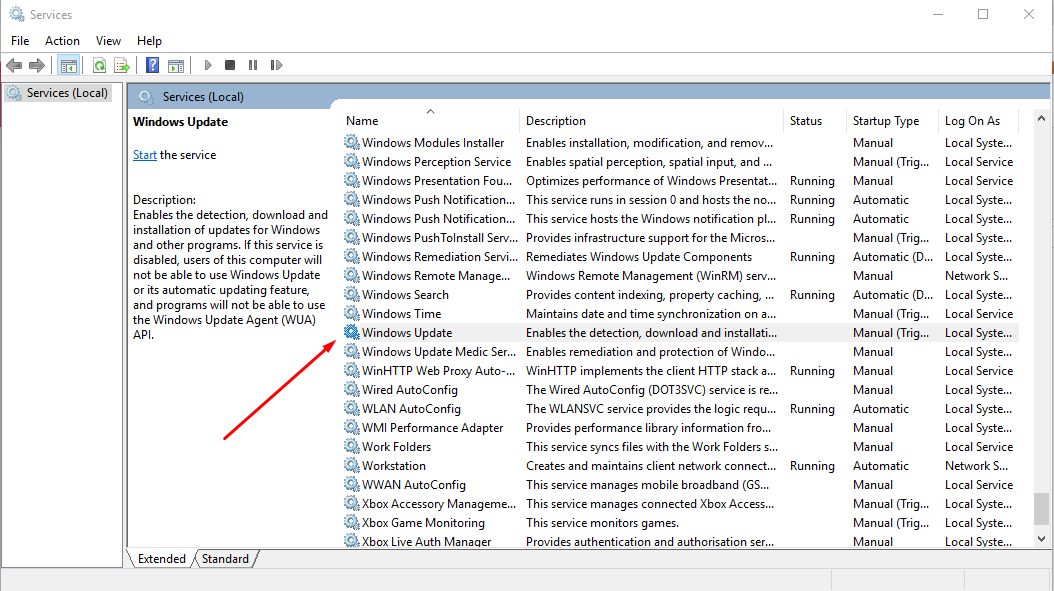 For example, an x86-based update cannot be installed on x64-based installations of Windows. For example, an x86-based update cannot be installed on x64-based installations of Windows. |
| Missing prerequisite update | Some updates require a prerequisite update before they can be applied to a system. If you are missing a prerequisite update, you may encounter this error message. For example, KB 2919355 must be installed on Windows 8.1 and Windows Server 2012 R2 computers before many of the updates that were released after April 2014 can be installed. | Check the related articles about the package in the Microsoft Knowledge Base (KB) to make sure that you have the prerequisite updates installed. For example, if you encounter the error message on Windows 8.1 or Windows Server 2012 R2, you may have to install the April 2014 update 2919355 as a prerequisite and one or more pre-requisite servicing updates (KB 2919442 and KB 3173424). To determine if these prerequisite updates are installed, run the following PowerShell command: get-hotfix KB3173424,KB2919355, KB2919442. If the updates are installed, the command will return the installed date in the InstalledOn section of the output. |
Error that you might see in Windows Update logs:
DownloadManager Error 0x800706d9 occurred while downloading update; notifying dependent calls.
Or
[DownloadManager] BITS job {A4AC06DD-D6E6-4420-8720-7407734FDAF2} hit a transient error, updateId = {D053C08A-6250-4C43-A111-56C5198FE142}.200 <NULL>, error = 0x800706D9
Or
DownloadManager [0]12F4.1FE8::09/29/2017-13:45:08.530 [agent]DO job {C6E2F6DC-5B78-4608-B6F1-0678C23614BD} hit a transient error, updateId = 5537BD35-BB74-40B2-A8C3-B696D3C97CBA.201 <NULL>, error = 0x80D0000A
Go to Services.msc and ensure that Windows Firewall Service is enabled. Stopping the service associated with Windows Firewall with Advanced Security is not supported by Microsoft. For more information, see I need to disable Windows Firewall.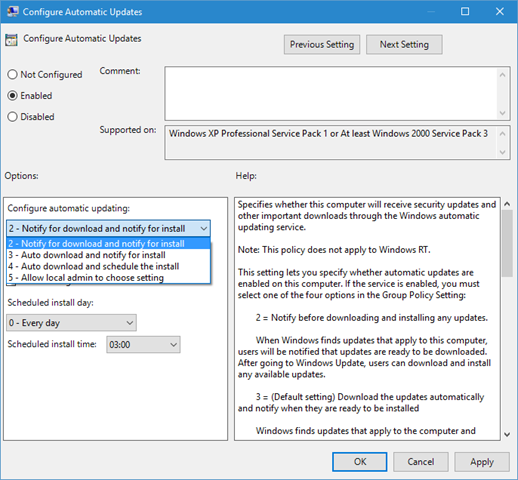
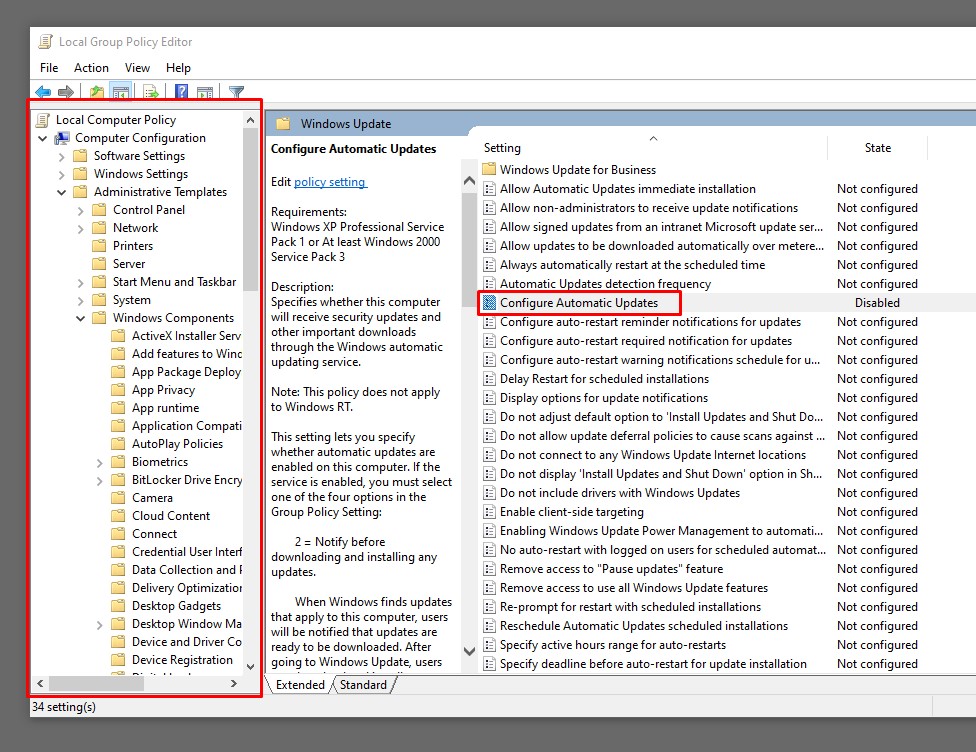
Issues arising from configuration of conflicting policies
Windows Update provides a wide range configuration policy to control the behavior of the Windows Update service in a managed environment. While these policies let you configure the settings at a granular level, misconfiguration or setting conflicting policies may lead to unexpected behaviors.
For more information, see How to configure automatic updates by using Group Policy or registry settings for more information.
Device cannot access update files
Ensure that devices can reach necessary Windows Update endpoints through the firewall. For example, for Windows 10, version 2004, the following protocols must be able to reach these respective endpoints:
| Protocol | Endpoint URL |
|---|---|
| TLS 1.2 | *.prod.do.dsp.mp.microsoft.com |
| HTTP | emdl.ws.microsoft.com |
| HTTP | *. |
| HTTP | *.windowsupdate.com |
| HTTPS | *.delivery.mp.microsoft.com |
| TLS 1.2 | *.update.microsoft.com |
| TLS 1.2 | tsfe.trafficshaping.dsp.mp.microsoft.com |
 dl.delivery.mp.microsoft.com
Note
Be sure not to use HTTPS for those endpoints that specify HTTP, and vice versa. The connection will fail.
The specific endpoints can vary between Windows client versions. See, for example, Windows 10 2004 Enterprise connection endpoints. Similar articles for other Windows client versions are available in the table of contents nearby.
Updates aren’t downloading from the intranet endpoint (WSUS or Configuration Manager)
Windows client devices can receive updates from a variety of sources, including Windows Update online, a Windows Server Update Services server, and others. To determine the source of Windows Updates currently being used on a device, follow these steps:
- Start Windows PowerShell as an administrator.
- Run $MUSM = New-Object -ComObject «Microsoft.Update.ServiceManager».
- Run $MUSM.Services.
Check the output for the Name and OffersWindowsUPdates parameters, which you can interpret according to this table.
| Output | Meaning |
|---|---|
| — Name: Microsoft Update -OffersWindowsUpdates: True |
— The update source is Microsoft Update, which means that updates for other Microsoft products besides the operating system could also be delivered. — Indicates that the client is configured to receive updates for all Microsoft Products (Office, etc.) |
| — Name: DCat Flighting Prod — OffersWindowsUpdates: True |
— Starting with Windows 10, version 1709, feature updates are always delivered through the DCAT service. — Indicates that the client is configured to receive feature updates from Windows Update. |
| — Name: Windows Store (DCat Prod) — OffersWindowsUpdates: False |
-The update source is Insider Updates for Store Apps. — Indicates that the client will not receive or is not configured to receive these updates. |
| — Name: Windows Server Update Service — OffersWindowsUpdates: True |
— The source is a Windows Server Updates Services server. — The client is configured to receive updates from WSUS. |
| — Name: Windows Update — OffersWindowsUpdates: True |
— The source is Windows Update. — The client is configured to receive updates from Windows Update Online. |
You have a bad setup in the environment
In this example, per the Group Policy set through registry, the system is configured to use WSUS to download updates (note the second line):
HKEY_LOCAL_MACHINE\SOFTWARE\Policies\Microsoft\Windows\WindowsUpdate\AU]
"UseWUServer"=dword:00000001
From Windows Update logs:
2018-08-06 09:33:31:085  480 1118 Agent ** START **  Agent: Finding updates [CallerId = OperationalInsight  Id = 49]
2018-08-06 09:33:31:085  480 1118 Agent *********
2018-08-06 09:33:31:085  480 1118 Agent   * Include potentially superseded updates
2018-08-06 09:33:31:085  480 1118 Agent   * Online = No; Ignore download priority = No
2018-08-06 09:33:31:085  480 1118 Agent   * Criteria = "IsHidden = 0 AND DeploymentAction=*"
2018-08-06 09:33:31:085  480 1118 Agent   * ServiceID = {00000000-0000-0000-0000-000000000000} Third party service
2018-08-06 09:33:31:085  480 1118 Agent   * Search Scope = {Machine}
2018-08-06 09:33:32:554  480 1118 Agent   * Found 83 updates and 83 categories in search; evaluated appl.  rules of 517 out of 1473 deployed entities
2018-08-06 09:33:32:554  480 1118 Agent *********
2018-08-06 09:33:32:554  480 1118 Agent **  END  **  Agent: Finding updates [CallerId = OperationalInsight  Id = 49]
rules of 517 out of 1473 deployed entities
2018-08-06 09:33:32:554 480 1118 Agent *********
2018-08-06 09:33:32:554 480 1118 Agent ** END ** Agent: Finding updates [CallerId = OperationalInsight Id = 49]
In the above log snippet, we see that the Criteria = "IsHidden = 0 AND DeploymentAction=*". «*» means there is nothing specified from the server. So, the scan happens but there is no direction to download or install to the agent. So it just scans the update and provides the results.
As shown in the following logs, automatic update runs the scan and finds no update approved for it. So it reports there are no updates to install or download. This is due to an incorrect configuration. The WSUS side should approve the updates for Windows Update so that it fetches the updates and installs them at the specified time according to the policy. Since this scenario doesn’t include Configuration Manager, there’s no way to install unapproved updates. You’re expecting the operational insight agent to do the scan and automatically trigger the download and installation but that won’t happen with this configuration.
2018-08-06 10:58:45:992  480 5d8 Agent ** START **  Agent: Finding updates [CallerId = AutomaticUpdates  Id = 57]
2018-08-06 10:58:45:992  480 5d8 Agent *********
2018-08-06 10:58:45:992  480 5d8 Agent   * Online = Yes; Ignore download priority = No
2018-08-06 10:58:45:992  480 5d8 Agent   * Criteria = "IsInstalled=0 and DeploymentAction='Installation' or IsPresent=1 and DeploymentAction='Uninstallation' or IsInstalled=1 and DeploymentAction='Installation' and RebootRequired=1 or IsInstalled=0 and DeploymentAction='Uninstallation' and RebootRequired=1"

2018-08-06 10:58:46:617  480 5d8 PT   + SyncUpdates round trips: 2
2018-08-06 10:58:47:383  480 5d8 Agent   * Found 0 updates and 83 categories in search; evaluated appl. rules of 617 out of 1473 deployed entities
2018-08-06 10:58:47:383  480 5d8 Agent Reporting status event with 0 installable, 83 installed,  0 installed pending, 0 failed and 0 downloaded updates
2018-08-06 10:58:47:383  480 5d8 Agent *********
2018-08-06 10:58:47:383  480 5d8 Agent **  END  **  Agent: Finding updates [CallerId = AutomaticUpdates  Id = 57]
High bandwidth usage on Windows client by Windows Update
Users might see that Windows is consuming all the bandwidth in the different offices under the system context.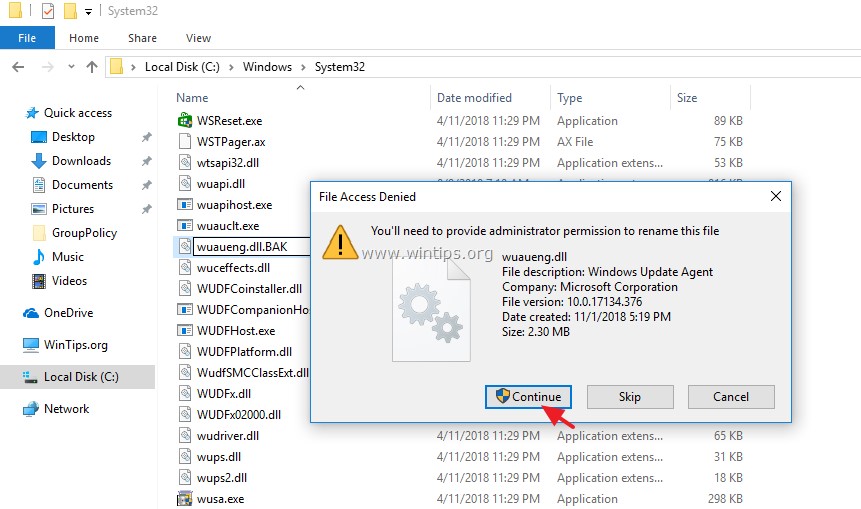 This behavior is by design. Components that might consume bandwidth expand beyond Windows Update components.
The following group policies can help mitigate this situation:
- Blocking access to Windows Update servers: Policy Turn off access to all Windows Update features (Set to enabled)
- Driver search: Policy Specify search order for device driver source locations (Set to «Do not search Windows Update»)
- Windows Store automatic update: Policy Turn off Automatic Download and Install of updates (Set to enabled)
Other components that connect to the internet:
- Windows Spotlight: Policy Configure Windows spotlight on lock screen (Set to disabled)
- Consumer experiences: Policy Turn off Microsoft consumer experiences (Set to enabled)
- Background traffic from Windows apps: Policy Let Windows apps run in the background
Windows Update: FAQ
Note: If you’re looking for Microsoft Office update info, see Install Office updates.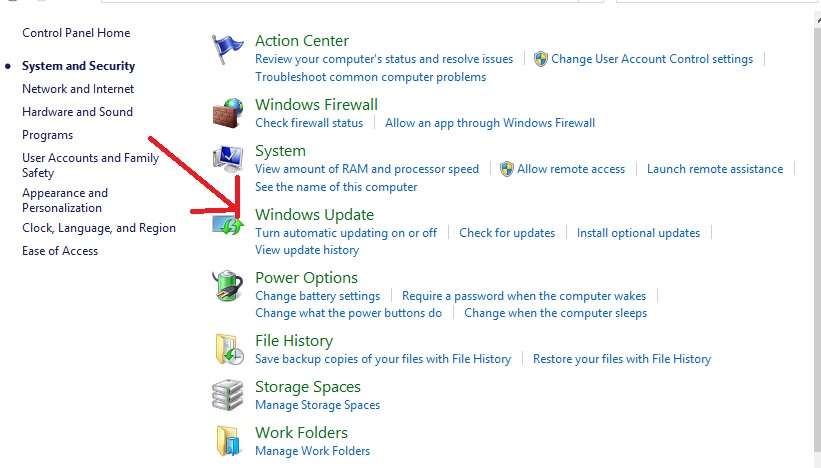
In Windows 11, you decide when and how to get the latest updates to keep your device running smoothly and securely. When you update, you’ll get the latest fixes and security improvements, helping your device run efficiently and stay protected. In most cases, restarting your device completes the update. Make sure your device is plugged in when you know updates will be installed.
If other questions come up when you update Windows 11, here are some other areas that might interest you:
-
How to reset your Microsoft account password -
Activate Windows
When you only want info about updating Windows 11, you’ll find answers to many of your questions here:
When Windows 11, version 22h3 is ready for your device, it will be available to download and install from the Windows Update page in Settings. Choose a time that works best for you to install it. You’ll then need to restart your device and complete the installation. After that, your device will be running Windows 11, version 22h3.
To manually check for the latest recommended updates on your Windows 11 device, select Start > Settings > Windows Update > Check for updates.
Check for updates
Some updates may not be available on all devices at the same time—we’re making sure updates are ready and compatible.
To stay up to date, select Start > Settings > Windows Update > Check for updates.
Check for updates
If a feature update is available for your device, it will appear separately on the Windows Update page. To install it, select Download and install now.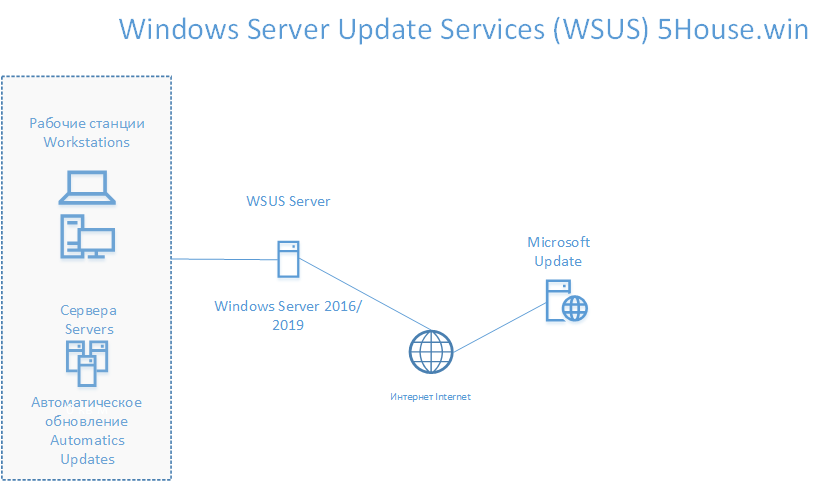
Here are a few things you can try if you’re having trouble installing updates:
-
Make sure that your device is connected to the internet. Downloading updates requires an internet connection.
-
If you’re connected the internet, try to install the updates manually. Select Start > Settings > Windows Update , and then view available updates.
Check for updates
-
Run the Windows Update Troubleshooter. Select Start > Settings > System > Troubleshoot > Other troubleshooters.
 Under Most frequent, select Windows Update.
 -
If the Troubleshooter doesn’t fix the problem, see Troubleshoot problems updating Windows or Fix Windows Update errors.
The time required to download updates primarily depends on internet connection speed, network settings, and update size. Make sure your device is plugged in and connected to the internet to download updates faster.
You can’t stop updates entirely—because they help keep your device safe and secure, updates will eventually need to be installed and downloaded, regardless of your update settings. Here’s how to temporarily pause updates from being downloaded and installed.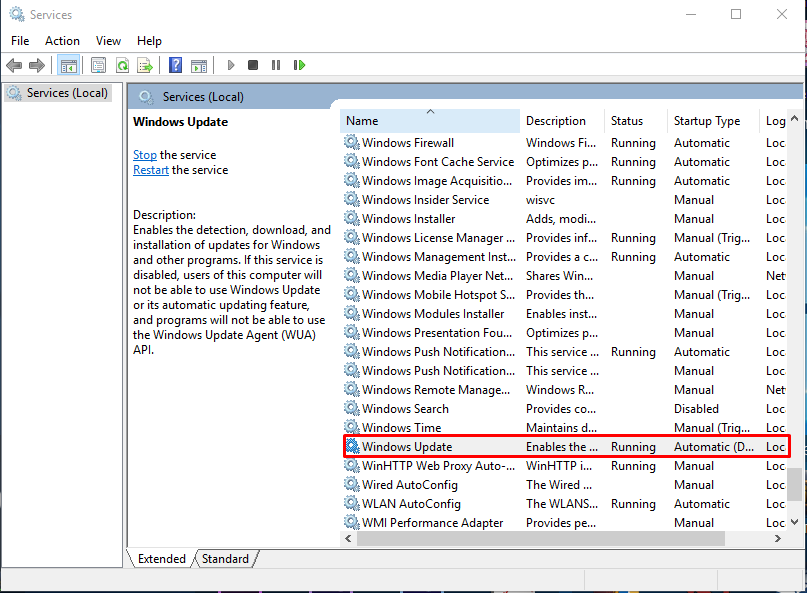 Note that after the pause limit is reached, you’ll need to install the latest updates before you can pause updates again.
In Windows 11, select Start > Settings > Windows Update . Next to Pause updates, select the pause length you prefer.
To finish installing an update, your device will need to restart. Windows will try to restart your device when you’re not using it. If it can’t, you’ll be asked to schedule the restart for a more convenient time. Or, you can schedule anytime by following these steps:
-
Select Start > Settings > Windows Update .
-
Select Schedule the restart and choose a time that’s convenient for you.

You can set active hours to make sure automatic restarts for updates only happen when you’re not using your device. Get updates when you’re away from your PC with active hours in Windows.
Try deleting files you don’t need, uninstalling apps you don’t use, or moving files to another drive like an external USB drive or OneDrive. For more tips on freeing up disk space, see Free up drive space in Windows.
We recommend keeping devices like laptops and tablets plugged in when you’re not using them. This way, if updates are installed outside active hours, your device will have enough power to complete the installation. Windows updates don’t consume more battery than other typical system processes.
An update history is available so you can see which updates were installed, and when. You can also use this list to remove specific updates, although we don’t recommend this unless it’s necessary.
Select Start > Settings > Windows Update > Update history .
View update history
We don’t recommend that you remove any installed updates. However, if you must remove an update, you can do so in update history.
-
Select Start > Settings > Windows Update > Update history > Uninstall updates .
-
Select the update you want to remove, then select Uninstall.

Feature updates are typically released twice per year and include new functionality and capabilities as well as potential fixes and security updates. Quality updates are more frequent and mainly include small fixes and security updates. Windows is designed to deliver both kinds of updates to devices through Windows Update.
To double check that your device is up to date, open Start > Settings > Windows Update and see your update status and available updates.
Check for updates
To find which version of Windows you’re running, see Which version of Windows operating system am I running?
Reserved storage will be turned on for new devices with Windows 11 preinstalled, or devices on which a clean install of Windows 11 was performed.
Note: If you’re looking for Microsoft Office update info, see Install Office updates.
In Windows 10, you decide when and how to get the latest updates to keep your device running smoothly and securely. When you update, you’ll get the latest fixes and security improvements, helping your device run efficiently and stay protected. In most cases, restarting your device completes the update. Make sure your device is plugged in when you know updates will be installed.
If other questions come up when you update Windows 10, here are some other areas that might interest you:
-
How to reset your Microsoft account password -
Activate Windows -
Make sure that your device is connected to the internet. Downloading updates requires an internet connection.
-
Run the Windows Update Troubleshooter. Select Start > Settings > Update & Security > Troubleshoot . Under Get up and running, select Windows Update.
-
If the Troubleshooter doesn’t fix the problem, see Troubleshoot problems updating Windows or Fix Windows Update errors.
The time required to download updates primarily depends on internet connection speed, network settings, and update size.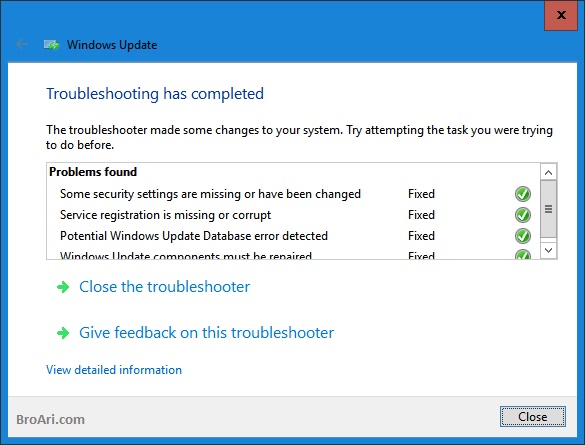 Make sure your device is plugged in and connected to the internet to download updates faster.
You can’t stop updates entirely—because they help keep your device safe and secure, updates will eventually need to be installed and downloaded, regardless of your update settings. Here’s how to temporarily pause updates from being downloaded and installed. Note that after the pause limit is reached, you’ll need to install the latest updates before you can pause updates again.
In the Windows 10 November 2019 Update (version 1909) or later, or in Windows version 1809 for Pro or Enterprise, select Start > Settings > Update & Security > Windows Update . Then choose one of the following options:
-
Select Pause updates for 7 days.
-
Select Start > Settings > Update & Security > Windows Update .
-
Select Schedule the restart and choose a time that’s convenient for you.

-
Select Start > Settings > Update & Security > Windows Update > View update history > Uninstall updates.
-
Select the update you want to remove, then select Uninstall.
-
Select Choose how updates get installed, and then, under Important updates, select Install updates automatically (recommended).
-
Under Recommended updates, select Give me recommended updates the same way I receive important updates.
-
Under Microsoft Update, select Give me updates for other Microsoft products when I update Windows, and then select Apply.
-
Select the update you want to remove, then select Uninstall.
-
Make sure that your PC is connected to the internet. Some updates can’t be installed if you’re using a metered internet connection.
-
If you’re connected the internet and updates aren’t installed automatically, wait a few minutes and then try to install the updates manually.
-
See the Fix Windows Update errors guided walkthrough to try to fix the problem.
-
Select the Start button, then select Control Panel > Programs. Under Programs and Features, select View installed updates.
-
Select the update you want to remove, then select Uninstall.
-
Make sure that your PC is connected to the internet. Some updates can’t be installed if you’re using a metered internet connection.
-
If you’re connected the internet and updates aren’t installed automatically, wait a few minutes and then try to install the updates manually.
-
See the Fix Windows Update errors guided walkthrough to try to fix the problem.
- The most recent security updates for your OS
- OS updates to improve performance and reliability
- Device drivers from both Microsoft and other companies
- Microsoft Windows Update
- Microsoft Download Notifications
- Microsoft Store (for both Windows software and MS Office software)
- Microsoft OS Service Packs
- Microsoft Technologies (focusing on Internet Explorer, DirectX, and Windows 7)
- Customer access at the MS Windows Update website (Windows 98, Windows XP, Windows ME, Windows 2000)
- Control Panel applet (Windows 7, Windows Vista)
- Disable automatic reboot after Windows Updates in Windows 10
- Offers for new or trial MS Windows software
- Updated device drivers from non-Microsoft companies (a driver may be promoted to Recommended level if your system is missing that driver and needs it, or the new driver has major feature revisions). Guide to block device driver updates via Windows Update.
- Compatibility updates
- Revised contents of Help files
- New features for the Windows OS
- New features for other Microsoft software
- Security and privacy updates
- Significant reliability updates
- Updates for detection of non-genuine Microsoft software
- Verification of copyright-protected media
- Semi-Annual Channel — replaced Current Branch and Current Branch for Business. Twice a year release target (March and September), and supported for 18 months in total.
- Current Branch — updates are downloaded and installed when they become available.
- Current Branch for Business — not available in Windows 10 Home. Defer updates up to 4 months.
- Long Time Servicing Branch — not available in Home or Pro.
- Security Only Quality Update only include security updates released in the month mentioned in the update title.
- Security Monthly Quality Rollup includes security updates and non-security updates. Cumulative.
- In HKEY_CURRENT_USER\Software\Microsoft\Windows\CurrentVersion\Policies\Explorer, create a new DWORD key.
- Make the Name of the key NoWindowsUpdate, and set the Value to 1.
- Whenever this user attempts to start Windows Update, an error message will display.
- Block Windows Updates with Windows 10 Update Switch
- Control Windows Updates with W10Privacy Tool
- Run Disk Cleanup after the Windows 10 upgrade to free space
- Save lots of disk space with Microsoft’s new Windows Update Cleanup tool
- Background Intelligent Transfer Service
- Cryptographic Services
- Automatic Updates
- Event Log
- First, enable the Windows firewall by clicking Start…Run, typing FIREWALL.CPL in the Open box, and pressing ENTER.
- Second, disable any other firewall that may be running on your PC.
- Open a command prompt with the CMD, making sure the command is being Run as Administrator.
- In the CMD prompt, type net stop WuAuServ and press enter (this action stops the Windows Update service).
- Wait for a response that the Windows Update service was successfully stopped.
- Type %windir% in the OPEN box of the Start Menu, and press Enter.
- Right-click the SoftwareDistribution folder, and select Rename.
- Rename the folder to SoftwareDistributionOLD (saving the original contents so that you can revert to them if needed by renaming to the original name).
- Back in the CMD window, type «net start WuAuServ» (without quotes). and press ENTER.
- Use the same steps you used in Measure #2 to check to see if the Windows Update service is running.
- In a CMD box (started up in the same way as described in Measure #6), type «sfc /scannow» (without quotes), and press ENTER.
- When the scan is done, close the CMD box, and reboot your PC.
- Windows Vista 32-bit
- Windows Vista 64-bit
- Windows 7 32-bit
- Windows 7 64-bit
- Fixing Windows Update Error 0x80072ee2
- How to find out more about Windows updates before you install them
- How to remove installed Windows Updates and block them afterwards
- How to uninstall Windows Updates
- Windows 7 and Windows Server 2008 R2 Update History
- Windows 8.
 1 and Windows Server 2012 R2 Update History
 - Windows 10 and Windows Server 2016 Update History
- Windows 10 Update Delivery Optimization explained
- Windows Update error 0x80246017 continues to plague users
- Windows Update Fix
- Windows Update Error services not running
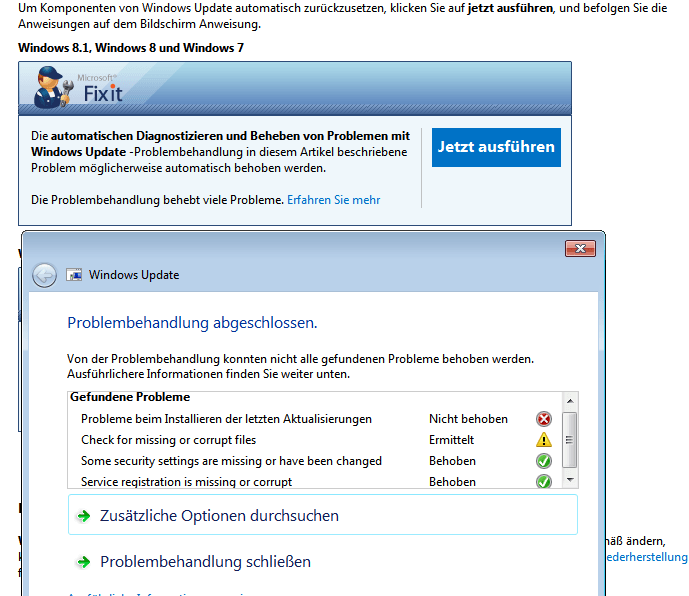
- Run Windows Update Troubleshooter
- Check for malware
- Check associated services
- Restart Windows Update
- Clear Windows SoftwareDistribution Folder
- Upgrade device drivers
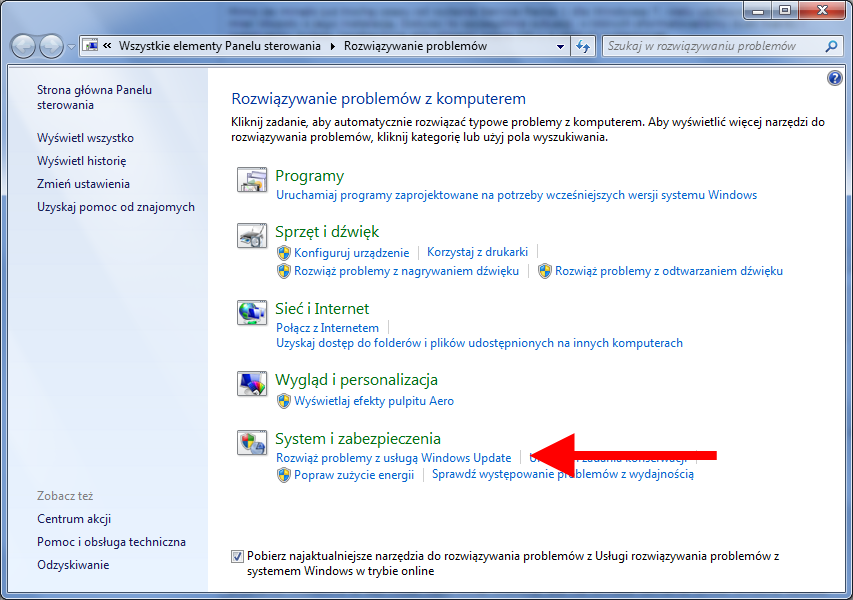
- Type troubleshoot in the Windows Search bar and click on the Troubleshooting option.
- Press Fix problems with Windows Update and then Next.
- Restart your computer and run the service again to see if the problem has been fixed.
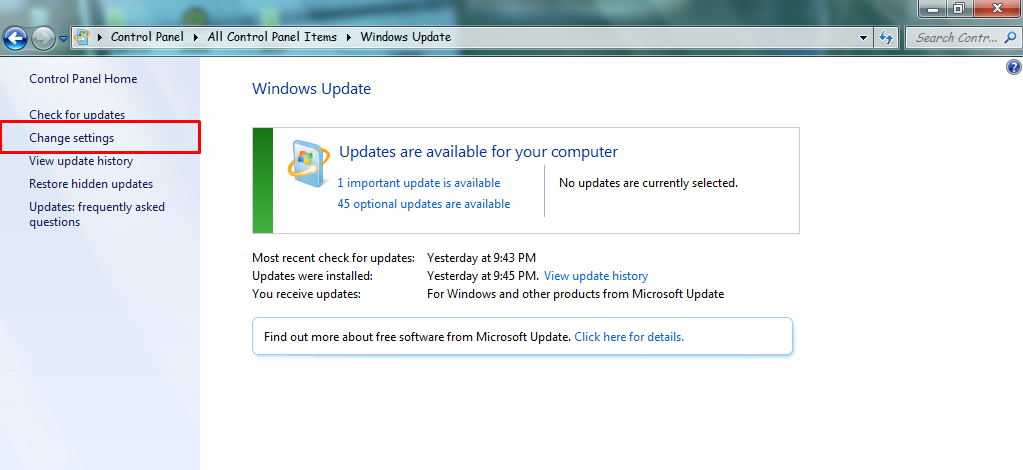
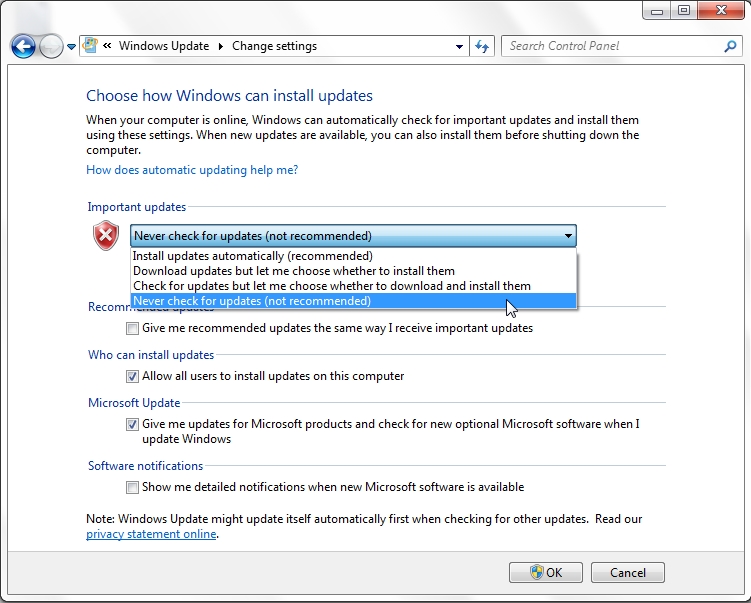
- Type Windows Update in the search bar then choose Change Settings.
- Under Important updates, click on Never check for updates.
- Go to the settings window again and select Install updates automatically and click OK.
- Enter Windows logo key and R on your keyboard to run the command box.
- Enter services.msc and click OK.
- Right-click on Windows Update and select Stop.
- Open Windows Explorer and navigate to C: Windows folder.
- Find and delete the Software Distribution folder.
- Return to Control Panel, right-click on Windows Update service and enter Start.
- Restart your computer.
- Reset Windows Update using Troubleshooter tool
- Fix Windows Update installing latest update manually
- Fix Windows Update installing latest Servicing Stack Update (SSU)
- Fix Windows Update repairing corrupted system files
- Reset Windows Update using Command Prompt
-
Open Settings on Windows 10.
-
Click on Update & Security.
-
Click on Troubleshoot.
-
Click the “Additional troubleshooters” option.
-
Under the “Get up and running” section, select the Windows Update option.
-
Click the Run the troubleshooter button.
-
Continue with the on-screen directions.
-
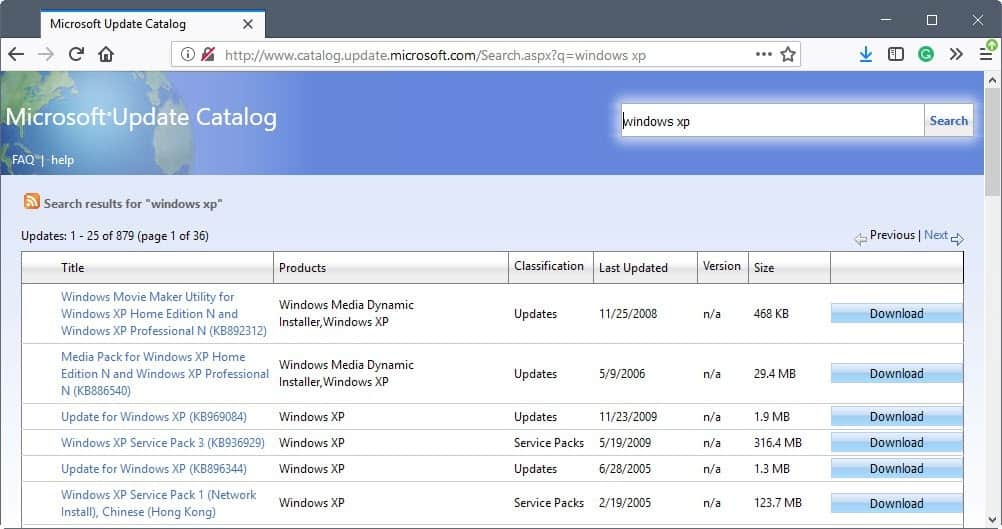
Open the Windows 10 update history website.
-
In the left pane, browse the latest update for your version of Windows 10 and note the update’s KB number.
Quick tip: You can check your current version on Settings > System > About, and under the “Windows Specifications” section, confirm the version information.

-
Open the Microsoft Update Catalog website.
-
Search for the knowledge base (KB) number of the update.
-
Download the update for the version of Windows 10 that you have (32-bit (x86) or 64-bit (x64)).
-
Double-click the file to install the update.
-
Restart the computer.
-
Open Settings.
-
Click on System.
-
Click on About.
-
Under the “System type” section, check whether you have the 32-bit or 64-bit version of Windows 10.
-
Open the Microsoft Update Catalog website.
-
Download the most recent Servicing Stack Update for the version you have (32-bit (x86) or 64-bit (x64)).
-
Double-click the file to install the update.
-
Restart your computer.
-
Open Start.
-
Search for Command Prompt, right-click the top result, and select the Run as administrator option.
-
Type the following DISM command to repair corrupted system files and press Enter:
dism.exe /Online /Cleanup-image /Restorehealth
-
Type the following SFC command to repair system files and press Enter:
sfc /scannow
-
Open Start.
-
Search for Command Prompt, right-click the top result, and select the Run as administrator option.
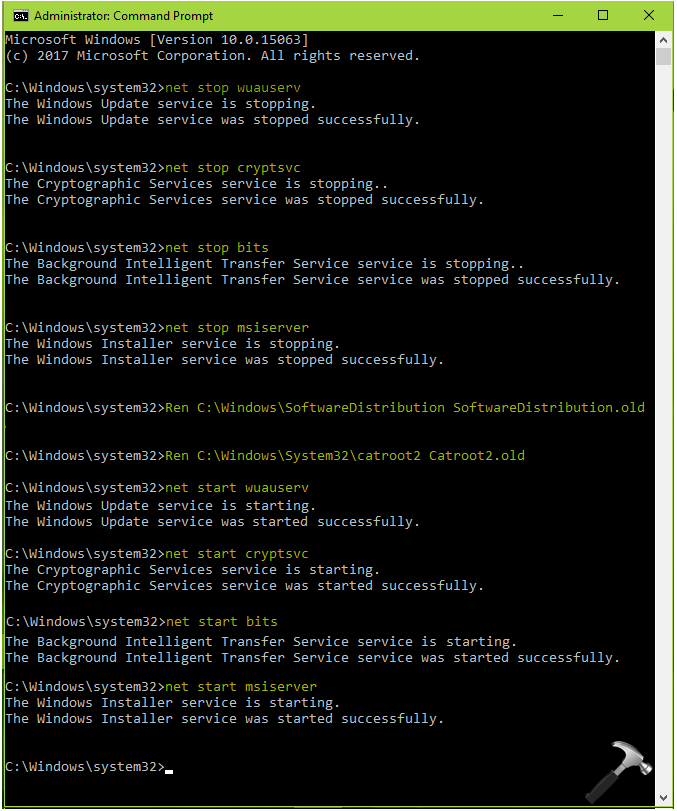
-
Type the following commands to stop the Background Intelligent Transfer Service (BITS), Windows Update service, and Cryptographic service, and press Enter on each line:
net stop bits
net stop wuauserv
net stop appidsvc
net stop cryptsvc
Quick tip: You may need to run the command more than once until you see the message that the service has stopped successfully.
-
Type the following command to delete all the qmgr*.dat files created by BITS from your PC. and press Enter:
Del "%ALLUSERSPROFILE%\Application Data\Microsoft\Network\Downloader\*.
 *"
*" -
Type Y to confirm the deletion.
-
Type the following commands to clear the Windows Update cache to allow Windows 10 to re-download the updates instead of using the files already downloaded on the system that might be damaged, and press Enter on each line:
rmdir %systemroot%\SoftwareDistribution /S /Q
rmdir %systemroot%\system32\catroot2 /S /Q
Quick tip: We use the remove directory
rmdircommand with the/Soption to delete the specified directory and all subdirectories within the main folder, and the/Qoption deletes directories quietly without confirmation. If you get the message “The process cannot access the file because it is being used by another process,” repeat step 1 and try again, as one of the services might have restarted unexpectedly. -
Type the following commands to reset the BITS and Windows Update services to their default security descriptor, and press Enter on each line:
sc. exe sdset bits D:(A;;CCLCSWRPWPDTLOCRRC;;;SY)(A;;CCDCLCSWRPWPDTLOCRSDRCWDWO;;;BA)(A;;CCLCSWLOCRRC;;;AU)(A;;CCLCSWRPWPDTLOCRRC;;;PU)
sc.exe sdset wuauserv D:(A;;CCLCSWRPWPDTLOCRRC;;;SY)(A;;CCDCLCSWRPWPDTLOCRSDRCWDWO;;;BA)(A;;CCLCSWLOCRRC;;;AU)(A;;CCLCSWRPWPDTLOCRRC;;;PU)
exe sdset bits D:(A;;CCLCSWRPWPDTLOCRRC;;;SY)(A;;CCDCLCSWRPWPDTLOCRSDRCWDWO;;;BA)(A;;CCLCSWLOCRRC;;;AU)(A;;CCLCSWRPWPDTLOCRRC;;;PU)
sc.exe sdset wuauserv D:(A;;CCLCSWRPWPDTLOCRRC;;;SY)(A;;CCDCLCSWRPWPDTLOCRSDRCWDWO;;;BA)(A;;CCLCSWLOCRRC;;;AU)(A;;CCLCSWRPWPDTLOCRRC;;;PU) -
Type the following command to move to the System32 folder and press Enter:
cd /d %windir%\system32
-
Type the following commands to register all the corresponding BITS, and Windows Update DLL files on the Registry and press Enter on each line:
regsvr32.exe /s atl.dll
regsvr32.exe /s urlmon.dll
regsvr32.exe /s mshtml.dll
regsvr32.exe /s shdocvw.dll
regsvr32.exe /s browseui.dll
regsvr32.exe /s jscript.dll
regsvr32.exe /s vbscript.dll
regsvr32.exe /s scrrun.dll
regsvr32.exe /s msxml.dll
regsvr32.exe /s msxml3.dll
regsvr32.exe /s msxml6.dll
regsvr32.exe /s actxprxy.dll
regsvr32. exe /s softpub.dll
regsvr32.exe /s wintrust.dll
regsvr32.exe /s dssenh.dll
regsvr32.exe /s rsaenh.dll
regsvr32.exe /s gpkcsp.dll
regsvr32.exe /s sccbase.dll
regsvr32.exe /s slbcsp.dll
regsvr32.exe /s cryptdlg.dll
regsvr32.exe /s oleaut32.dll
regsvr32.exe /s ole32.dll
regsvr32.exe /s shell32.dll
regsvr32.exe /s initpki.dll
regsvr32.exe /s wuapi.dll
regsvr32.exe /s wuaueng.dll
regsvr32.exe /s wuaueng1.dll
regsvr32.exe /s wucltui.dll
regsvr32.exe /s wups.dll
regsvr32.exe /s wups2.dll
regsvr32.exe /s wuweb.dll
regsvr32.exe /s qmgr.dll
regsvr32.exe /s qmgrprxy.dll
regsvr32.exe /s wucltux.dll
regsvr32.exe /s muweb.dll
regsvr32.exe /s wuwebv.dll
exe /s softpub.dll
regsvr32.exe /s wintrust.dll
regsvr32.exe /s dssenh.dll
regsvr32.exe /s rsaenh.dll
regsvr32.exe /s gpkcsp.dll
regsvr32.exe /s sccbase.dll
regsvr32.exe /s slbcsp.dll
regsvr32.exe /s cryptdlg.dll
regsvr32.exe /s oleaut32.dll
regsvr32.exe /s ole32.dll
regsvr32.exe /s shell32.dll
regsvr32.exe /s initpki.dll
regsvr32.exe /s wuapi.dll
regsvr32.exe /s wuaueng.dll
regsvr32.exe /s wuaueng1.dll
regsvr32.exe /s wucltui.dll
regsvr32.exe /s wups.dll
regsvr32.exe /s wups2.dll
regsvr32.exe /s wuweb.dll
regsvr32.exe /s qmgr.dll
regsvr32.exe /s qmgrprxy.dll
regsvr32.exe /s wucltux.dll
regsvr32.exe /s muweb.dll
regsvr32.exe /s wuwebv.dllQuick note: The
regsvr32helps to register “.DLL” files as command components in the Registry, and we use the/Soption to specify the tool to run the command silently without prompting additional messages.
-
Type the following commands to reset the network configurations that might be part of the problem (but do not restart your computer just yet), and press Enter on each line:
netsh winsock reset
netsh winsock reset proxy
-
Type the following commands to restart the BITS, Windows Update, and Cryptographic services, and press Enter on each line:
net start bits
net start wuauserv
net start appidsvc
net start cryptsvc
-
Restart the computer.
- How to rename network adapter on Windows 11
- How to move Taskbar to top or side on Windows 11
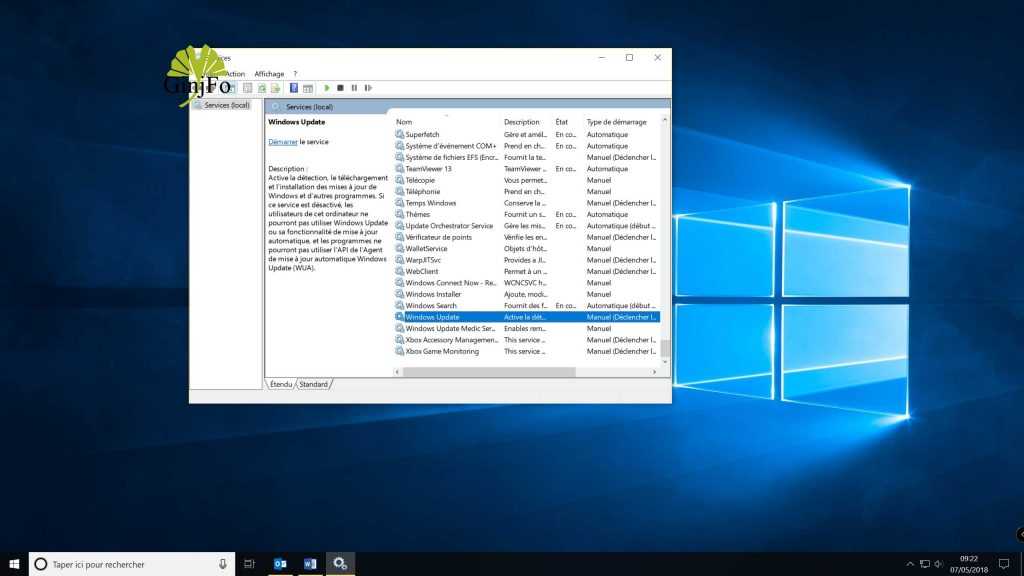
- Press the Windows key and in the Windows search, type: Services. Now, hover your mouse over the result of Services, and in the right pane of the Start menu, choose Run as Administrator.Open Services as Administrator
- Now, double-click on the Windows Update service (or right-click and choose Properties) and change its Startup Type to Automatic.
 Open Properties of Windows Update Service
 - Then click on the Start button and apply the changes.Set the Startup Type of the Windows Update Service to Automatic and Start it
- After that, repeat the same for the BITS (Background Intelligent Transfer Service) service to set its Startup type to Automatic and Start it.Change Startup Type of BITS to Automatic
- Now reboot your PC and check if the update service issue is resolved.
- If not, hit the Windows key and open Settings.
- Now select Update and Security and in the left pane, head to the Troubleshoot tab.Open Update & Security
- Then, in the right pane of the Update & Security window, open Additional Troubleshooters.Open Additional Troubleshooters
- Now, in the section of Get Up and Running, expand the option of Windows Update.
- Then click on Run the Troubleshooter and let the process complete.Run the Windows Update Troubleshooter
- Upon completion, apply the recommended troubleshooting steps and check if the Windows update is working fine.
- Perform a clean boot of your system (you can also use Autoruns to find out the problematic application) and check if you can update the Windows of your system. You may have to enable the Windows Update service as discussed in solution 1.
- If so, then enable the applications/processes/services one by one (that were disabled during the clean boot process) till you find the application/process/service that was causing the issue.

- Once found, either disable the problematic application at the system’s startup or completely uninstall it.
- Launch the Power User menu (by simultaneously pressing the Windows + X keys) and choose Apps & Features.Open Apps & Features
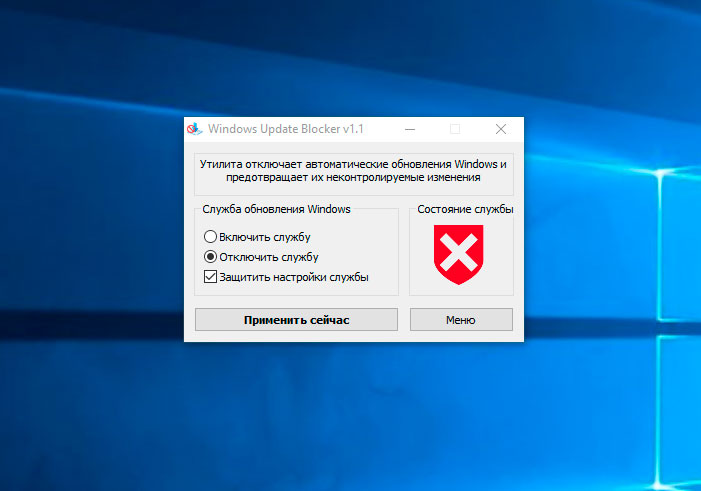
- Now expand the StopUpdates10Guard application and click on the Uninstall button.
- Then confirm to uninstall the StopUpdates10Guard utility and let the process complete.
- Now reboot your PC and check if the update services issue is resolved.
- If you do not want to uninstall StopUpdates10Guard, then you may disable it at the system’s startup.Disable StopUpdates10Guard in the Services tab of the System Configuration
- Manually update the drivers of your PC and BIOS. You may download the latest BIOS/drivers from the OEM website and install them. Also, if your OEM has an update utility (like Dell Support Assist), use that utility to update the drivers/BIOs.
- After updating the BIOS/drivers, check if the system is clear of the update services issue.
- Launch the Services manager (as discussed in solution 1) and right-click on the Windows Update service.Stop the Windows Update Service
- Now, in the menu shown, select Stop and minimize the Services window (do not close).
- Then right-click on the Windows button and choose Run.Open the Run Command From the Quick Access Menu
- Now navigate to the following (copy-paste the address):
\Windows\SoftwareDistribution
Open Software Distribution Folder
- Then delete all the contents of the SoftwareDistribution folder (if you want to play safe, rename the SoftwareDistribution folder) and steer to the Services window.Delete the contents of the Software Distribution Folder
- Now right-click on the Windows Update service and choose Start.
 Start the Windows Update Service
 - Then check if the system is clear of the update services issue.
- Launch a web browser and steer to the Windows Catalogue page.
- Now, download the latest Windows 10 cumulative update and install it as administrator.Download the Latest Windows Update from the Catalog Website
- Then reboot your PC and hopefully, the Windows update is working fine.
-
How to reset your Microsoft account password
-
Windows Activation
-
Make sure the device is connected to the Internet. An Internet connection is required to download updates.
-
If you are connected to the Internet, try installing updates manually. Press button > settings > Windows Update client component , and then view the available updates.
Check for updates
-
Run the Windows Update troubleshooter. Select Start > Settings > System > Troubleshooting > Other troubleshooting tools . In the Most Common section, select Windows Update Client Component .
-
If the troubleshooter does not resolve the issue, see Troubleshoot Windows Update client component errors.
-
Select Start > Settings > Windows Update .
-
Select Schedule reboot and select a time that is convenient for you.
-
Select Start > Settings > Windows Update > Update History > Uninstall updates .
-
Select the update you want to uninstall and click Uninstall .
-
How to reset your Microsoft account password
-
Windows Activation
-
Make sure the device is connected to the Internet. An Internet connection is required to download updates.
-
Run the Windows Update troubleshooter. Select Settings > Settings > Update & Security > Troubleshoot . Under Run diagnostics and troubleshoot , select Windows Update .
-
If the troubleshooter does not resolve the issue, see Troubleshoot Windows Update client component errors.
-
Select Pause updates for 7 days .
-
Select Additional parameters . Then, in section Suspend updates , select the drop-down menu and specify the date when updates will resume.
-
Select Settings > Settings > Update & Security > Windows Update client component.
-
Select Schedule reboot and select a time that is convenient for you.
-
Select the update you want to uninstall and click Uninstall .
-
Open Windows Update. To do this, swipe in from the right edge of the screen (if you are using a mouse, move the mouse pointer to the lower right corner of the screen and then up) and select Settings > Change PC settings > Update and restore > Windows Update . To check for updates manually, select Check now .
-
Under Recommended updates select Receive recommended updates in the same way as important updates .
-
In Microsoft Update , select When updating Windows, provide updates to other Microsoft products and click Apply .
-
Open Windows Update. To do this, swipe in from the right edge of the screen (if you are using a mouse, move the mouse pointer to the lower right corner of the screen and then up) and select Settings > Change PC settings > Update and restore > Windows Update > View update history .
-
Select the update you want to uninstall and click Uninstall .
-
Make sure your computer is connected to the Internet. If you are using a limited Internet connection, some updates may not be able to install.
-
If you are connected to the Internet and the updates are not automatically installed, please wait a few minutes and try installing the updates manually.
-
Detailed troubleshooting instructions can be found in the Fixing Errors section of Windows Update.
-
Press the button Start , then select Control Panel > Programs . Section Programs and Features click View installed updates .
-
Make sure your computer is connected to the Internet. If you are using a limited Internet connection, some updates may not be able to install.
-
If you are connected to the Internet and the updates are not automatically installed, please wait a few minutes and try installing the updates manually.
-
Feedback
Twitter
LinkedIn
Facebook
E-mail address
- Article
- Reading takes 2 minutes
Application:
- Windows 10
- Windows 11
There are a number of requirements to consider when manually configuring devices to comply with updates.
 They are subject to change with newer versions of the Windows client. The update compliance configuration script will be updated when any configuration requirements change, so you only need to redeploy the script.
 The requirements are divided into different categories:
- Verify that the required policies for update compliance are configured correctly.
- Devices in each network topology must send data to the required endpoints for update compliance. For example, devices in the main and back office, which may have different network configurations, must be able to access the endpoints.
- Make sure you have the necessary Windows 9 services0683 are running or planned. It is recommended that all Microsoft and Windows services be set to their standard defaults to ensure correct functionality.
Required Policies
Update Compliance has a number of policies that must be correctly configured for devices to be handled by Microsoft and appear in the Update Compliance section.
 They are listed below and are separated by whether the policies are configured using mobile device management (MDM) or Group Policy. For both tables:
 - Policy matches the location and name of the policy.
- Value Specifies what value should be set for the policy. Compliance with updates requires at least basic (or required) diagnostics, but can work with advanced or full (or optional).
- Function provides information about why a policy is required and what function it performs to comply with updates. In addition, the minimum version required for the policy, if any, will be detailed here.
Policies Mobile Device Management
Each MDM policy references its documentation in the CSP hierarchy, providing the exact location in the hierarchy and additional details.
Policy Data type Meaning Function Provider/ ProviderID / CommercialID Line Your business ID Identifies the device as belonging to your organization. 
System/ AllowTelemetry integer 1 — basic Sends basic device information, including quality-related data, application compatibility, and other similar data, to help keep the device secure and up to date. For more information, see Set up Windows diagnostic data for your organization. System/ ConfigureTelemetryOptInSettingsUx integer 1. Disable telemetry consent options (in Windows 10 version 1803 and later) controls whether device users can configure diagnostic data to levels lower than the level defined by AllowTelemetry. We recommend disabling this policy, or the actual level of diagnostic data on devices may not be sufficient. System/ AllowDeviceNameInDiagnosticData integer 1 — allowed Allows you to send the device name for Windows diagnostic data.  If this policy is not configured or set to 0 (disabled), the device name will not be sent and will not appear in the Update Compliance list.
 #System/ AllowUpdateComplianceProcessing integer 16 — allowed Enables data flow through the update compliance data processing system and indicates explicit device registration with the service. System/ AllowCommercialDataPipeline integer 1 — included Configures Microsoft as the handler for Windows diagnostic data collected from an Azure Active Directory joined device. Group policies
All group policies that need to be configured to comply with updates are located in Computer Configuration>Policies>Administrative templates >Windows Components\Data collection and preview builds. All of these policies must be in the state «Enabled » and have the value listed below
Policy Meaning Function Customize commercial ID Your business ID Identifies the device as belonging to your organization. 
Enable telemetry 1 — basic Configures the maximum allowable diagnostic data to send to Microsoft. Individual users can still set this value lower than the policy. See the following policy for more information. Configuring the telemetry consent user interface 1. Disable diagnostic data consent settings (in Windows 10 version 1803 and later) controls whether device users can configure diagnostic data to levels lower than the level defined by AllowTelemetry. We recommend disabling this policy, otherwise the actual level of diagnostic data on devices may not be sufficient. Allow device name to be sent to Windows diagnostic data 1 — included Allows you to send the device name for Windows diagnostic data. If this policy is not configured or disabled, the device name will not be sent and will not appear in Update Compliance. 
#Allow update compliance processing 16 — included Enables data flow through the update compliance data processing system and indicates explicit device registration with the service. Enable commercial data pipeline 1 — included Configures Microsoft as the handler for Windows diagnostic data collected from an Azure Active Directory joined device. Required endpoints
To allow data sharing between devices, network, and Microsoft Diagnostic Data Service, configure a proxy server to allow devices to communicate with the following endpoints.
Devices must be able to contact the following endpoints to authenticate and send diagnostic data:
Endpoint Function https://v10c. events.data.microsoft.com
 User Experience and Diagnostics endpoint for Windows 10 version 1803 and later. DeviceCensus.exe should be run regularly and contact this endpoint to get the most information about update compliance. https://v10.vortex-win.data.microsoft.comUser Experience and Diagnostics endpoint for Windows 10 version 1709 or earlier. https://settings-win.data.microsoft.comRequired for the Windows Update client component functionality. https://adl.windows.comRequired for the Windows Update client component functionality. https://watson.telemetry.microsoft.comWindows Error Reporting (Windows Error Reporting), used to provide more sophisticated error reporting when certain component update deployment failures occur. https://oca.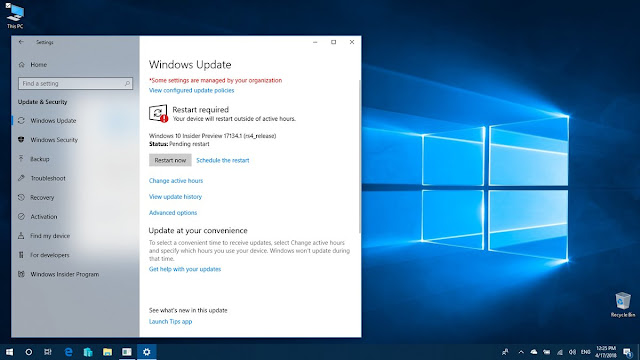 telemetry.microsoft.com
 Network failure analysis, used to provide device-specific recommendations and detailed errors when certain failures occur. https://login.live.comThis endpoint simplifies Microsoft account access and is required to generate the primary ID used for devices. Without this service, devices will not appear in the solution. The Microsoft Account Sign-in Assistant service (wlidsvc) must also be running. Required services
Many Windows and Microsoft services are required to not only enable your device to work, but also to see device data as updated. It is recommended that all default services from the standard interface remain running. The update compliance configuration script checks to see if most of these services are running or allowed to run automatically.
Feedback
Send and view feedback on
This product
This page
View all reviews per page
How Windows Update works — Windows Deployment
- Article
- Reading takes 2 minutes
Related to:
- Windows 10
- Windows 11
The Windows Update Client Workbench has four main areas of functionality:
Scan
- Orchestrator is scheduling a scan.
- Orchestrator validates download administrator and policy approvals.
Download
- Orchestrator is starting downloads.
- The Windows Update client component downloads the manifest files and provides them to the resolver.
- The arbitrator evaluates the manifest and tells the client the Windows Update client component to download files.
- The Windows Update client component downloads files to a temporary folder.
- The arbiter is preparing downloaded files.
Install
- Orchestrator is starting the installation.
- The arbitrator calls the installer to install the package.
Commit
- Orchestrator is restarting.
- The arbiter exits before restarting.
How the update works
During the update process, the Windows Update Orchestrator client component runs in the background to scan, download, and install updates.
 It performs these actions automatically according to the settings and automatically so as not to disrupt the use of the computer.
 Scan for updates
The Windows Update client orchestrator on the computer checks the Microsoft Update server or WSUS endpoint for new updates at random intervals. Random randomization ensures that the Windows Update server client component is not overloaded at the same time as requests. Update Orchestrator only searches for updates added since the last update search, allowing you to find updates quickly and efficiently.
When checking for updates, the Windows Update Orchestrator client component checks to see if the update is appropriate for your device. It uses the best practices defined by the update publisher, such as Microsoft Office, including corporate group policies.
Verify that you are familiar with the following terminology that is associated with the Windows Update client component scan:
Term Definition Update We use this term to mean several different things, but in this context it is actually an updated code or change. 
Pack update Update containing 1-N child updates; does not contain useful data. Child update Destination update that is bundled with another update; contains useful data. Detector update Special update containing only the IsInstalled applicability rule and no payload. Used for preliminary evaluation. Category update Special «detectoid» with IsInstalled rule which is always true. Used to group updates and allow the device to filter updates. Complete test Scanning with an empty datastore. Differential check Scan with previous scan updates already cached in the data store. Network test Scanning using the network and checking the update server. Offline test A test that does not use the network and a test of the local data store. 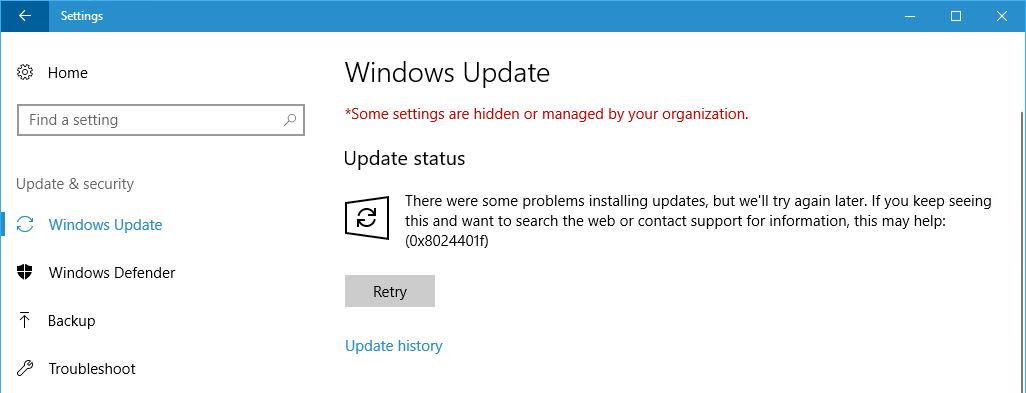 This is only useful if the network check has been performed before.
 CatScan Category scanning, where the caller can specify category ID to retrieve updates published by that category ID . AppCatScan Scanning categories where the caller can specify AppCategoryId to publish apps in this appCategoryId . Software synchronization Part of the check that only checks for software updates (both applications and operating system). Driver synchronization Part of the check that only checks for driver updates. This synchronization is optional and is performed after software synchronization. ProductSync Attribute-based synchronization, in which the client provides a list of device, product, and caller attributes in advance for the service to check for applicability in the cloud. 
How the Windows Update client component
checks The Windows Update client component does the following when it runs a check.
Running a check for updates
When users start scanning the Windows Update client component through the Settings panel, the following occurs:
Proxy server behavior updates ([MS-WUSP]: simpleAuth Web Service | Microsoft Documentation[ MS-WUSP]: Web Service Client | Microsoft Documentation):
-
An attempt was made to use the system proxy server (set using the
netshcommand). -
If the WUA is unable to connect to the service due to a specific proxy, service, or authentication error code, it attempts to use the user’s proxy (typically the user who is logged in).
Note
For intranet WSUS Update Service URLs, we provide a Windows Update client component policy setting to select proxy behavior.
For the Windows Update client component, URLs that are not are used to detect updates, such as downloads or reporting:
- An attempt was made to use a user proxy.

- If WUA cannot connect to a service due to a specific proxy, service, or authentication error code, it tries to use the system proxy.
Service IDs
-
Service IDs indicate which update source is checked.
-
The Windows Update client subsystem treats each service as a separate entity, even though multiple services may contain the same updates.
-
Common Service Identifiers
Important!
Here, the ServiceId specifies a client abstraction, not a specific service in the cloud. You should not make assumptions about which server the serviceId will point to. It is entirely driven by responses from the service pointer service.
Service ServiceId Not specified / default Windows Update client component, Microsoft Update, or WSUS
00000000-0000-0000-0000-000000000000Windows Update 9482F4B4-E343-43B6-B170-9A65BC822C77 Microsoft Update 7971f918-a847-4430-9279-4a52d1efe18d Store 855E8A7C-ECB4-4CA3-B045-1DFA50104289 Test OS 8B24B027-1DEE-ACS-9A95-3517DFB9C552 WSUS or Configuration Manager Via ServerSelection::ssManagedServer
3DA21691-E39D-4da6-8A4B-B43877BCB1B7Offline Scan Service Using IUpdateServiceManager::AddScanPackageService Network troubleshooting
A common update failure occurs due to network issues.
 To find the root of the problem, follow these steps:
 -
Look for ProtocolTalker messages to view network synchronization traffic between client and server.
-
SOAP errors can be either client-side or server-side. Read message.
-
The Windows Update client component uses the service locator service to discover configurations and endpoints of Microsoft network update sources: Windows Update, Microsoft Update, or Flighting.
Note
If you are searching in WSUS or Configuration Manager, you can ignore the warning messages for the service pointer service.
-
Sites that only use WSUS or Configuration Manager may have the service pointer service blocked in the firewall. In this case, the request will fail, and although the service cannot check for the Windows Update or Microsoft Update client component, it can still check for WSUS or Configuration Manager because it is configured locally.
Downloading updates
When the Windows Update Orchestrator client component determines which updates apply to your computer, it will begin downloading updates if you have selected the option to download updates automatically.
 It performs operations in the background without interrupting the normal use of the device.
 To prevent other downloads from being affected or slowed down by downloading updates, the Windows Update client component uses Delivery Optimization, which downloads updates and reduces bandwidth consumption.
See Configuring Delivery Optimization for Windows 10 updates for more information.
Install updates
If the update is applicable, the Arbiter and metadata are downloaded. Depending on the settings of the Windows Update client component, when the download is complete, Arbiter will collect information from the device and compare it with the downloaded metadata to create an «action list».
The action list describes all the files required from the Windows Update client component and what the installation agent (such as CBS or Setup) should do with them. The list of actions is provided to the installation agent along with the payload to start the installation.

Fixing updates
If you configure the automatic updates option, the Windows Update Orchestrator client component automatically restarts the device after updates are installed in most cases. It should restart the device as it may not be safe or fully updated until it restarts. You can use Group Policy, Mobile Device Management (MDM), or the Registry (not recommended) to configure when devices restart after installing a Windows 10 update.
For more information, see Managing device restarts after an update.
Essential Services and Connected Windows
Windows has built-in apps, services, and features to help you do more. Windows also provides additional options for connecting to the Internet. These «connected experiences» can help you in a variety of ways. For example, by allowing the device to track its last known location, you can locate the device if it is lost or stolen.
When connected, data is sent and processed by Microsoft to provide this connected experience.
 This data is very important because this information allows us to use cloud connected experiences. This data is called the required service. Required service data may include information related to the operation of the connected connection, which is necessary to secure, obtain, and perform the service as expected. Required service data can also include information that the Connected Experience needs to complete the task, such as Windows configuration information.
 Connected experiences you choose to use in Windows will impact what required service data is sent to us.
Required service data is also collected and sent to Microsoft for essential services. Core services are used to ensure the security, performance and performance of the product’s work as expected, or are an integral part of the product’s operation. For example, the Windows Update client component is an essential service that ensures you have the latest updates to keep your device secure, up to date, and running.
 Because these services are important, you won’t be able to disable them.
 The list below describes the main services and connected experiences available in Windows, as well as links to more information about each.
Note: This article describes the most common core services and connected experiences. To reflect ongoing improvements to these experiences, the list below may be updated periodically.
Essential Services for Windows
Basic Services
Description
Authentication
You need an authentication service to sign in to your Microsoft account. It verifies your Microsoft identity and gives you access to several apps and features, such as OneDrive and Find My Device.
 If you can sign in to Windows with your Microsoft account, the authentication service provides Microsoft with a consistent experience across all of your devices.
 Certificates
Certificates are digital files that are stored on your device and are used to encrypt data and verify the identity of a user or organization.
-
Trusted root certificates are certificates that are issued by a certificate authority (CA) and are stored in the certificate trust list (CTL). Root Certificates Automatic Update service contacts the Windows Update client component to update the CTL. If a new version of the CTL is defined, the list of trusted root certificates stored on your device will be updated.
-
Learn more about Windows Update
Make sure you have enough free space on your device. Your device requires at least 16 GB of free space to update a 32-bit OS, or 20 GB for a 64-bit OS. If your device uses a small hard drive, you may need to use a USB flash drive to update.
If your computer is running out of memory, try the steps in Free up disk space in Windows.
After installing a number of updates, the device must be restarted. Save your documents and close all applications. Then press button Start > Shutdown
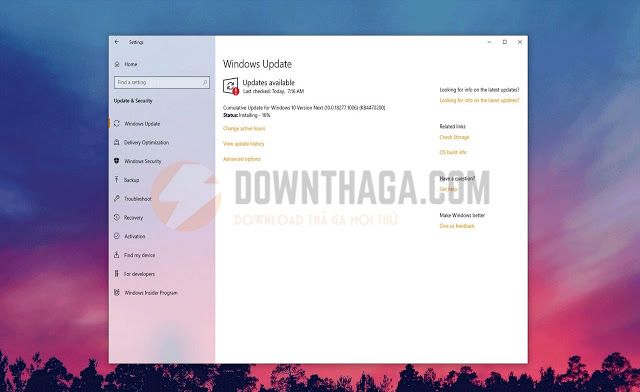
and select Refresh and reboot or Refresh and shut down .Even if you have downloaded some updates, others may be available. After completing the previous steps, run Windows Update again by selecting Start > Settings > Windows Update > Check for updates . Download and install the latest updates, if available.
Checking for an update in settings
Remove all external storage devices and drives, docking stations, and other equipment connected to the device that is not needed for basic functions. Then try running the updates again and check if the problem is fixed.
 If it doesn’t, move on to the next tip.
 If you installed new hardware for your device, check for third-party driver updates and see the hardware manufacturer’s website for installation instructions. Update all drivers and try running the updates again and check if the problem is fixed. If it doesn’t, move on to the next tip.
-
Type 9 in the search box on the taskbar0003 Device Manager , and then select Device Manager from the list of results.
-
In the window that opens, look for any device with a yellow exclamation mark. (You may need to select each category to see a list of devices.
 ) Select a device name.
 -
Select Action and then select Update driver or Remove to correct errors.
Troubleshooting FAQ
If you receive an error message with a specific error code, try running the Windows Update troubleshooter. If the problem persists, see Troubleshoot Windows Update errors. Follow the steps to troubleshoot common update issues.
The time it takes to download and install updates depends on your connection speed, network settings, and update file size. If the installation is slow, try checking for updates again or running the Windows Update troubleshooter.
To check for updates, select Start > Settings > Windows Update > Check for updates .
To get help, in the search box on the taskbar, type tech support, and then select tech support from the list of results. To provide feedback for additional issues, enter Feedback Hub in the search box on the taskbar, and then select Feedback Hub from the list of results.
Windows 11 is the most secure version of Windows, and we recommend keeping it up to date to keep your PC safe from threats and running smoothly. However, you can temporarily pause updates, and you can also schedule a reboot to install updates at a time that suits you.
Learn how to temporarily pause updates
Learn how to schedule a restart to install updates at your convenienceYou will only be notified when you need to restart your computer to apply installed updates.
Windows 11 monthly fixes are minor and have minimal impact on data usage.
 Component updates are typically released twice a year, and you can control when they are installed. They require more data but occur less frequently.
 If you are using a metered connection, some Windows updates will not be installed automatically. Limit connections in Windows
Your computer may run slowly for a number of reasons, but updating to the latest version of Windows 11 may improve its performance. For help on a low-powered PC, see Tips for improving the performance of your Windows PC.
If you’re having trouble finding files after upgrading, see Find lost files after upgrading to Windows 10 or 11 for possible solutions.
Optional
Warning: Microsoft recommends that you follow the procedures in this section only if you are familiar with the command line. You need administrator permissions on your device to run them.
-
In the search box on the taskbar, type command prompt , and then select Run as administrator from the list of results. Select Yes . Then, in the window that appears, enter the following commands in turn, including spaces, as shown. After entering each command, press the key Enter . Wait for each command to complete before entering the next command.
net stop bits
net stop wuauserv
ren %systemroot%\softwaredistribution softwaredistribution.
 bak
bak
ren %systemroot%\system32\catroot2 catroot2.bak
net start bits
net start wuauserv
-
After executing all these commands, close the command prompt window and restart the computer.

In some cases, third-party antivirus and security software may cause errors when you try to upgrade to the latest version of Windows 11. You can temporarily uninstall this software, upgrade your computer, and then reinstall this software. We recommend using third-party antivirus or security software that is compatible with the latest version of Windows 11. Compatibility can be checked by visiting the software manufacturer’s website.
Note: Before uninstalling programs, make sure you know how to reinstall programs and that you have all the necessary keys at hand.
In the search box on the taskbar, type command prompt , and then select Run as administrator from the list of results. Select Yes . In the window that appears, enter the following command, including spaces:
chkdsk /f C:
and press the 9 key0003 Enter . Recovery will automatically start on your hard drive and you will be prompted to restart your device.
 A clean reboot starts Windows with a minimal set of drivers and startup programs. This helps eliminate software conflicts that occur when you install a program or update that might cause problems updating your computer.
Learn how to perform a clean reboot-
In the search box on the taskbar, type command prompt , and then select Run as administrator from the list of results.
-
In the window that appears, enter this command, including spaces, as shown:
DISM.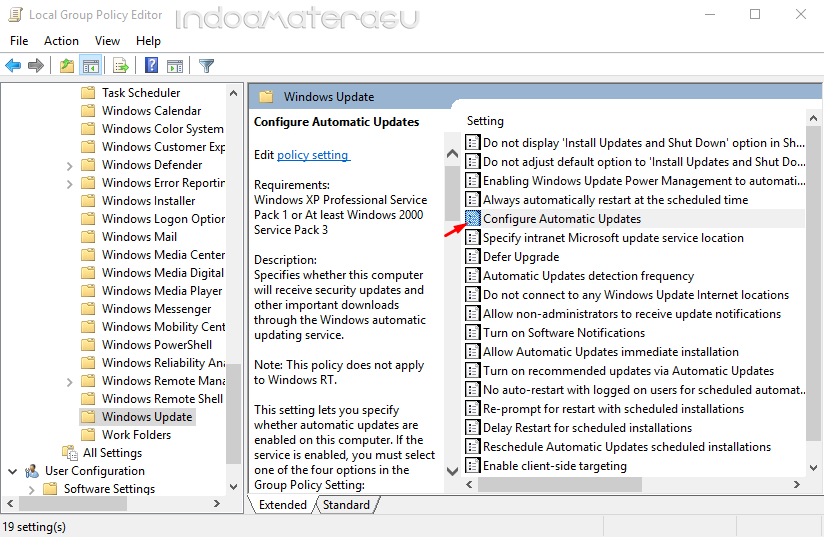 exe /Online /Cleanup-image /Restorehealth
 -
Press key Enter . Upon successful execution of the command, a confirmation message from the command prompt will appear on the command line that says «Restore operation completed successfully» or «Operation completed successfully».
Note: If you don’t see a confirmation message, enter the command again and try again. -
Then enter this command including a space as shown:
sfc /scannow -
Press key Enter . Wait until the sfc scan check is 100% complete and then close Command Prompt.
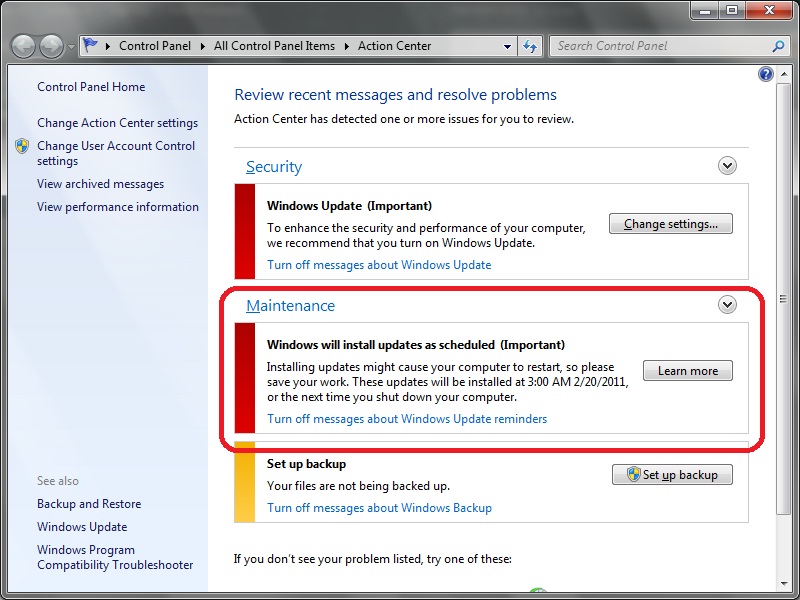
-
Try to run the Windows Update troubleshooter again.
Learn how to restore a Windows image
Go to the software download page and select Download tool to download the clean install tool. Read the notes on the software download page carefully before using the tool.
In Windows 10, you choose when and how you get the latest updates to keep your device healthy and secure. This article will help you find answers and troubleshoot common Windows 10 upgrade issues.
If you’re looking for information about how to activate Windows 10 or make sure your Windows 10 installation is activated, see Activate Windows.

Problems installing Windows updates? Start here.
Your device may not be able to update to the latest version of Windows 10 for several reasons. The tips below will help you identify the issue that you are experiencing with your device.
First, make sure that the device is connected to the mains and the Internet. Then follow the steps below to install the update on your computer.
Some updates require administrator access. If your account does not have administrator rights, see Create a local user or administrator account in Windows. If another user at home or office has an administrator account on your device, try asking him or her to install updates.
Important:
-
We recommend that you back up your personal files before you try one of the following solutions. You can use File History to back up files to another drive, or you can insert a USB drive and use File Explorer to drag and drop important files to the USB drive.
 If you sign in to Windows with a Microsoft account, system settings are automatically restored after the update as soon as you connect to the Internet.
 -
You can also back up your files using OneDrive. For more information, see Back up your Documents, Pictures, and Desktop folders with OneDrive.
-
Learn more about Windows Update
-
Supported Versions of Windows 10 FAQ
Make sure you have enough free space on your device.
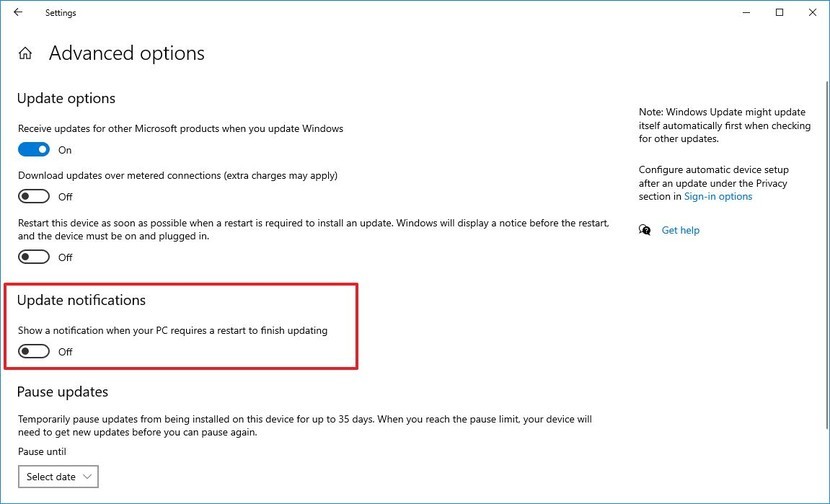 Your device requires at least 16 GB of free space to update a 32-bit OS, or 20 GB for a 64-bit OS. If your device uses a small hard drive, you may need to use a USB flash drive to update.
 If your computer is running out of memory, try the steps in Freeing up disk space in Windows.
After installing a number of updates, the device must be restarted. Save your documents and close all applications. Then click Start > Shutdown select Update and restart or Update and shutdown .
Even if you have downloaded some updates, others may be available. After following the previous steps, try running the Windows Update client component again by selecting Start > Settings > Update and security > Windows Update > Check for updates . Download and install the latest updates, if available.
Checking for an update in settings
Remove all external storage devices and drives, docking stations, and other equipment connected to the device that is not needed for basic functions.
 Then try running the updates again and check if the problem is fixed. If it doesn’t, move on to the next tip.
 If you installed new hardware for your device, check for third-party driver updates and see the hardware manufacturer’s website for installation instructions. Update all drivers and try running the updates again and check if the problem is fixed. If it doesn’t, move on to the next tip.
-
In the search box on the taskbar, type device manager , and then select Device Manager from the list of results.
-
In the window that opens, look for any device with a yellow exclamation mark.
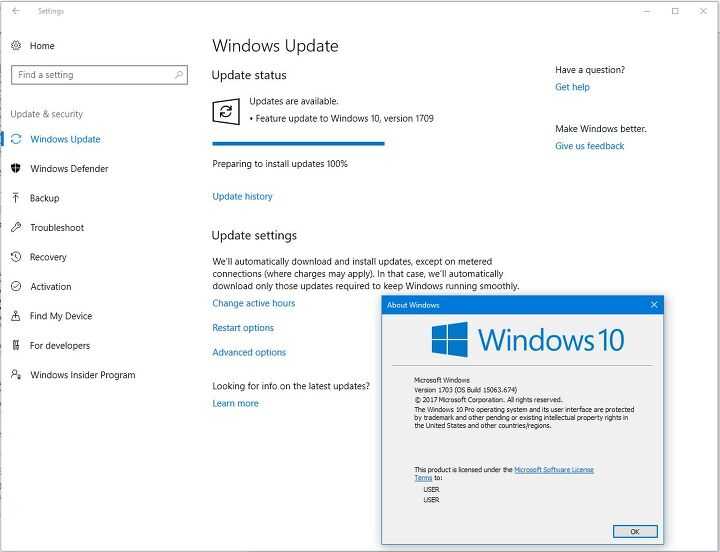 (You may need to select each category to see a list of devices.) Select a device name.
 -
Select Action and then select Update driver or Remove to fix errors.
Troubleshooting FAQ
If you receive an error message with a specific error code, try running the Windows Update troubleshooter. If the problem persists, see Troubleshoot Windows Update errors. Follow the steps to troubleshoot common update issues.
The time it takes to download and install updates depends on your connection speed, network settings, and update file size. If the installation is slow, try checking for updates again or running the Windows Update troubleshooter.
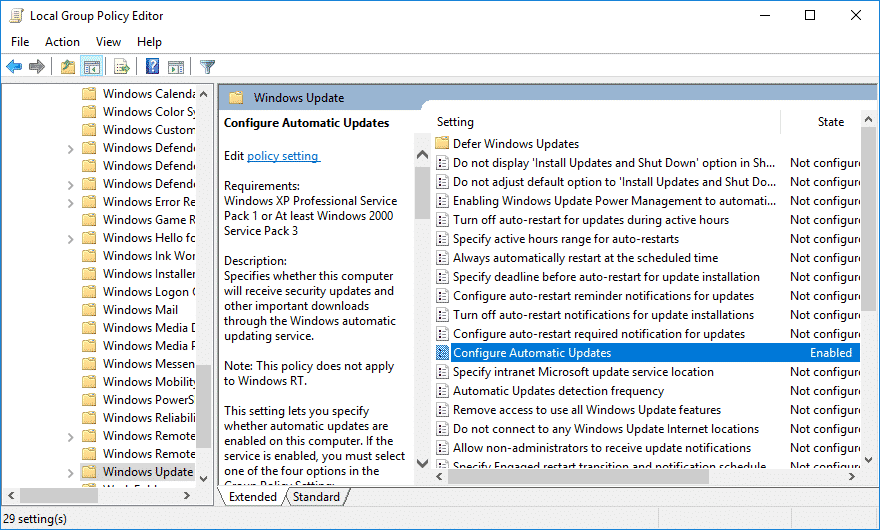
To check for updates, select Start > Settings > Update and security > Windows Update > Checking for updates.
To request assistance, type tech support in the search box on the taskbar, and then select tech support from the list of results. To provide feedback for additional issues, enter Feedback Hub in the search box on the taskbar, and then select Feedback Hub from the list of results.
Windows 10 is the most secure version of Windows, and we recommend keeping it up to date to keep your PC safe from threats and keep your system running smoothly. However, you can temporarily pause updates, and you can also schedule a reboot to install updates at a time that suits you.
Learn how to temporarily pause updates
Learn how to schedule a restart to install updates at your convenienceYou will only be notified when you need to restart your computer to apply installed updates.
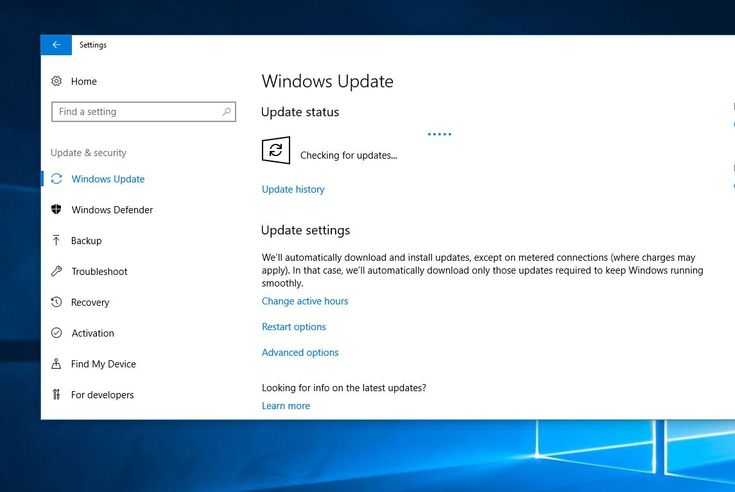
Tips:
-
After updating, if you need to know where you left off while working, use the timeline to return to that point.
-
To start using the timeline, select Task view on the taskbar, or press the Windows logo key + Tab, and then select the action you want to resume.
Windows 10 monthly fixes are minor and have minimal impact on data usage. Component updates are typically released twice a year, and you can control when they are installed. They require more data but occur less frequently.
If you are using a metered connection, some Windows updates will not be installed automatically. Limit connections in Windows
Your computer may run slowly for a number of reasons, but updating to the latest version of Windows 10 may improve its performance.
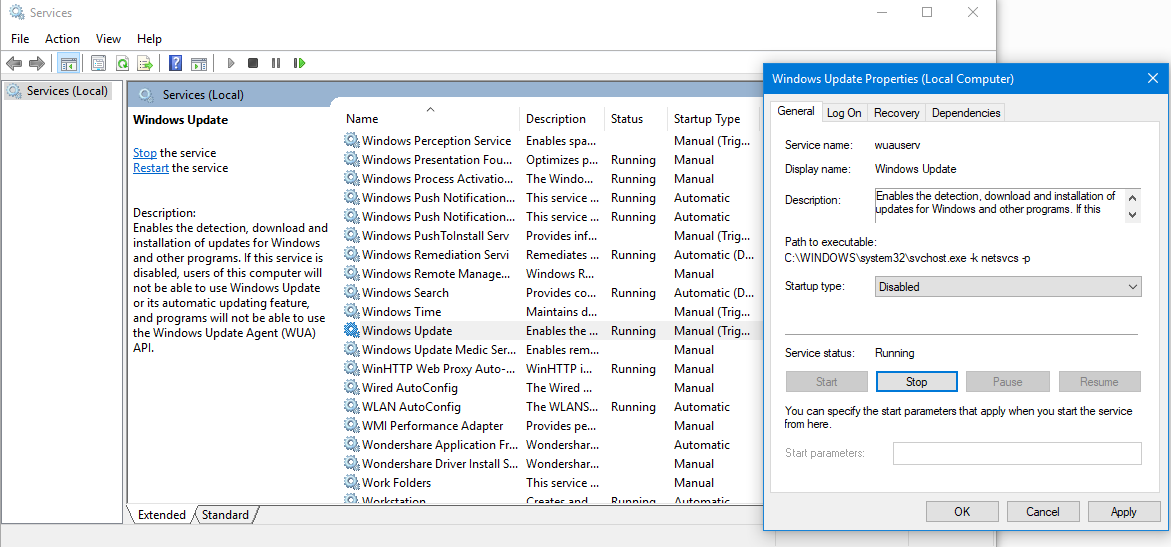 For help on a low-powered PC, see Tips for improving the performance of your Windows PC.
 If you’re having trouble finding files after upgrading, see Find lost files after upgrading to Windows 10 or 11 for possible solutions.
Optional
Warning: Microsoft recommends that you follow the procedures in this section only if you are familiar with the command line. You need administrator permissions on your device to run them.
-
In the search box on the taskbar, type command prompt , and then select Run as administrator from the list of results. Select Yes . Then, in the window that appears, enter the following commands in turn, including spaces, as shown.
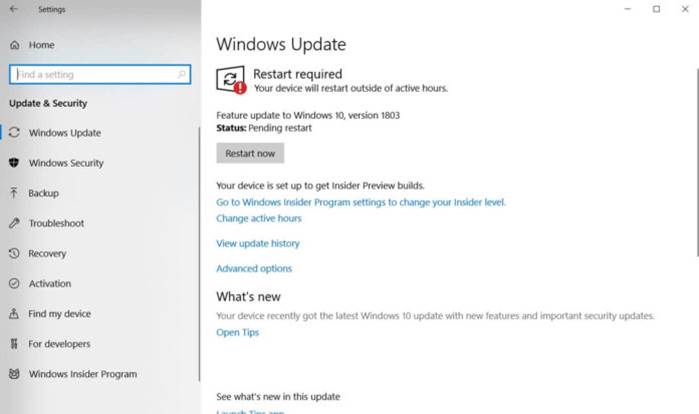 After entering each command, press the key Enter . Wait for each command to complete before entering the next command.
 net stop bits
net stop wuauserv
ren %systemroot%\softwaredistribution softwaredistribution.bak
ren %systemroot%\system32\catroot2 catroot2.
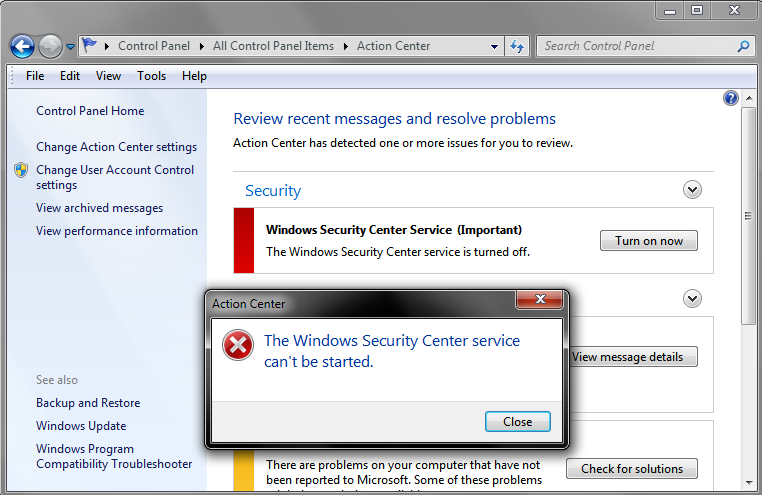 bak
bak
net start bits
net start wuauserv
-
After executing all these commands, close the command prompt window and restart the computer.
Sometimes, third-party antivirus or security software may cause errors when you try to update to the latest version of Windows 10.
 You can temporarily uninstall this software, upgrade your computer, and then reinstall this software after updating your device. We recommend using third-party antivirus or security programs that are compatible with the latest version of Windows 10. Compatibility can be checked by visiting the software manufacturer’s website.
 Note: Before uninstalling programs, make sure you know how to reinstall programs and that you have all the necessary keys at hand.
In the search box on the taskbar, type command prompt , and then select Run as administrator from the list of results. Select Yes . In the window that appears, enter the following commands, including spaces, as shown:
chkdsk /f C:
and press the key Enter . Recovery will automatically start on your hard drive and you will be prompted to restart your device.A clean reboot starts Windows with a minimal set of drivers and startup programs.
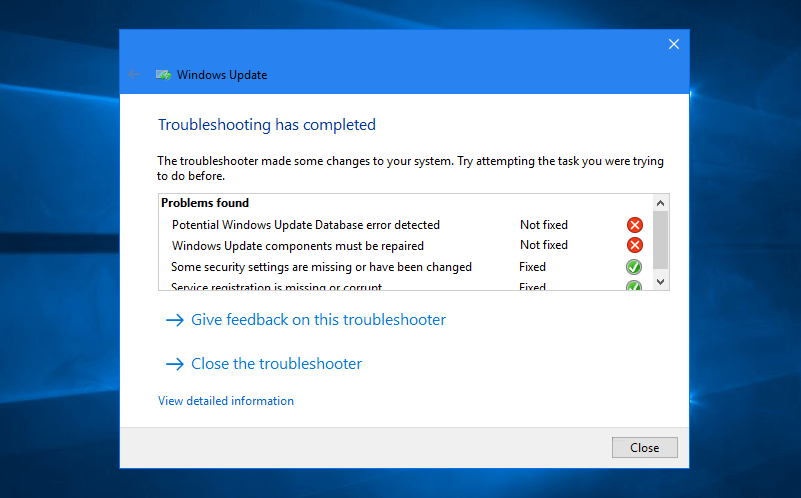 This helps eliminate software conflicts that occur when you install a program or update that might cause problems updating your computer.
Learn how to perform a clean reboot-
In the search box on the taskbar, type command prompt , and then select Run as administrator from the list of results.
-
In the window that appears, enter this command, including spaces, as shown:
DISM.exe /Online /Cleanup-image /Restorehealth -
Press key Enter .
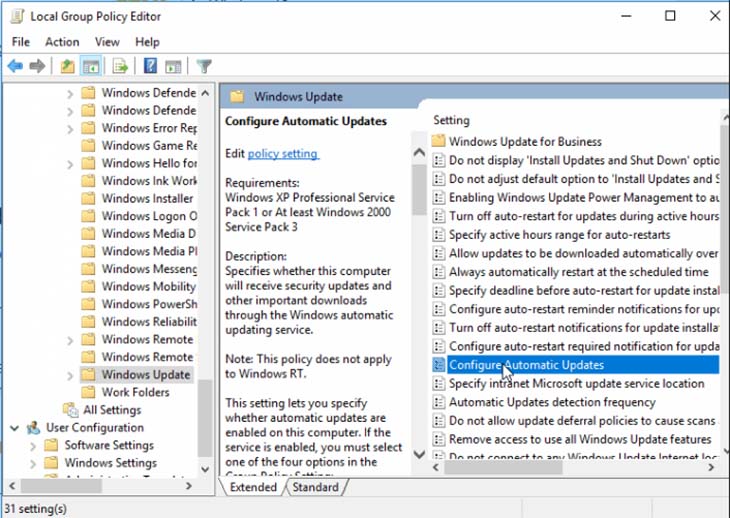 Upon successful execution of the command, a confirmation message from the command prompt will appear on the command line that says «Restore operation completed successfully» or «Operation completed successfully».
Note: If you don’t see a confirmation message, enter the command again and try again. -
Then enter this command including a space as shown:
sfc /scannow -
Press key Enter . Wait until the sfc scan check is 100% complete and then close Command Prompt.
-
Try to run the Windows Update troubleshooter again.
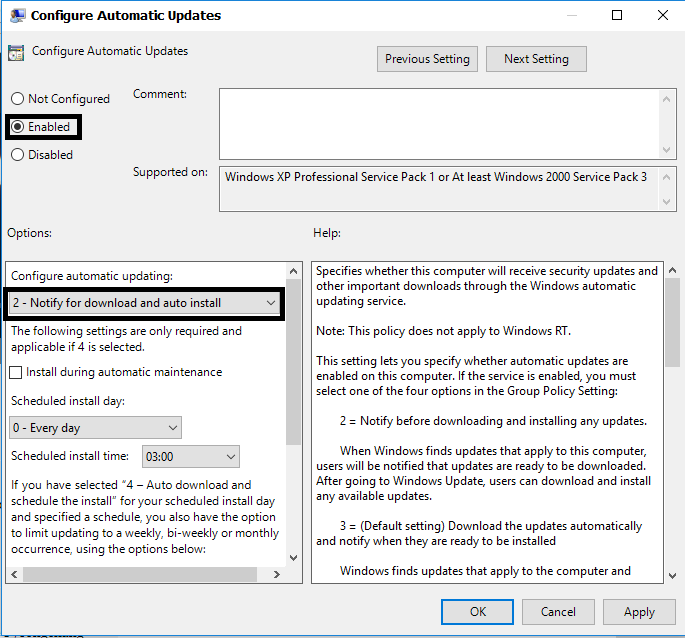
Learn how to restore a Windows image
Go to the software download page and select Download tool to download the clean install tool. Read the notes on the software download page carefully before using the tool.
Is the problem still?
Contact Microsoft Support if problems persist with Windows Updates.
Update the Windows Update Agent to the latest version — Windows Client
- Article
- Reading takes 6 minutes
This article describes how to update the Windows Update Agent to the latest version.
Applies to: Windows 7, Windows 8, Windows Server 2008 R2, Windows Server 2012
Original KB Number: 949104on your computer automatically. Or you can download and install the Windows Update Agent manually.
Automatic download of the Windows Update Agent
Follow these steps to automatically download the Windows Update Agent.
-
Turn on automatic updates. Follow these steps, depending on the version of Windows you are using.
-
Windows 8.1 or Windows 8
- Open Windows Update by swiping in from the right edge of the screen (or if you’re using a mouse, point to the lower right corner of the screen and move the pointer up), tap or click Settings , tap or click Control Panel , and then tap or click Windows Update .
- Tap or click Change settings .
- Under Important updates , select Install updates automatically .
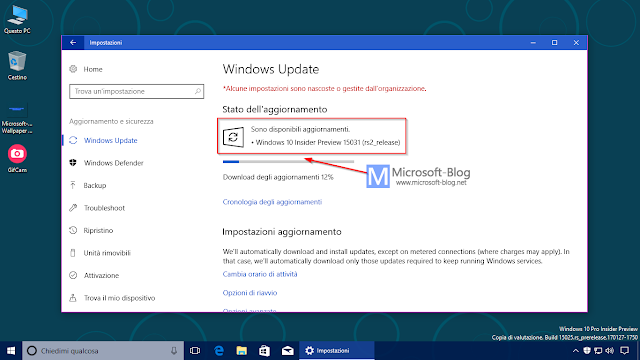
- Under Recommended updates , check Get recommended updates the same way I receive important updates , then press OK .
-
Windows 7, Windows Vista, or Windows XP
To automatically enable automatic updates, click the Fix button or follow the appropriate link, and then select Run in the View Downloads dialog box. After that, follow the instructions for fix (Fix It Wizard).
-
-
Restart the Windows Update service. To do this, follow these steps:
- Press Windows Key+R to open the Run window.
- Type services.msc in the Run field, then press ENTER.
- Right-click Windows Update in the Services Management Console and select Stop If your operating system is Windows XP, right-click Automatic Update , then select Stop .
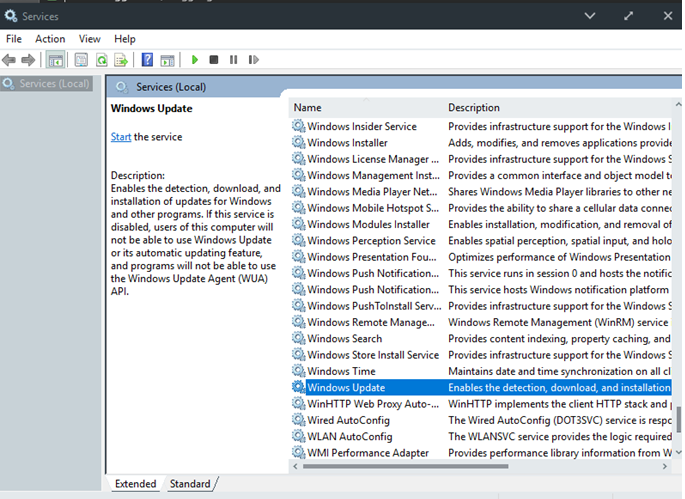
- After Windows Update stops, right-click Windows Update , and then click Run . If you are running Windows XP, right-click Automatic Updates, then select Run .
-
Wait for Windows Update to run, and then check if the agent has been updated.
Downloading the Windows Update Agent manually from the Microsoft Download Center
To download the latest version of the Windows Update Agent, click the download link that matches your version of Windows.
Update packages for Windows 8 and Windows Server 2012
The following files are available from the Microsoft Download Center.
Operating system Update All supported 32-bit (x86) versions of Windows 8 (KB2937636) Download the package now. All supported x64 versions of Windows 8 (KB2937636) Download the package now. 
All supported x64 versions of Windows Server 2012 (KB2937636) Download the package now. Service Pack for Windows 7 SP1 and Windows Server 2008 R2 SP1
The following files are available for download from Windows Update.
Operating system Update All supported x86 versions of Windows 7 SP1 Download the package now. All supported x64 versions of Windows 7 SP1 Download the package now. All supported 32-bit (x86) versions of Windows Server 2008 R2 SP1 Download the package now. All supported x64 versions of Windows Server 2008 R2 SP1 Download the package now. All supported versions of Windows Server 2008 R2 SP1 based on Itanium architecture
Download the package now. Note
Windows 8.
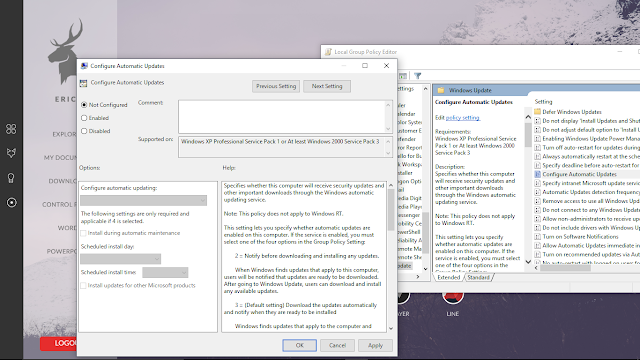 1, Windows RT 8.1, and Windows Server 2012 R2 Update 25 already contain the latest version of the Windows Update Agent.
 If you receive a Windows Update error message, use the solutions to resolve common Windows Update errors.
For more information about how you can find the version of the Windows Update Agent installed, follow these steps:
- Open the
%systemroot%\system32folder.%systemroot%is the folder where Windows is installed. For example, the folder%systemroot%isC:\Windows. - Right-click the Wuaueng.dll file and select Properties .
- Go to the tab Summary , then look for the version number of the file.
Note
The latest version of the Windows Update Agent for Windows 8.1 is 7.9.9600.16422. The latest version of Update Agent for Windows 8 is 7.8.9200.16693. The latest version of the Update Agent for Windows 7, Windows Vista, and Windows XP is 7.
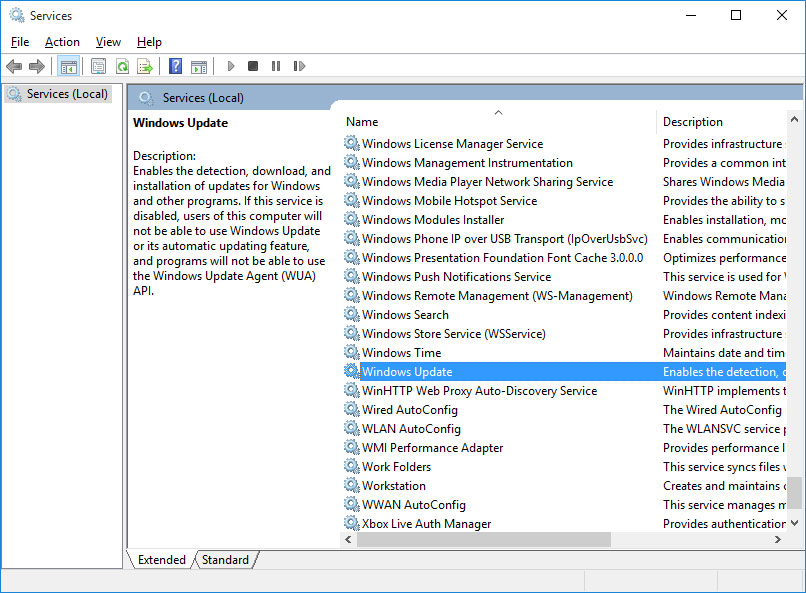 6.7600.256.
 Improvements in version 7.6.7600.256 of the Windows Update Agent
-
Strengthened infrastructure where the Windows Update client only trusts files signed with a new certificate. The certificate is only used to secure updates for the Windows Update client.
-
More secure communication channel for the Windows 9 Update client0005
Improvements in version 7.4.7600.226 of the Windows Update Agent
- Reduced time to search for updates in Windows Update.
- Improved the Windows Update user interface for computers running Windows Vista or Windows Server 2008.
- Update descriptions are more detailed and easier to read.
- Improved user notification of service packs.
Issues fixed in version 7.2.6001.788 of the Windows Update Agent
Windows Update Agent version 7.2.6001.788 resolves the following issues that were not previously documented in Microsoft Knowledge Base articles.
- Error code «0x80070057» is displayed when trying to install 80 or more updates at the same time from Windows Update or Microsoft Update.
Improvements in version 7.2.6001.784 of the Windows Update Agent
- Reduced time to search for updates in Windows Update
- Faster delivery of signature updates
- Support for reinstalling Windows Installer
- Improved error messaging
Issues fixed by Windows Update Agent version 7.0.6000.381
Windows Update Agent version 7.0.6000.381 fixes the following issues that were not previously documented in Microsoft Knowledge Base articles.
- Background Intelligent Transfer Service (BITS) fails on a computer that is running Windows Vista. For more information, see An update is available that fixes an issue that causes the Background Intelligent Transfer Service (BITS) to crash on a Windows Vista computer.
- A hotfix is included that reduces the number of reboots required by the offline installer when using Multilingual User Interface (MUI) package files.

- Correction of user interface elements in Korean and Chinese (Simplified and Traditional).
- Improved installation of the Windows Vista operating system.
Windows Update helps keep your system up-to-date and secure by allowing you to download and install the latest security updates and other updates released by Microsoft. Windows Update determines if updates are applicable to a given computer.
Microsoft periodically releases updates to users of Windows operating systems and other Microsoft software products. These include updates that improve system reliability and performance, updates that provide new protection against malware and other potentially harmful software, and updates to Windows components. To improve the performance or reliability of hardware components in your system, Microsoft also provides updates to device drivers provided by your computer manufacturer.
When Windows Update is enabled, software components directly associated with it need to be updated from time to time.
 This must be done before Windows Update can check for required updates or install other updates. These required updates fix bugs, provide ongoing improvements, and maintain compatibility with Microsoft servers that support Windows Update. When Windows Update is disabled, these updates are not provided.
 When you select the recommended option during installation of the Windows Out Of Box Experience (OOBE) application, Windows Update installs updates automatically. Alternatively, Windows Update can be enabled by selecting one of the following options in the Automatic Updates section of Control Panel.
- Automatic (recommended).
- Download updates but let you choose when to install.
- Notify but do not download or install them automatically.
After Windows Update is enabled, required updates for Windows Update components will be downloaded and installed automatically without notification. This occurs regardless of the option selected when enabling Windows Update.
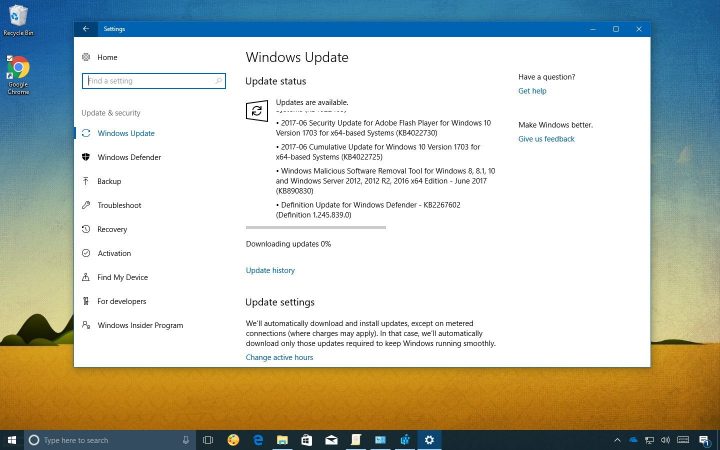
You can set active hours to make sure automatic restarts for updates only happen when you’re not using your device. Get updates when you’re away from your PC with active hours in Windows.
Try deleting files you don’t need, uninstalling apps you don’t use, or moving files to another drive like an external USB drive or OneDrive. For more tips on freeing up disk space, see Free up drive space in Windows.
We recommend keeping devices like laptops and tablets plugged in when you’re not using them. This way, if updates are installed outside active hours, your device will have enough power to complete the installation. Windows updates don’t consume more battery than other typical system processes.
An update history is available so you can see which updates were installed, and when. You can also use this list to remove specific updates, although we don’t recommend this unless it’s necessary.
Select Start > Settings > Update & Security > Windows Update > View update history .
View update history
For more info about what’s included in updates for Windows 10, see Windows 10 update history.
We don’t recommend that you remove any installed updates. However, if you must remove an update, you can do so in update history.
Feature updates are typically released twice per year and include new functionality and capabilities as well as potential fixes and security updates. Quality updates are more frequent and mainly include small fixes and security updates. Windows is designed to deliver both kinds of updates to devices through Windows Update.
To double check that your device is up to date, open Settings > Update & Security > Windows Update and see your update status and available updates.
Check for updates
To find which version of Windows you’re running, see Which version of Windows operating system am I running?
Reserved storage is not automatically turned on by Windows in any update scenarios. It is only turned on for new devices with the Windows 10 May 2019 Update (version 1903) or later preinstalled, or devices on which a clean install was performed.
Support for Windows 8.1 will end on January 10, 2023
Thank you for your loyalty. We want to help you prepare and recommend you move to a Windows 11 PC to stay supported and secure.
Learn more
Note: If you’re looking for Microsoft Office update info, see Install Office updates.
The best way to keep Windows 8.1 up to date is to turn on automatic updates. With automatic updates, you don’t have to search for updates online or worry about missing critical fixes or device drivers for your PC. Instead, Windows Update automatically installs important updates as they become available.
To turn on automatic updates:
Click the questions below to see answers about how Windows Update keeps your device up to date.
Note: If your PC is connected to a network where updates are managed by Group Policy, you might not be able to change settings related to Windows Update. For more info, contact your organization’s technical support.
Open Windows Update by swiping in from the right edge of the screen (or, if you’re using a mouse, pointing to the lower-right corner of the screen and moving the mouse pointer up), select Settings > Change PC settings > Update and recovery > Windows Update.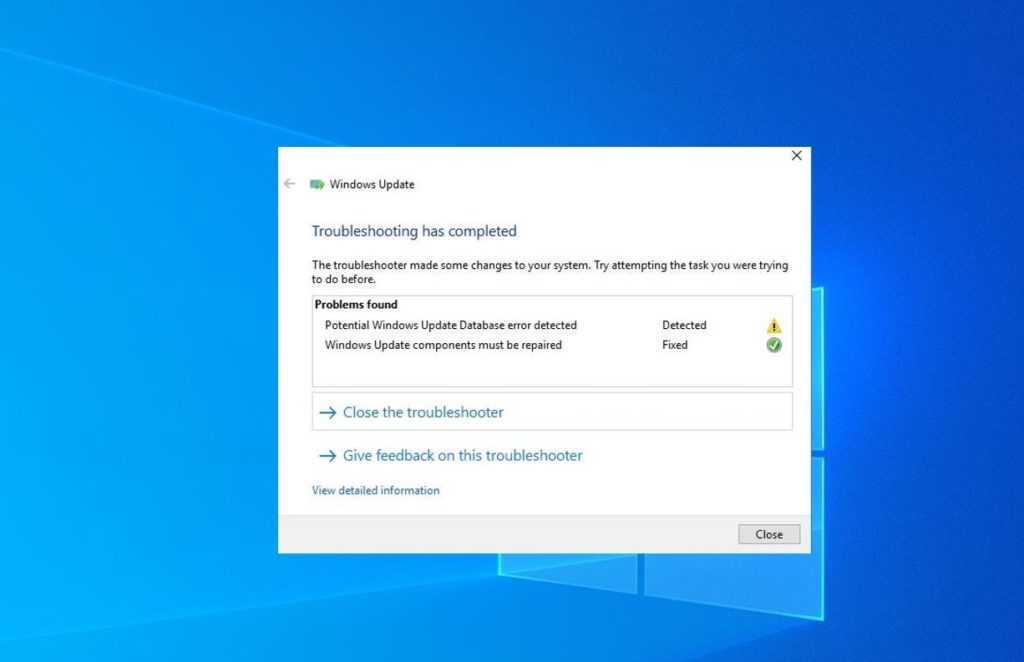 To check for updates manually, select Check now.
An update history is available so you can see which updates were installed, and when. You can also use this list to remove specific updates, although we don’t recommend this unless it’s necessary.
To see your PC’s update history, open Windows Update by swiping in from the right edge of the screen (or, if you’re using a mouse, pointing to the lower-right corner of the screen and moving the mouse pointer up), select Settings > Change PC settings > Update and recovery >Windows Update > View your update history.
We don’t recommend that you remove any installed updates. However, if you must remove an update, you can do so in update history.
Here are a few things to try if you’re having problems installing updates:
Support for Windows 7 ended on January 14, 2020
We recommend you move to a Windows 11 PC to continue to receive security updates from Microsoft.
Learn more
Click the questions below to see answers about how Windows Update keeps your device up to date.
See How to download a Windows update manually.
To see your PC’s update history, select the Start button, then select Control Panel > Programs. Under Programs and Features, select View installed updates.
We don’t recommend that you remove any installed updates. However, if you must remove an update, you can do so in update history.
Here are some things you can try if you’re having problems installing updates:
Note: If your PC is connected to a network where updates are managed by Group Policy, you might be unable to change settings related to Windows Update. For more info, contact your organization’s support person.
Microsoft Windows Update Overview, All You Need To Know
Windows Update is a free computer service provided by Microsoft that provides Operating System (OS) patches and service packs to computers running the many versions of Microsoft Windows.
These updates are either enhancements or corrections to OS features, or security updates meant to protect your system from malicious attacks and malware.
Reliability, security and performance are the the most important reasons that all computers running MS Windows should use Windows Update.
An option called Microsoft Update can be configured in this service to also provide updates for several other Microsoft software applications, such as the MS Office suite or the latest Internet Explorer browser.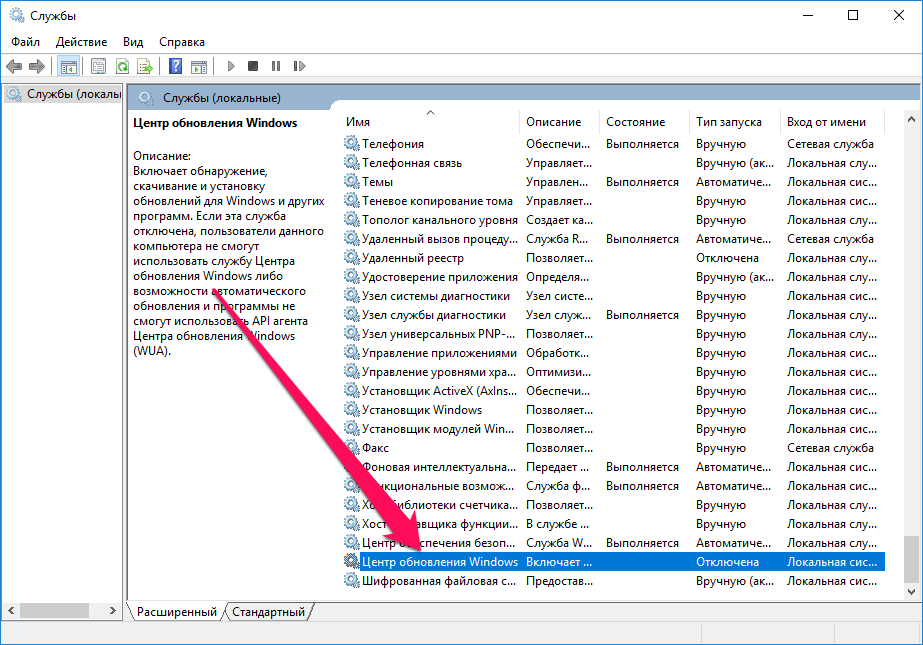
Windows Update Details
Windows Update always downloads these vital updates automatically. But, you can set up the service to install all or some of the updates as they are received, or to let you review the pending updates before you decide on which to install. Windows Update will provide a Windows PC with:
Upgrades are different from updates, in that upgrades are new versions of application software, or of the OS itself. Minor version upgrades may be available from Microsoft through Windows Update, but major version upgrades would likely involve a new software purchase, perhaps at a lower upgrade price.
The Microsoft Download Center is a website that contains all the elements of the Microsoft software updating, upgrading, and downloading programs that are both necessary and useful for the continuing operation of your Windows operating system.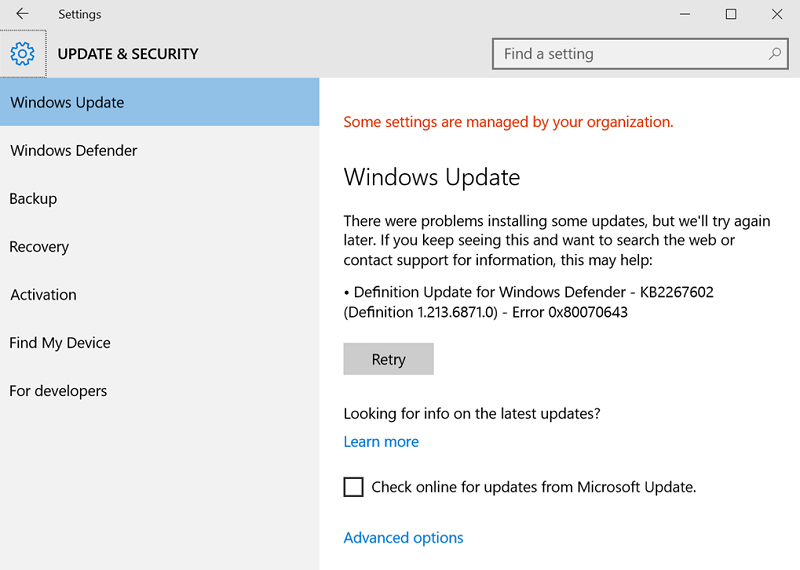
The web site contains sub-sites for:
Note: Microsoft started to push updates via its Microsoft Update Catalog website recently. Updates offered on the site are downloaded and installed manually.
Timeline for Windows Updates
Patch Tuesday, the second Tuesday of every month, is the day that security updates are globally distributed via Windows Update and the Internet. Emergency security updates, however, may be distributed any time it is deemed necessary because of a newly discovered exploit that targets MS Windows.
The Internet is the preferred avenue of distribution for Windows Update to PCs, but Microsoft also provides other means for updates to be received by computers with no Internet connection.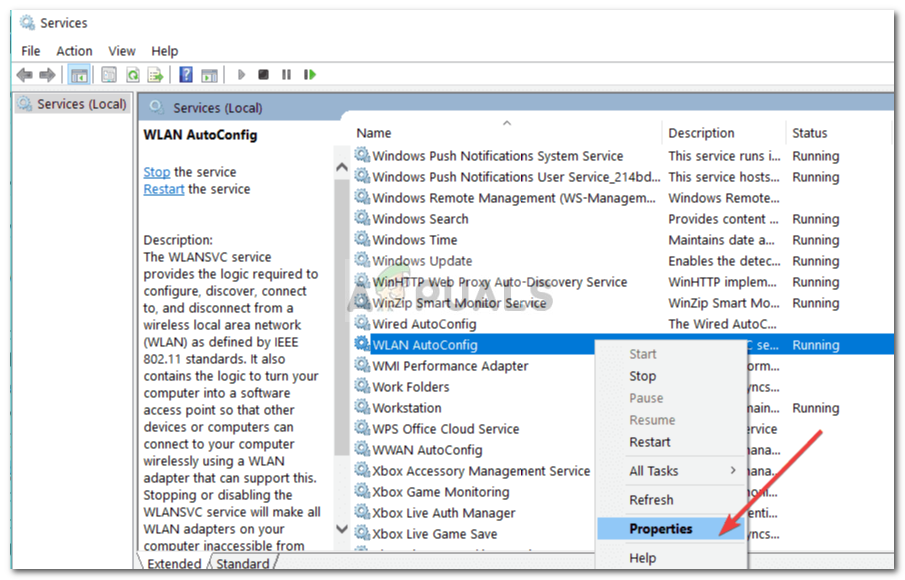 However, the PC interface controlling receipt of distributions is different for the various versions of Windows:
With any OS before Windows Vista, an update that required a PC reboot would display a dialog box every few minutes which would request that the machine be rebooted.
In Windows Vista and Windows 7, the same dialog box allows entry of a time period, up to four hours, before another dialog box appears — however, some updates that require a reboot may create a displayed countdown, at the end of which the computer will reboot no matter what the current user on the PC is doing, causing possible problems if data is not saved or the user is in the middle of a game.
Tip: It is possible to prevent the forced shutdown manually with the command shutdown –a in the Windows command line.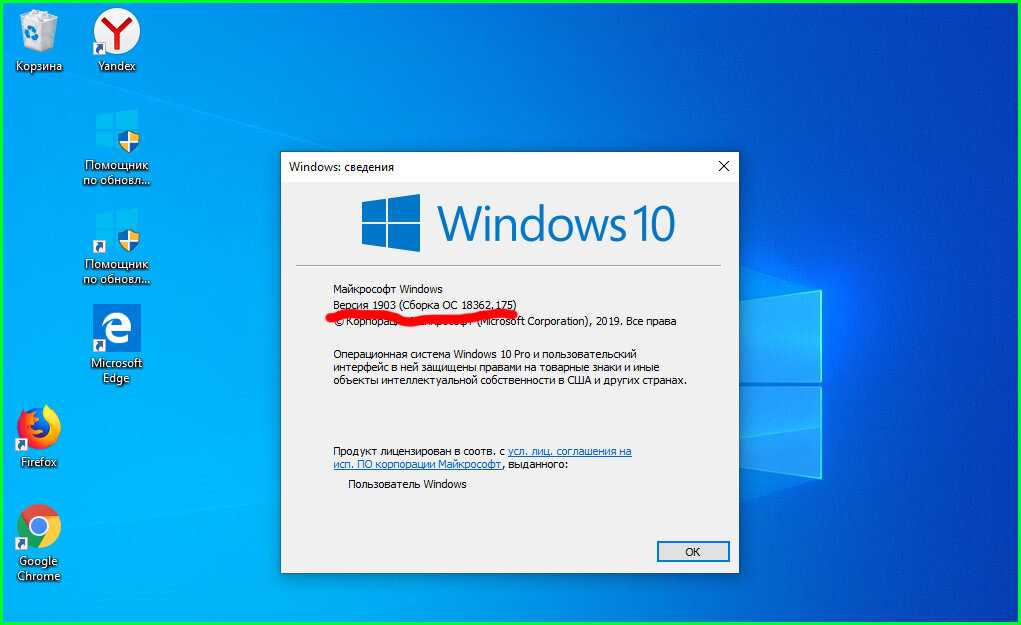
If there is an unexpected PC shutdown in the middle of an update download, Windows Update makes use of a feature of Windows system files called Transactional NTFS to enable the system to recover cleanly and to ensure that partially loaded updates are fully loaded before being applied.
Windows Update Levels
There are three levels Of Window Updates: Optional, Recommended, and Important.
Optional Updates, are, of course, optional, that a user can review, and choose to install or not to install. Included are:
Recommended Updates are those enhance the computing OS experience, improving performance.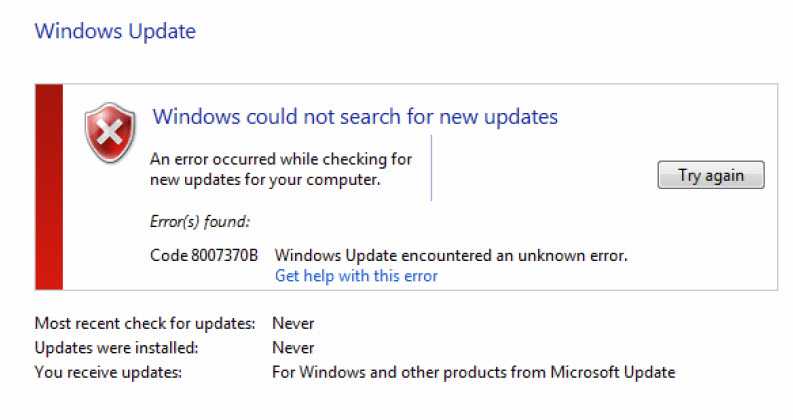 Included are:
Important updates are oriented more toward security and reliability. Included are:
Options can be set to download and install automatically both the Important updates (set as a default) and the Recommended updates — with Windows XP, however, only the updates that are classified High-Priority will be downloaded and installed automatically.
Cumulative Updates
Microsoft started to push out so-called cumulative updates with the release of Windows 10. The company switched to a similar system on Windows 7 and 8 in 2016.
On Windows 10, PCs are assigned to a servicing channel which determines the updating procedure.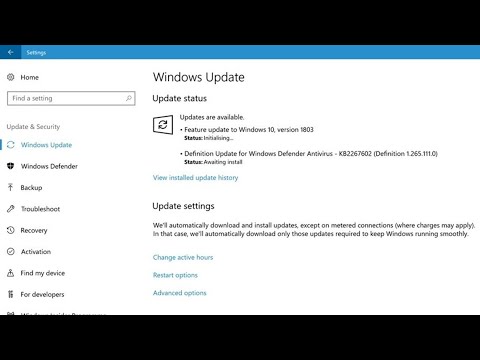 Home versions, and all unmodified Pro, Education and Enterprise versions are assigned to the Semi-Annual channel.
Current Terminolog:
Previous Terminology:
On Windows 7 and Windows 8, two update packages are provided each month:
| Update | Classification | Contents | Includes IE | Not applicable | Release |
| Security Monthly Quality Rollup (aka the Monthly Rollup) |
Security Updates | New security fixes + non-security fixes from latest Preview Rollup + all previous Monthly Rollups | Yes | If a later Monthly Rollup is installed | Update Tuesday (2nd Tuesday) |
| Security Only Quality Update (aka the Security Only update) |
Security Updates | New security fixes(not including IE fixes) | No | If a Monthly Rollup (current or later month) is installed | Update Tuesday (2nd Tuesday) |
| Preview of Monthly Quality Rollup (aka the Preview Rollup) |
Updates | New non-security fixes + all previous Monthly Rollups | Yes | If a later Monthly Rollup or Preview Rollup is installed | 3rd Tuesday |
| Cumulative Security Update for Internet Explorer | Security Updates | Fixes for IE11 (IE10 on Windows Server 2012) | Yes | If a Monthly Rollup (current or later month) or IE Update (later month) is installed | Update Tuesday (2nd Tuesday) |
Disabling Windows Update
If you want to disable Windows Update, you can disable the service for the PC, or by user-name.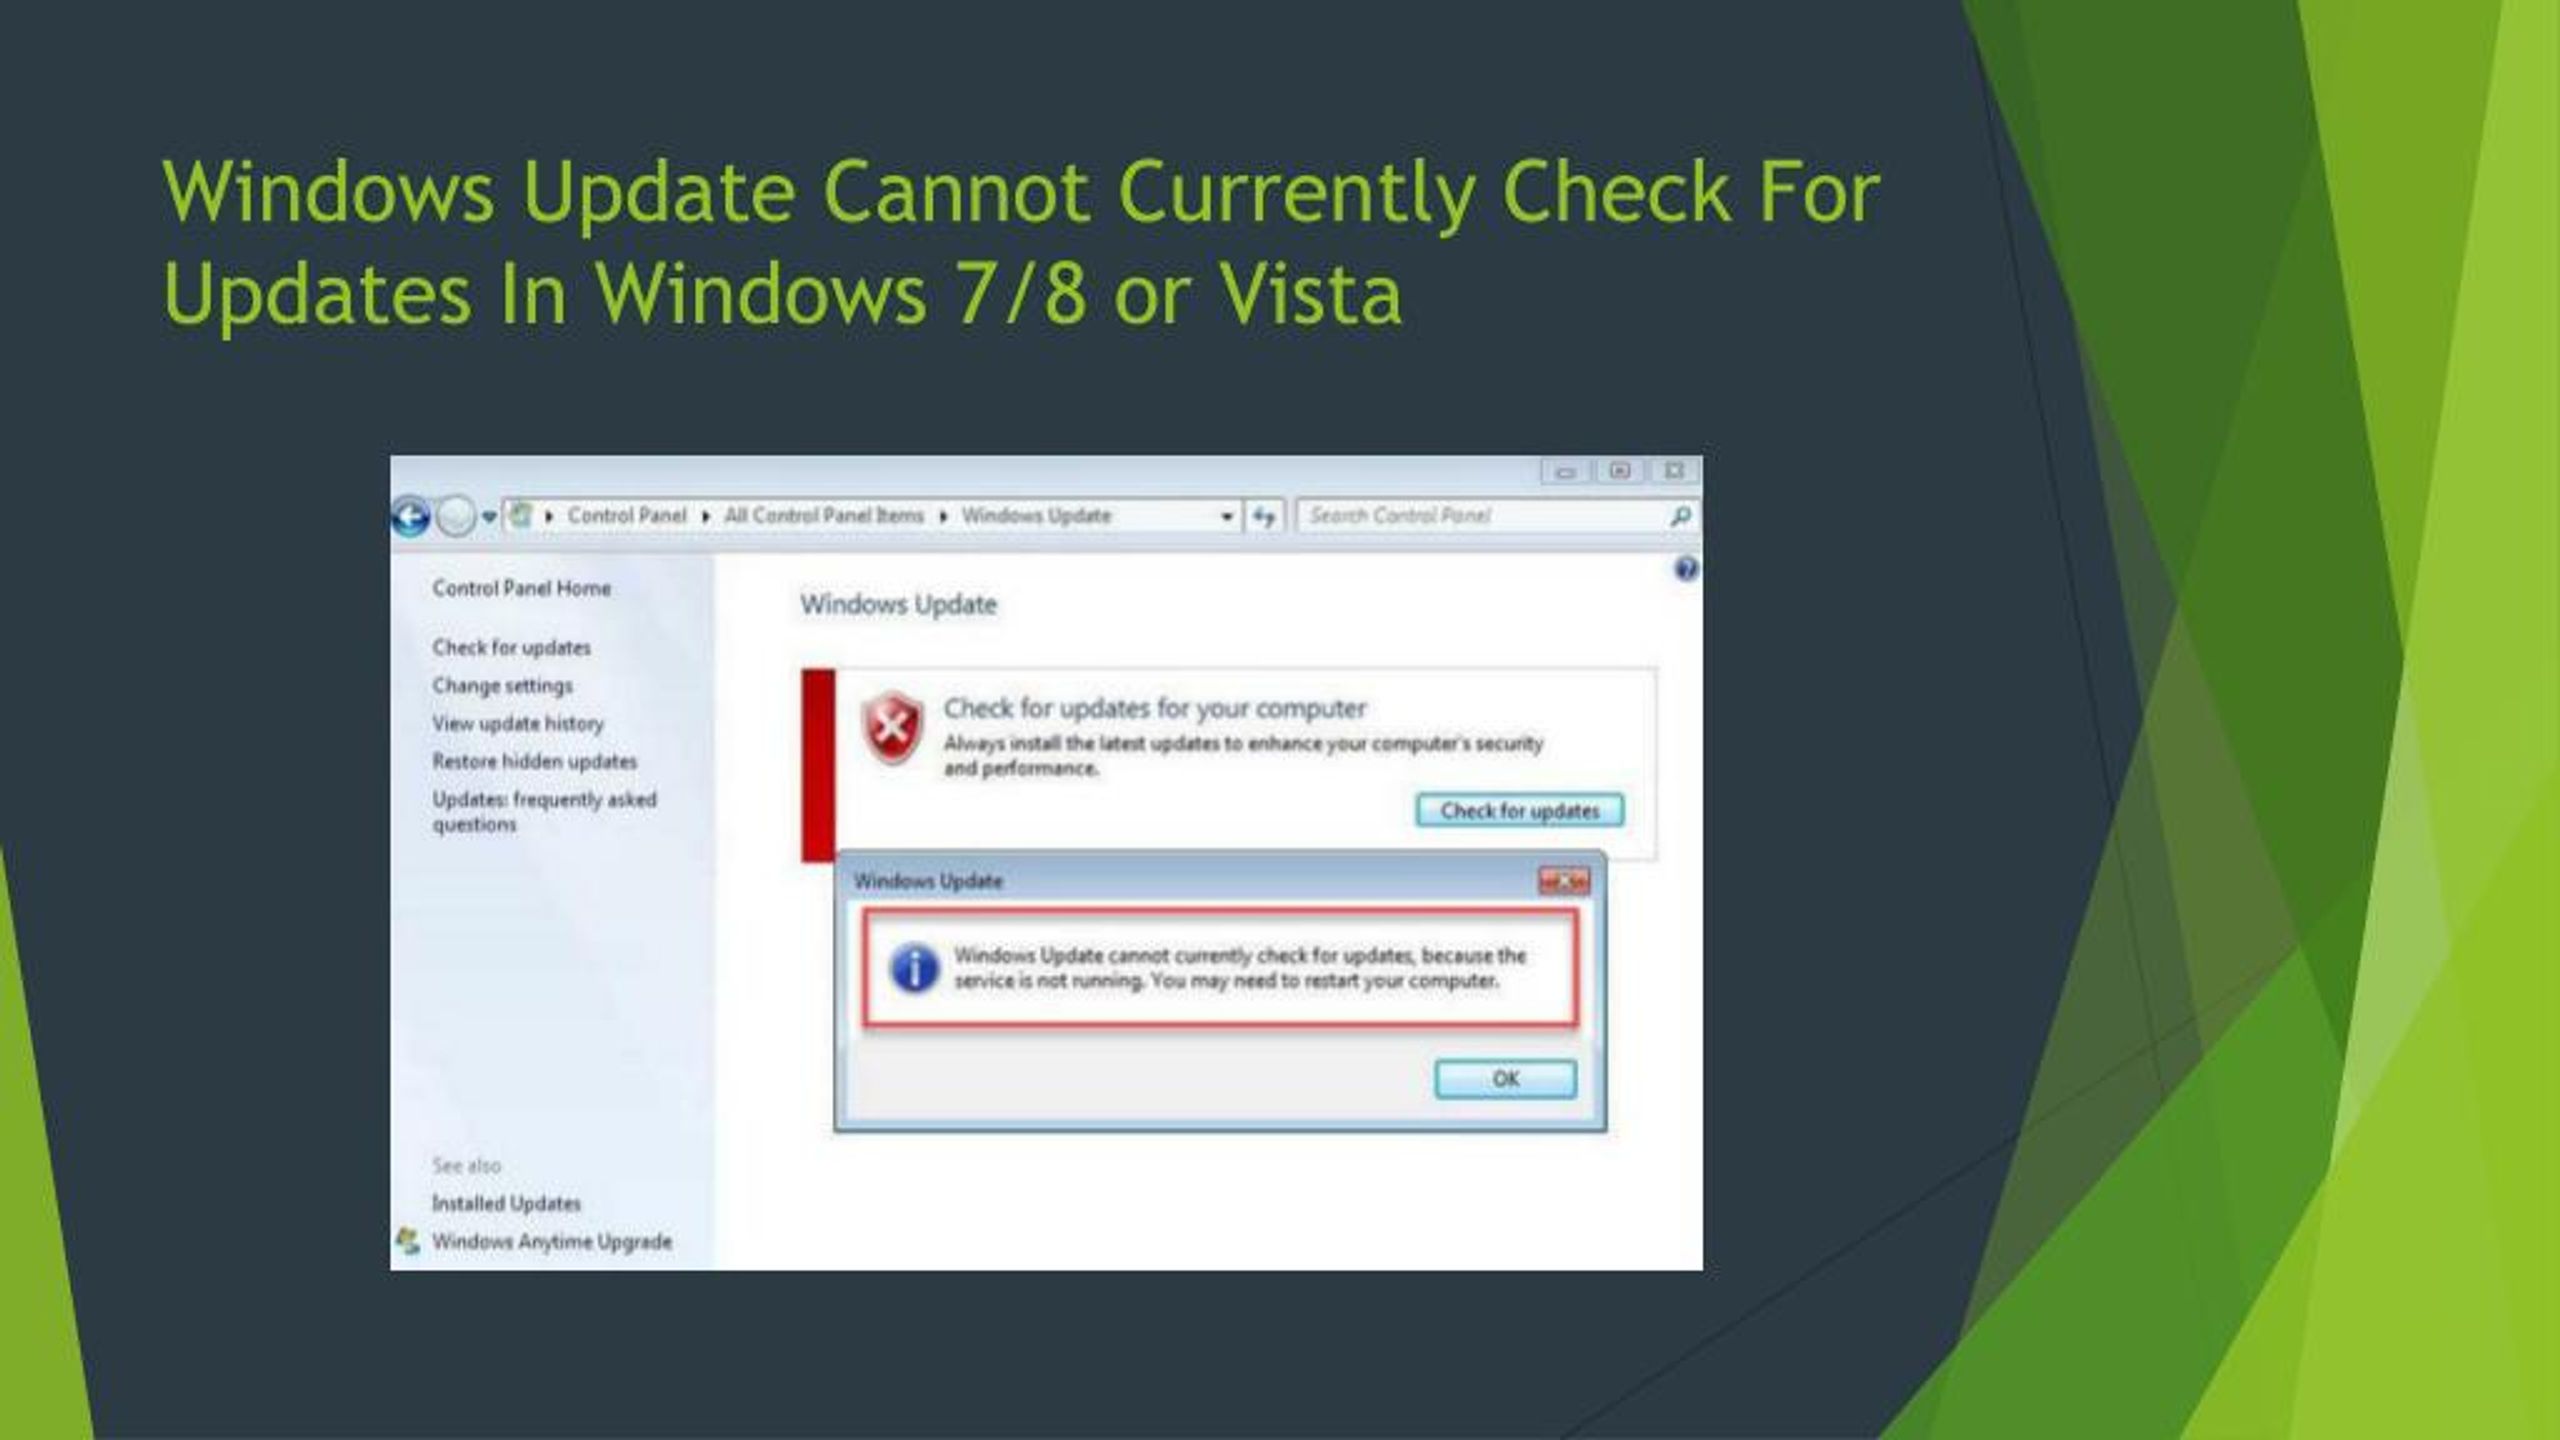 For an entire PC, the Group Policy Editor is used to disable Windows Update in the general User Configuration.
For individual users, REGEDIT is used to disable Windows Update in a User Registry key:
The following tools and articles may also be useful:
After Updates
Once you have made sure that updates work fine and don’t cause any issues, you may want to run clean up operations to remove files that are no longer needed. This may free up Gigabytes of disk space depending on the update.
Troubleshooting Windows Update Errors
Windows Update is an essential maintenance element for the optimum performance of your computer.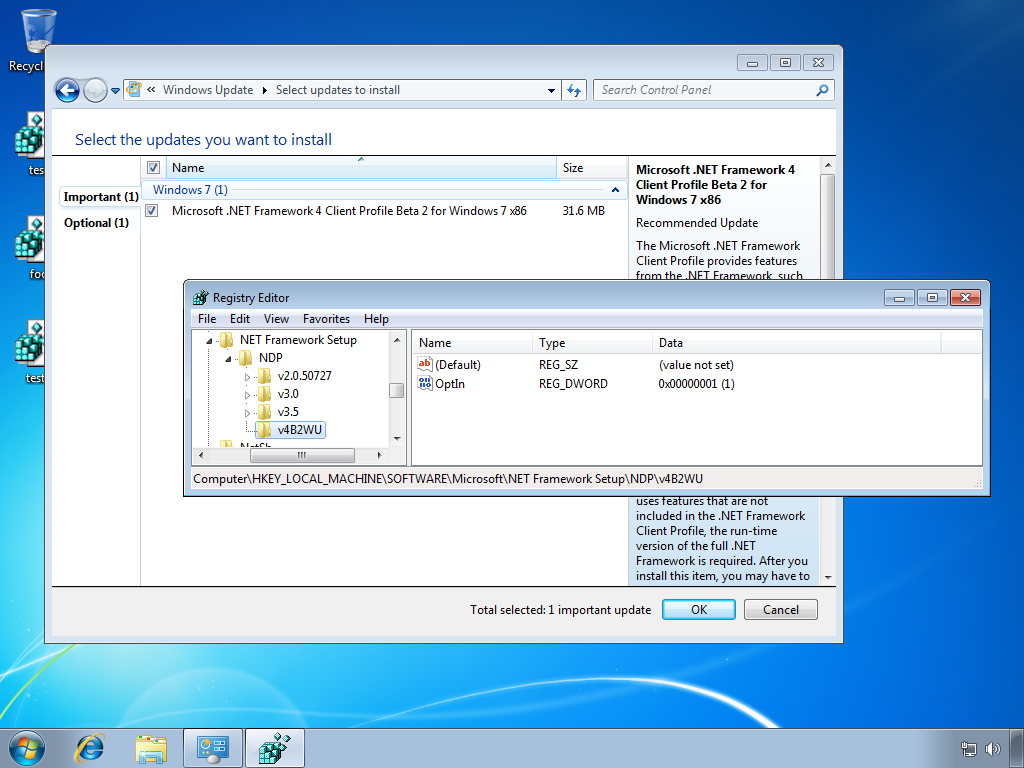 However, errors can occur during the normal operation of this important service. Here’s where we describe what measures you can take if Windows Update stops working on your computer system.
Measure #0: Check Date and Time
Make sure the date and time of the operating system is set correctly. Simply move the mouse cursor over the time in the system tray area to verify that.
Windows Update may not work properly if the date or time is not set correctly.
Measure #1: Check Internet Connection
Windows Update depends a great deal on Internet connectivity. First step is to see if you have full Internet connectivity by connecting to several web sites — if able to do so, the next step is to check the reliability of the connection, by checking email, signing on to forums, and looking at videos. If connection seems reliable, wait fifteen minutes and try running Windows Update again.
Measure #2: Start Supporting Services
Windows Update depends on several other services that also must be running on your PC.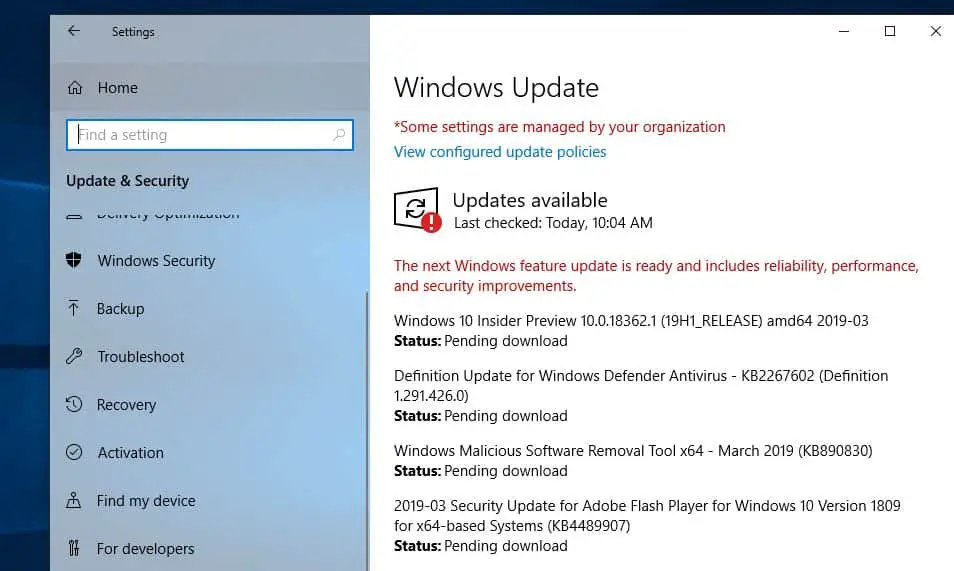 Check for these other services by clicking on Start, typing SERVICES.MSC, and pressing ENTER. Check in the display of services at the right for the names:
For each one whose Status is not Running, double-click to make the General tab appear — Startup Type should be Automatic. Click the Start button to change the service to a Running status.
Measure #3: Check Firewalls
The next measure to make sure the Windows Firewall is running, and not a firewall from a company other than Microsoft. To ensure continuous firewall protection, turn on the MS Firewall before turning off any other firewall.
Now, try running Windows Update again.
Measure #4: Check Anti-Virus
Start the Security Center applet in the Control Panel, and turn off or disable the anti-virus application listed under either ‘Virus Protection’ or ‘Malware Protection’ section. Try running Windows Update again, and then immediately go back to the Security Center and enable the anti-virus application that had been disabled. Be careful with this measure — temporarily turning off your anti-virus application may allow Windows Update to start up, but, at the same time, doing so will leave your PC vulnerable.
Measure #5: Check Accelerators
Check to see if your PC has any Internet accelerators installed to increase the performance of Internet access. Such software can interfere with the operation of Windows Update. Consult the documentation for those accelerators to either disable or uninstall the software. Check the operation of Windows Update again.
Measure #6: Reset the Windows Update Folder
A corrupt file within the Windows Update distribution folder may be causing a problem with Windows Update.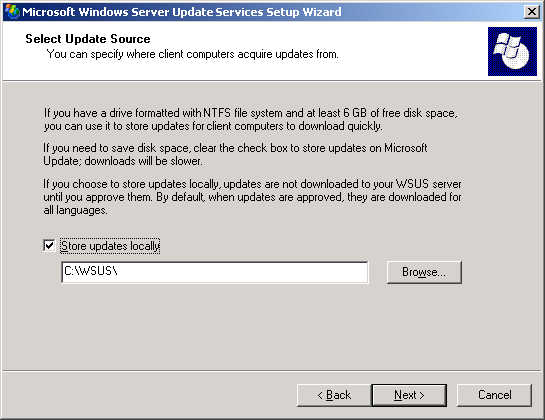 The solution is to reset the folder.
Try to run Windows Update — if unsuccessful, rename the SoftwareDistributionOLD folder back to its original name of SoftwareDistribution.
Measure #7: Check System Files
System files may have become corrupted, and you may need to scan the Windows system files to see if they are still correct and accurate.
Try running Windows Update when your PC comes back up.
Measure #8: Verify BITS Files
BITS stands for Background Intelligence Transfer Service, and these files are essential to the functioning of Windows Update. It is possible the BITS files on your PC may be corrupted. You can download a BITS repair tool at the MS website:
32-bit Windows
64-bit Windows
Once you’ve downloaded and installed the BITS Repair Tool on your PC, reboot and let the tool run.
Measure #9: Check Support Sites
Check these two Microsoft support websites for descriptions of problems that may be similar to yours, with possible solutions.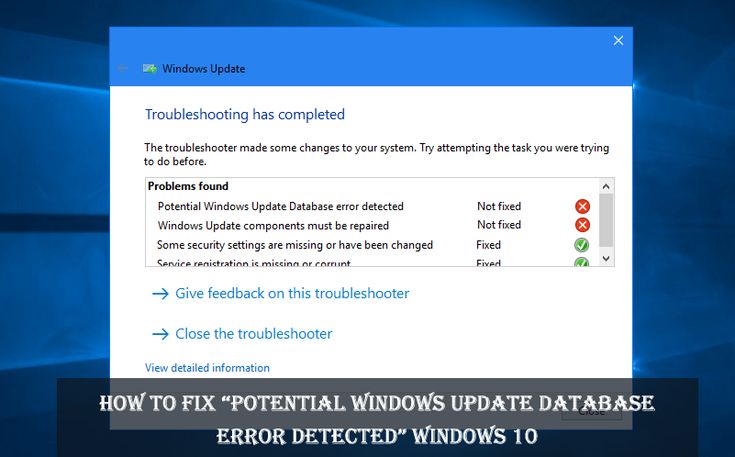
FAQ
Problems
Measure #10: System Update Readiness Tool
Microsoft has released the System Update Readiness Tool for its operating systems that aim to repair issues related to the operating system’s automatic update functionality.
If you are experiencing issues, download the tool for your system and run it afterwards to resolve issues that you may experience.
If this last measure does not help you to restore Windows Update to its proper functioning, then contact MS Customer Support.
Update: Microsoft released a new Windows Update repair tool that you can download as well to fix update related issues. Check out Fix Windows Update issues with Reset Windows Update Agent as well.
Helpful Windows Update Videos
Other Update Tools
Windows Update takes care of the specific updates to the Windows operating systems, and those to other Microsoft software applications as well — but what about all those other software applications that you have installed on your PC that have just a great a need for up-to-date updates?
Here are several update tools that will help you take care of the need for updates by your other software applications.
Windows Update MiniTool
The free program is a third-party downloader for Windows Updates. It enables you to query the Windows Update server for updates, and download updates selectively.
CTUpdate (WSUS Offline)
Supports all Microsoft operating systems and languages. Users just need to select their operating system and language from the list to download all updates for it. It is optionally possible to create an ISO image or copy the data to an USB device instead of a hard drive. The patches can then be applied once everything has been downloaded.
Windows Update Downloader
Only for pre-Windows 7 operating systems. WUD allows you to download all of the current Windows Updates using a simple interface. All of the updates are contained in Update Lists (ULs) which allows you to choose which updates you want for which version of Windows.
UpdateStar
Update Star is a freeware application that helps you keep track of all the software installations on your PC, checking that the latest patches, fixes, and updates are downloaded for whatever is installed on your PC.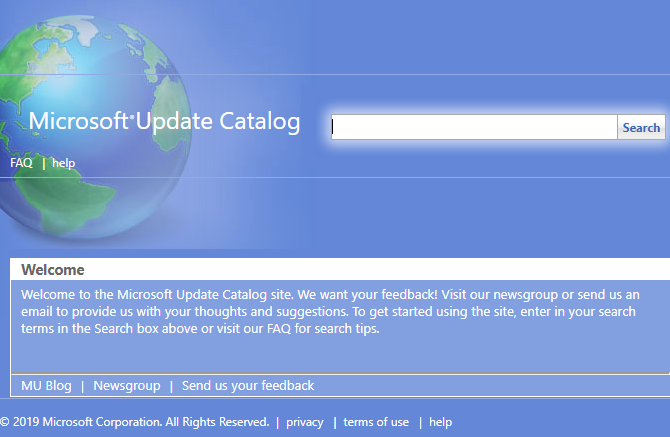 This software does not download anything, though.
Software-Uptodate
This monitoring tool checks with an online database to see what’s current for updates for many software packages, and displays a notification when there is an available update (although it does not do the download itself).
Personal Software Inspector
This monitoring software, from Secunia Company, uses a database containing information on over four thousand software applications to inspect your system for weak spots, such as missing critical patches for software installed on your PC. The software, however, does not download anything.
Additional Resources
See also:
Summary
Advertisement
Solved: Windows Update Service Not Running
Windows Update is a Microsoft service for the Windows family of operating systems that automates downloading and installing Windows updates over the internet. The service will check for updates for Windows as well as other critical updates such as antivirus products.
Many users have reported problems with this service. When Windows Update runs, users are receiving an error message that says, «Windows Update cannot currently check for updates because the service is not running.» Since it is not running properly, users are unable to check for updates and install the required updates.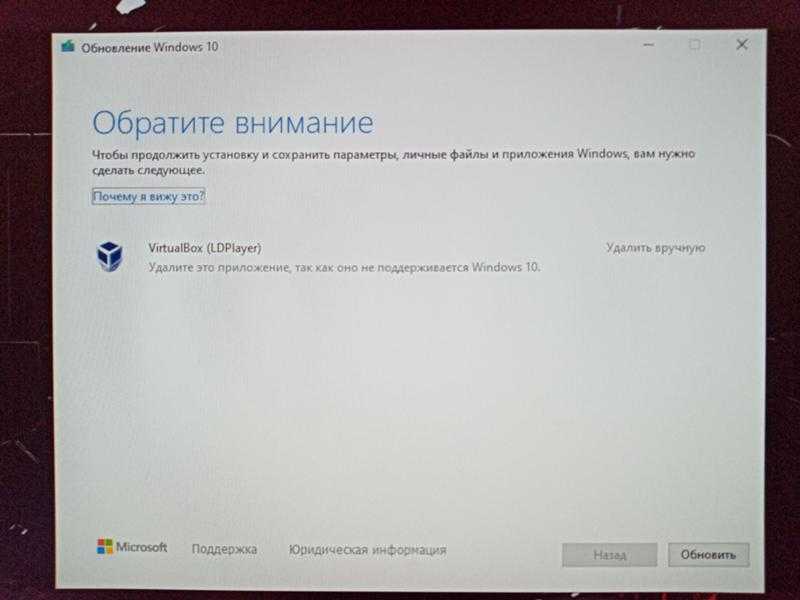
If the Windows update service is not running properly this can present major problems because it can expose your laptop or computer to potentially harmful viruses or prevent your operating system from functioning optimally. Thankfully, you should be able to find a simple solution to fix the problem. Just follow the steps below to find the right solution if you find your Windows Update stuck.
Follow the steps below for each solution in order until you find the solution that works for your device.
Method 1 — Run Update Troubleshooter
Windows has a built-in troubleshooter that can run a diagnostic and help you fix issues with service. This should be your first option if you encounter issues including problems with Windows 10 update. If you choose this option, just follow the steps below to attempt the solution.
Method 2 — Check for malware
It is possible that you are running into problems due to malicious software on your device. If that is the case, then the solution is to run a scan on your device to detect malware and delete it.
Microsoft offers a Malicious Software Removal Tool that you can download and run on your own device. Once you have downloaded and run the tool on your computer, try to run the program again and see if the problem is fixed.
Method 3 — Check associated services
The problem might be due to the fact that associated services are not running.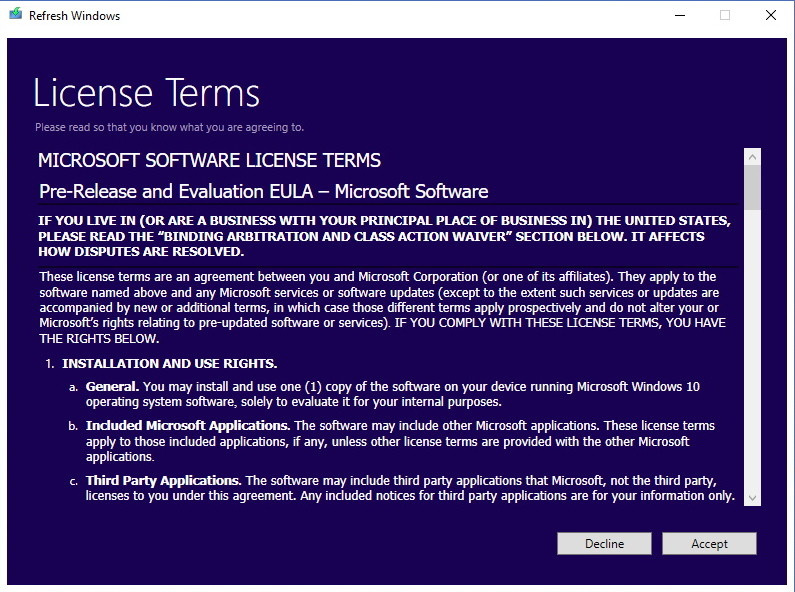 You will need to restart those services to fix the problem by following the steps below.
Following this procedure should allow you to restart the program and correct the error. We note that the procedure for solving the Windows Update problem may vary slightly from above for different versions of Windows.
Method 5 — Clear Windows SoftwareDistribution Folder
The Software Distribution folder stores temporary files that can potentially prevent the service from running properly if those files are corrupted. You can delete the corrupted files to correct this problem.
Method 6 — Upgrade your drivers
The error may be occurring due to the use of an incorrect or outdated device driver. Simply check for the latest device driver and install them on your device to fix this error.
If you’re looking for a software company you can trust for its integrity and honest business practices, look no further than SoftwareKeep. We are a Microsoft Certified Partner and a BBB Accredited Business that cares about bringing our customers a reliable, satisfying experience on the software products they need.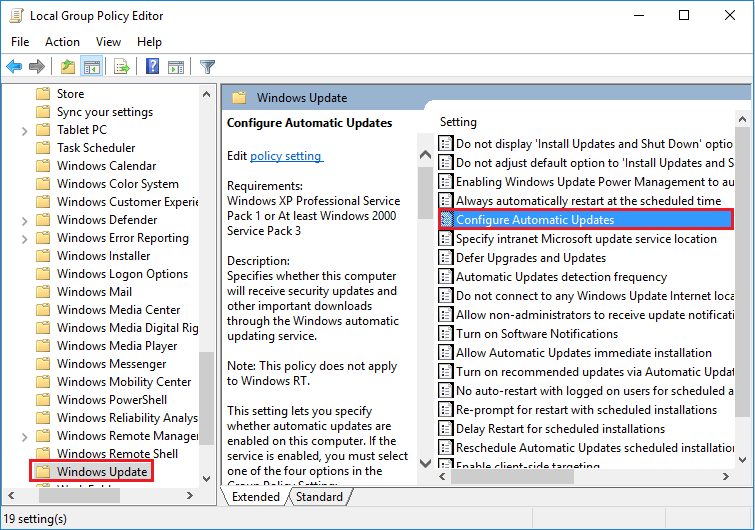 We will be with you before, during, and after all the sales.
How to reset Windows Update components on Windows 10
Keep updating
Here are a few techniques to reset the Windows Update components to fix stuck updates trying to download and install on Windows 10.
Mauro Huc
@pureinfotech
Windows Update is an essential component of Windows 10, as it provides the ability to download and install the latest updates with bug fixes, security patches, and drivers. Also, it is the mechanism to download new feature updates and preview builds. However, there will be times when your device may not download or install updates because of a specific error message, Windows Update not connecting to the Microsoft servers, and other problems.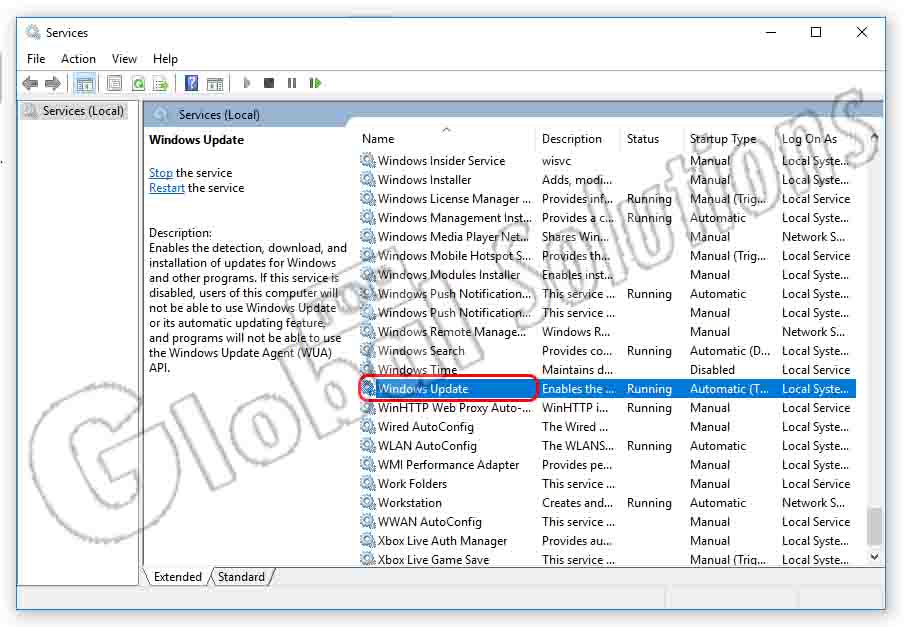
Typically, users may encounter this type of problem when the Windows Update agent-related services stop working, Windows 10 has an issue with the update cache, or some components get corrupted. You can reset Windows Update on Windows 10 to fix most problems in these situations.
This guide will teach you how to reset the Windows Update components using the “Windows Update Troubleshooter” utility. Also, you will learn the instructions to use Command Prompt to fix Windows Update manually to get security patches, drivers, and features downloaded again on your computer. However, before using the Command Prompt option, use the instructions to manually install the most recent update, Service Stack Update (SSU), and repair system files.
Reset Windows Update using Troubleshooter tool
To reset Windows Update using the troubleshooter, use these steps:
Once the computer restarts, try to update Windows 10 one more time, and now it should work as expected.
Fix Windows Update installing latest update manually
To install an update manually, which can help to fix problems with Windows Update on Windows 10, use these steps:
Once you complete the steps, the device should have the latest update installed. The update should have also fixed the problem with Windows Update. You can check by clicking the Check for updates button on the Windows Update settings page.
Fix Windows Update installing latest Servicing Stack Update (SSU)
To make sure the computer has the most recent Servicing Stack Update to fix Windows Update problems, use these steps:
After you restart the computer, you should now be able to download and install the update using the Settings app.
Fix Windows Update repairing corrupted system files
To fix the system files using the Deployment Image Servicing and Management (DISM) and System File Checker (SFC) tools to fix Windows Update problems, use these steps:
After completing the steps, the Windows Update components should start working again, and you can check for updates to verify.
Reset Windows Update using Command Prompt
To reset Windows Update manually using Command Prompt on Windows 10, use these steps:
Once you complete the steps, Windows Update should have reset, and it should be working again on your Windows 10 device.
You can also use the above instructions to fix the update problems when Surface Pro 8, Pro 7, Laptop 4, Studio, or any other Surface cannot seem to download a new firmware update.
Or subscribe with this link to get emails weekly
We hate spam as much as you! Unsubscribe any time
Powered by follow. it (Privacy), our Privacy.
[SOLVED] One of the Update Services is not Running Properly in Windows Update
By Kevin Arrows March 31, 2021
4 minutes read
Kevin is a certified Network Engineer
One of the Windows update services might not run if an application on your system (like StopUpdates10Guard) is hindering the operation of the update modules of your system. Moreover, the wrong configuration of the Windows Update or BITS services may also cause the error under discussion.
The issue arises when the Windows update fails to check for the latest available updates with the following message:
“Error encountered. One of the update services is not running properly, but you can try to run a troubleshooter to fix the problem. Go to Start button > Settings > Update & Security > Troubleshoot, and then select Windows Update.”
Windows Update: One of the Update Services is not Running Properly
But when the user launches the troubleshooter to fix the Windows Update services issue, the troubleshooter does not work.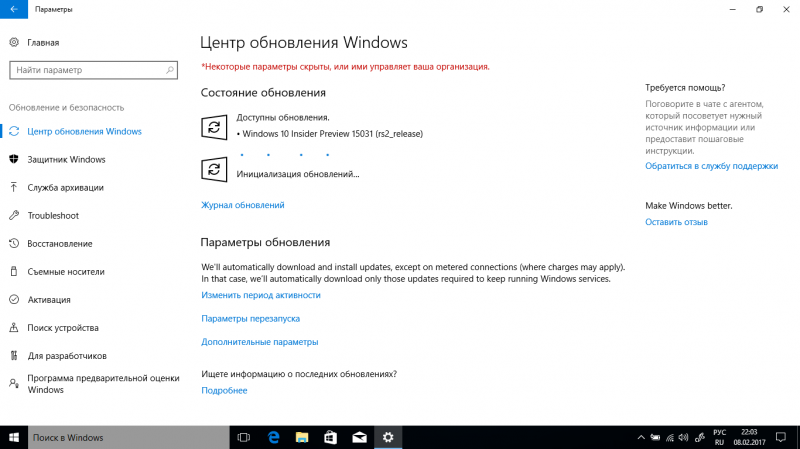
Before moving on to fix the Windows update service issue, check if you can update your system on another network. For example, if you are using a Wi-Fi connection, then check if trying an ethernet connection resolves the issue. In some cases, the users reported that the issue was occurring on a cellular-based or metered network, so, make sure that is not the case with you.
Solution 1: Set Startup Type of the BITS and Windows Update Service to Automatic
The Windows update issue may arise if any of the essential update services are in an error state or disabled. In this context, setting the Startup type of these Update services (i.e., BITS and Windows Update service) to Automatic may solve the problem.
Solution 2: Uninstall the Conflicting Applications
You may encounter the issue at hand if an application on your system is hindering the operation of the update services (especially, the applications that are used to disable automatic Windows updates of a PC). In this case, removing the conflicting applications (StopUpdates10Guard is reported to cause the current issue) may solve the problem.
The StopUpdates10Guard application was reported by some users to create the issue.
If StopUpdates10Guard is shown in the Startup tab of the Task Manager but not shown in the Apps list, then you may download and install the StopUpdates10Guard application.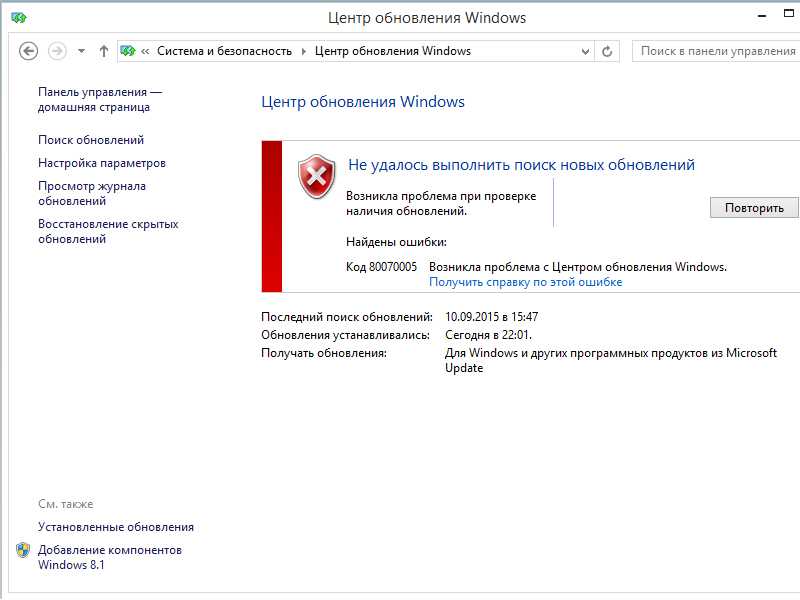 Then remove the application through the Apps & Features.
Solution 3: Update the BIOS and Drivers of Your System to the Latest Builds
The update services issue may emerge if the BIOS and drivers of your system are outdated or incompatible with the OS modules. In this context, manually updating the BIOS and Drivers of your system may solve the problem.
Solution 4: Delete the Software Distribution Folder and Manually Update the System
The update services issue may arise if the Software Distribution folder is corrupt. In this context, deleting the Software Distribution folder and manually updating the system may solve the problem.
Delete the Software Distribution Folder
Manually update the System
If the issue persists, then performing an in-place upgrade (download the Windows 10 ISO and then launch its setup as administrator) of the Windows of your system may solve the update issue.
Tags
Windows Update Error
Windows Update FAQ
Note: If you need information about updating Microsoft Office, see Install Office updates.
With Windows 11, you choose when and how you get the latest updates to keep your device healthy and secure.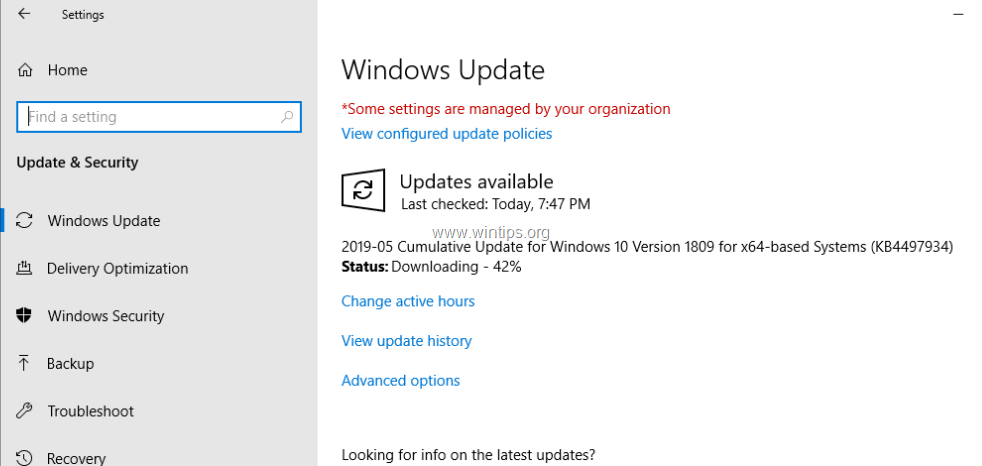 Installing updates gives you the latest software fixes and security enhancements to help your device run efficiently and stay protected. In most cases, restarting the device completes the update. Don’t forget to check your device’s electrical connection if you know you need to install updates.
If you have any other questions about updating Windows 11, you might be interested in the following questions:
If you’re only looking for information about updating Windows 11, you’ll find answers to many of your questions here:
When Windows 11 version 22h3 is ready for your device, it will be available for download and installation from the Windows Update client page under Settings. Choose the time that works best for installation. You will then need to restart your device and complete the installation. The device will then run Windows 11 version 22h3.
To manually check for the latest recommended updates on your Windows 11 device, click > Settings > Windows Update Client Component > Check for updates .
Check for updates
Some updates may not be available on all devices at the same time; we monitor the readiness and compatibility of updates.
To stay up to date, click > Settings > Windows Update Client Component > update .
Check for updates
If a feature update is available for your device, it will appear separately on the Windows Update page. To install it, select Download and install now .
If you are having problems installing updates, try the following steps.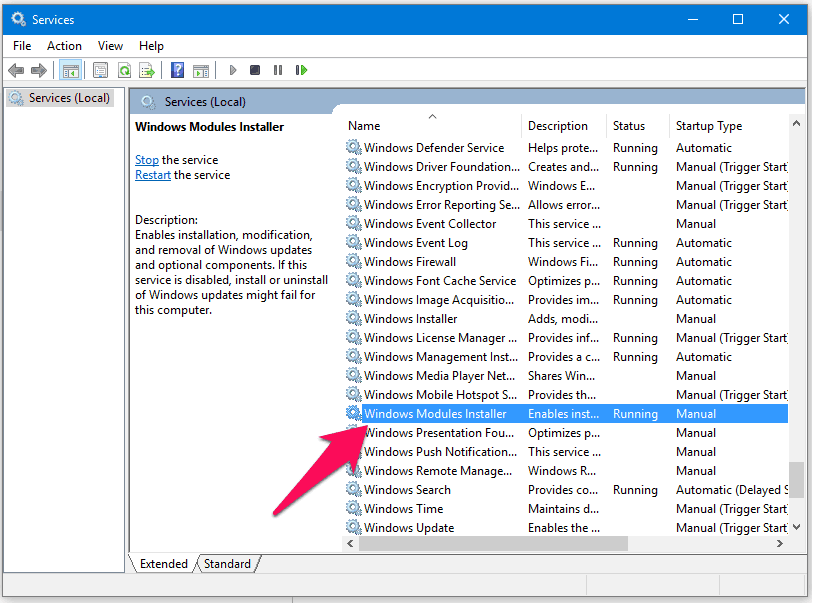
The time it takes to download updates depends primarily on your Internet connection speed, network settings, and update file size. Make sure your device is connected to a power outlet and the Internet to reduce the time it takes to download updates.
You cannot completely disable updates. Because they keep your device safe and secure, no matter what update options you set, they will eventually need to be downloaded and installed. Here’s how you can temporarily pause the download and installation of updates. Please note that once you reach the pause limit, you will need to install the latest updates before you can pause downloading and installing updates again.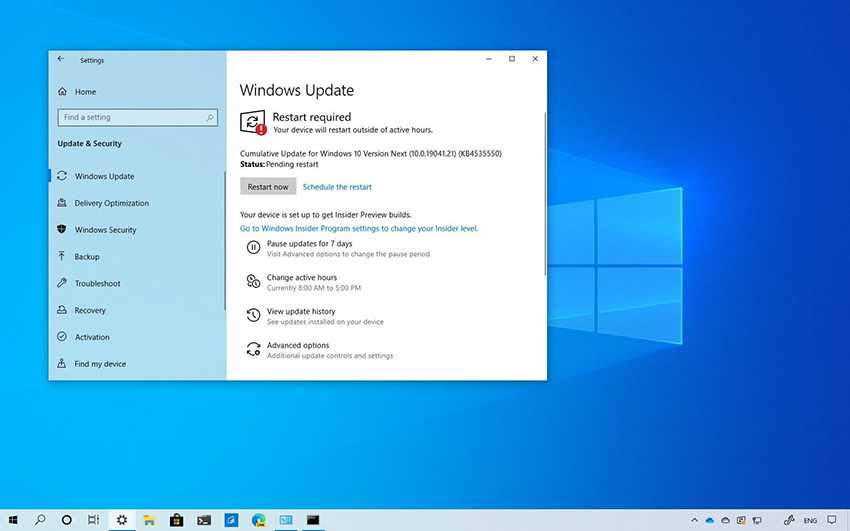
In Windows 11, select » > » > Windows Update client component . Next to , the Pause Updates button, select your preferred pause length.
The device must be rebooted to complete the update installation. Windows will try to restart the device when you are not using it. If this is not possible, you will be prompted to schedule a restart at a more convenient time. You can also schedule a restart at any time by doing the following:
You can set the active period so that the automatic restart for updating occurs only when you are not using the device. Get updates when you’re not on a computer with an active clock in Windows.
Try deleting unnecessary files, apps you don’t use, or moving files to another drive, such as an external USB drive or OneDrive. For more tips on freeing up disk space, see «Free up disk space» in Windows.
When not in use, devices such as laptops and tablets are recommended to be connected to the mains. Thus, if updates are installed before or after your activity period, the device will receive enough power to install. Windows updates consume no more energy than other standard system processes.
The list of installed updates and their installation time can be viewed in the update log.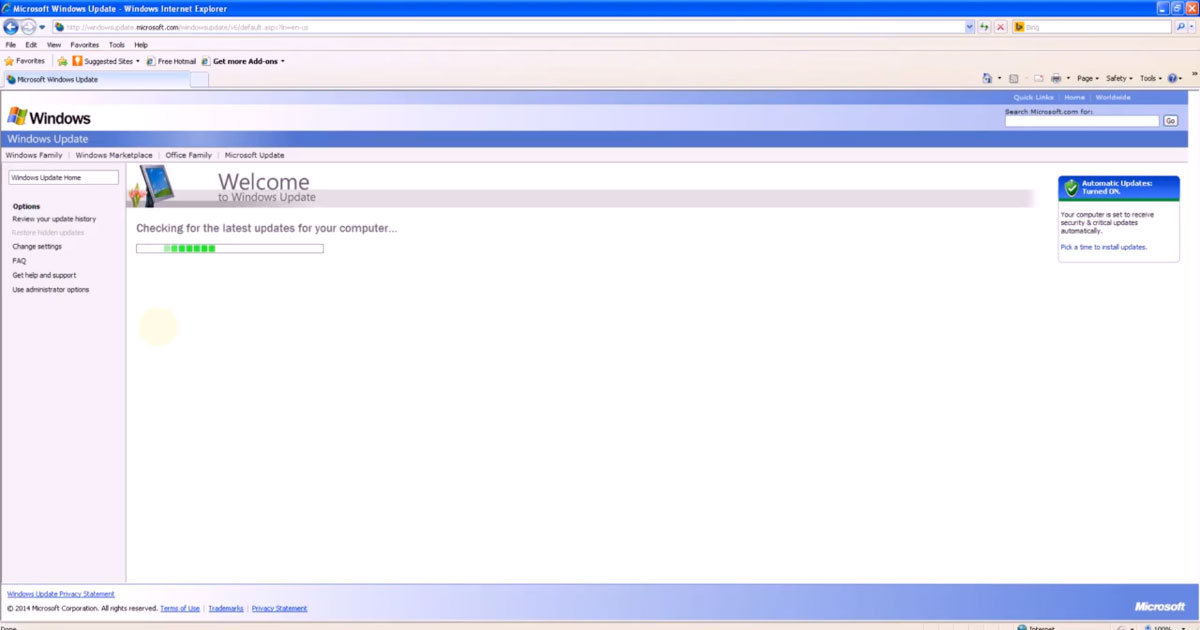 This list can also be used to uninstall certain updates, but it’s generally not a good idea to uninstall them without a good reason.
Select Options > « > Windows Update Client Component > Update» .
Viewing the update history
We do not recommend uninstalling installed updates. However, if necessary, this can be done in the update log.
Feature updates are typically released twice a year and contain new features and functionality, as well as potential security updates and fixes. Hotfixes are released more frequently and mostly contain minor security updates and fixes. Windows provides both types of updates to devices through Windows Update.
To verify that the device is up to date, open the menu > > Windows Update client component and view the update status and available updates.
Check for updates
To find out which version of Windows you’re using, see How do I find out my version of the Windows operating system?
Reserved storage will be enabled for new devices pre-installed with Windows 11 or devices that have had a clean installation of Windows 11 devices.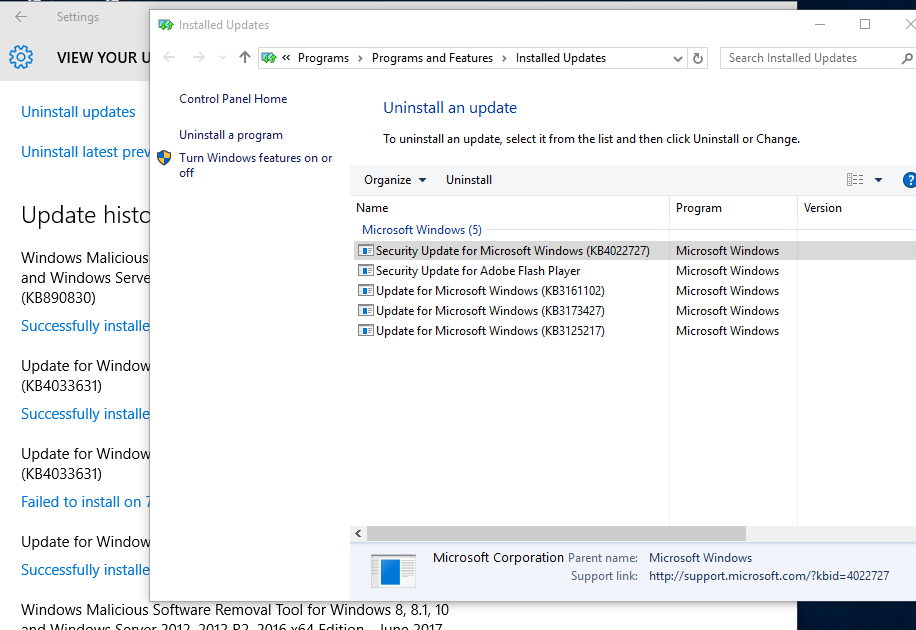
Note: If you need information about updating Microsoft Office, see Install Office updates.
With Windows 10, you choose when and how you get the latest updates to keep your device healthy and secure. Installing updates gives you the latest software fixes and security enhancements to help your device run efficiently and stay protected. In most cases, restarting the device completes the update. Don’t forget to check your device’s electrical connection if you know you need to install updates.
If you have any other questions while updating Windows 10, here is some more information that you might find helpful.
The time it takes to download updates depends primarily on your Internet connection speed, network settings, and update file size.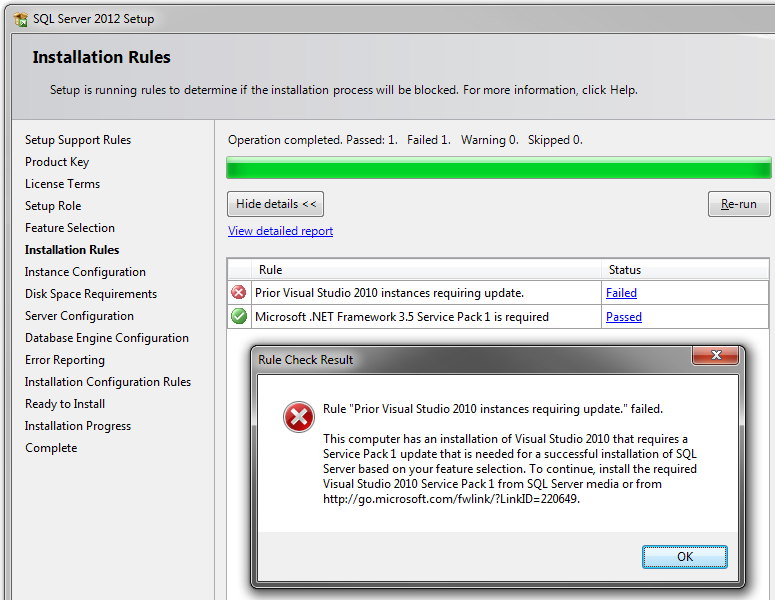 Make sure your device is connected to a power outlet and the Internet to reduce the time it takes to download updates.
You cannot completely disable updates. Because they keep your device safe and secure, no matter what update options you set, they will eventually need to be downloaded and installed. Here’s how you can temporarily pause the download and installation of updates. Please note that once you reach the pause limit, you will need to install the latest updates before you can pause downloading and installing updates again.
On Windows 10 November 2019 Update (version 1909) or later, or on Windows version 1809 for Pro or Enterprise, select Launch Options > > Update & Security > Windows Update client component. Then choose one of the following options.
The device must be rebooted to complete the update installation. Windows will try to restart the device when you are not using it. If this is not possible, you will be prompted to schedule a restart at a more convenient time. You can also schedule a restart at any time by doing the following:
You can set the active period so that the automatic restart for updating is performed only when you are not using the device. Get updates when you’re not on a computer with an active clock in Windows.
Try deleting unnecessary files, apps you don’t use, or moving files to another drive, such as an external USB drive or OneDrive. For more tips on freeing up disk space, see «Free up disk space» in Windows.
When not in use, devices such as laptops and tablets are recommended to be connected to the mains. Thus, if updates are installed before or after your activity period, the device will receive enough power to install. Windows updates consume no more energy than other standard system processes.
The list of installed updates and their installation time can be viewed in the update log. This list can also be used to uninstall certain updates, but it’s generally not a good idea to uninstall them without a good reason.
Select Options > « > » & « > Windows Update Client Component > View Update History» .
Viewing the update history
For more information about what’s included in updates for Windows 10, see the Windows 10 update history.
We do not recommend uninstalling installed updates. However, if necessary, this can be done in the update log.
Feature updates are typically released twice a year and contain new features and functionality, as well as potential security updates and fixes. Hotfixes are released more frequently and mostly contain minor security updates and fixes. Windows provides both types of updates to devices through Windows Update.
To check if the device is up to date, open Settings > Update & Security > Windows Update Client Component and view the update status and available updates.
Check for updates
To find out which version of Windows you are using, see How do I find out my version of the Windows operating system?
Windows does not automatically enable reserved storage in any of the upgrade scenarios. It’s only enabled on new devices that are preinstalled with the Windows 10 May 2019 Update (version 1903) or later, or devices that have had a clean install.
Support for Windows 8.1 will end on January 10, 2023
Thank you for your loyalty. We want to help you prepare, and we encourage you to upgrade to a Windows 11 PC for support and protection.
More
Note: If you need information about updating Microsoft Office, see Install Office updates.
The best way to keep Windows 8.1 features up to date is to turn on automatic updates. Once automatic updates are enabled, you no longer have to search the web for updates or worry about missing critical patches or device drivers for your computer. As soon as important updates become available, they will be automatically installed by Windows Update.
Enable automatic updates
Click on the questions below about how Windows Update keeps your device up to date for answers.
Note: If your computer is connected to a network where updates are managed by Group Policy, you may not be able to change Windows Update settings. For more information, contact your organization’s technical support.
Open Windows Update. To do this, swipe in from the right edge of the screen (if you’re using a mouse, move your mouse pointer to the bottom right corner of the screen and then up) and select Settings > Change computer settings > Update and restore > Windows Update . To manually check for updates, select Check now .
The list of installed updates and their installation time can be viewed in the update log. This list can also be used to uninstall certain updates, but it’s generally not a good idea to uninstall them without a good reason.
To view the update history, open Windows Update. To do this, swipe in from the right edge of the screen (if you are using a mouse, move the mouse pointer to the lower right corner of the screen and then up) and select Settings > Change PC settings > Update and restore > Windows Update > View update history .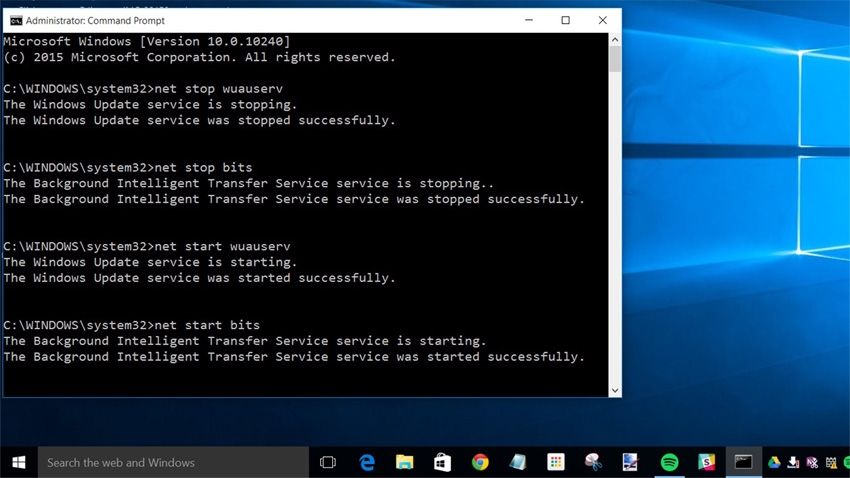
We do not recommend uninstalling installed updates. However, if necessary, this can be done in the update log.
If you are having problems installing updates, try the following steps.
Support for Windows 7 ended on January 14, 2020
We recommend upgrading to a Windows 11 PC to continue receiving security updates from Microsoft.
More
Click the questions below about how Windows Update keeps your device up to date for answers.
See How to download Windows updates manually.
To view the computer’s update history, click the Start button and select Control Panel > Programs . Under Programs and Features click View Installed Updates .
We do not recommend uninstalling installed updates. However, if necessary, this can be done in the update log.