SSD performance tweaks for Vista
Written by
Harry Butler
August 27, 2009 | 11:46
Companies: #bit-tech
1 — Keeping your SSD in TRIM2 — Windows Vista SSD Tweaks3 — More Windows SSD Tweaks
If you’re a PC enthusiast, then SSDs are one of the most exciting new products to arrive in years. Installing one in your system can have a huge impact, be it in greatly improved system boot times, application start-ups, or just giving you a generally more responsive and smoother operating system experience.
However, just like hard disk drives when they become defragmented, MLC SSD performance can degrade overtime following heavy use when cells of data on the drive become partially filled with deleted files.
Reusing these cells requires the drive to offload the data that’s still needed to the cache before rewriting it elsewhere; this results in a read/erase/modify/write process that takes far longer than just sending a simple write command to an empty cell. This is one reason that SSD performance suffers over time, and this effect can compromise performance to a significant degree.
For evidence, take a look at the two HD-Tach screen shots below. One is of an OCZ Vertex as it performs out of the box with the latest v1571 firmware. The other is the same drive after a full OS install, extended use (with none of the tweaks and fixes listed here) and a good few months of abuse. The difference works out to about 40MB/s over the drive’s average read — that’s a performance hit of almost 17 percent!
Extended heavy use can reduce SSD performance — compare the new and heavily used OCZ Vertex above
While some SSDs boast garbage collection or self healing algorithms to reverse performance degradation, and Windows 7 promises to introduce the TRIM command that automatically clears out deleted files from partially filled cells, the best way to avoid these problems is to minimise your operating system’s abuse of your drive.
Taking a hammer to an SSD will unsurprisingly, not restore performance
Windows Vista is the key culprit here as it was written to make continued use of the hard drive, even when idle, be it background defragmentation, pre-fetching often-used files into the system’s page file or continually re-indexing files for search purposes.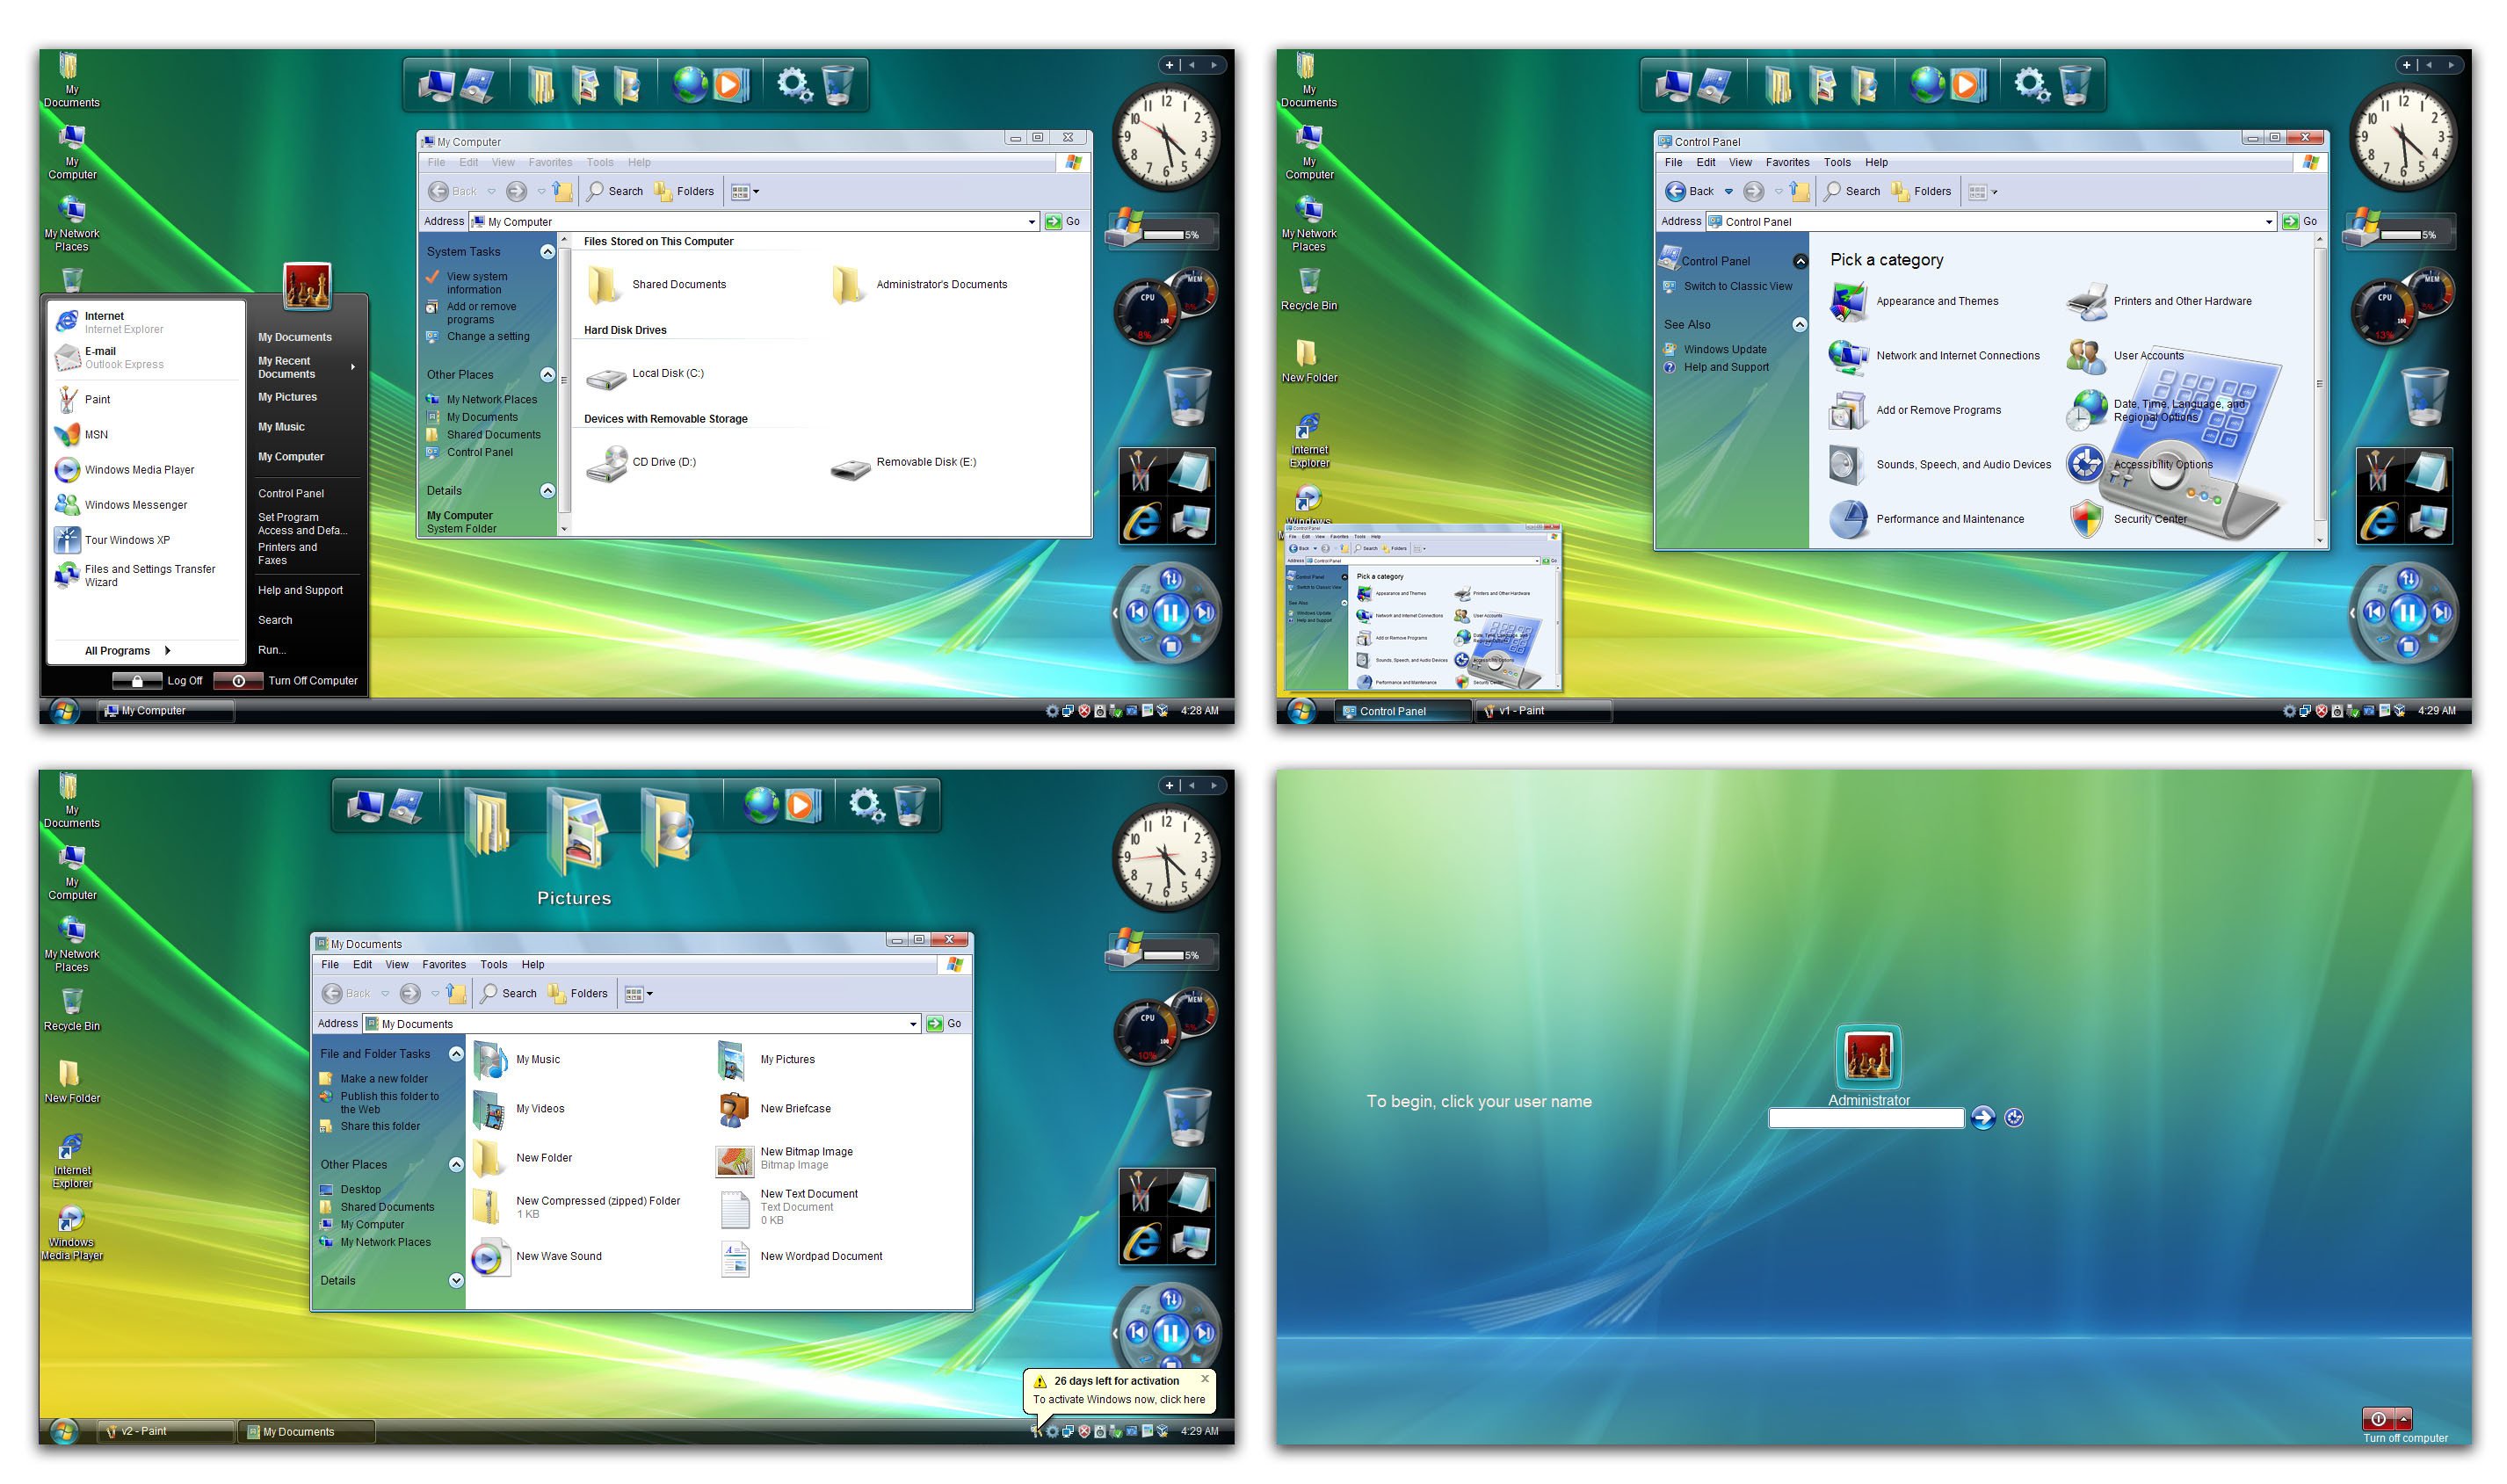 While these can have a positive impact on the «smoothness» of a system fitted with a HDD, when you’ve got an SSD system these features are rendered mostly useless due to the much improved read and response times. Leaving them enabled will actually compromise you’re SSD’s performance over time.
Lucky for you then that here at bit-tech we’ve been benchmarking and playing with SSDs for over nine months now, and have amassed a few tips and tricks with which to optimise Windows for SSDs. Jump to the next page to get started.
1 — Keeping your SSD in TRIM2 — Windows Vista SSD Tweaks3 — More Windows SSD Tweaks
What do I do if my computer lacks compatibility with TRIM? O&O Software
We welcome you to the help pages provided by the technical support team of O&O Software!
You have been directed to this page because one of our products has established that your system is incompatible with TRIM optimizations of solid state drives. Here, we would like to present you with the most common causes for such incompatibility. You will also find suggested solutions for making your system capable of carrying out TRIM commands to optimize your SSD.
If you have a question or if you need assistance, please contact our technical support. We look forward to hearing your suggestions!
What is TRIM and why is it necessary?
Solid State Drives store data on flash chips and because they do not contain any moving parts, they are faster than hard drives. However, flash chips have a major drawback: a limited lifetime. Upon each write request, flash memory cells experience a physical degradation and if written onto too frequently, flash memory may in fact fail.
To keep flash chips in a perfect working condition for as long as possible, the controlling processor inside an SSD must perform wear leveling by distributing recurrent writes to as many flash cells as possible. This is a proven means of preventing data from being written to just a few flash cells, ultimately leading to their destruction and the loss of all data contained on them.
This necessary function can be facilitated by software using the so-called TRIM command. Through this command the SSD is told about unused space in a file system and this free space may be then used to assist wear leveling. If used in a clever way, TRIM will extend the lifetime of a solid state drive and will improve its performance.
What is required for TRIM to work?
In order to perform TRIM optimizations of your solid state drive, the following four prerequisites must be met:
- The SSD must implement the ATA TRIM command or its equivalent SCSI UNMAP. Most drives that were introduced in the year 2010 or later should support TRIM. If the drive features SATA-600 speeds, then it is a good indicator that it supports TRIM.
- The SSD needs to be attached to a controller that will pass through TRIM commands to the drives. This is usually the case if the drive is attached to a SATA chip which is running in AHCI mode. A good sign is if the SSD is directly attached to a SATA port provided by the main chipset on the motherboard.
- If the SSD is attached to a RAID controller, it must be used as a single drive volume. In most cases RAID volumes consisting of multiple SSDs cannot be optimized by TRIM. Also, the SSD needs to be partitioned as a Basic Disk since Dynamic Volumes are not compatible with TRIM.
- The controller’s driver must not block TRIM commands and needs to pass them through to the drive. The most common reason for TRIM incompatibility lies in severely outdated drivers or OEM drivers that will not pass through TRIM commands. However, if the Standard AHCI driver which is already included in Windows is installed, then nothing should hinder a successful TRIM optimization.
Known bad configurations
We would like to present you the two most common cases for TRIM incompatibility.
SATA controller is running in IDE mode
Problem
Due to BIOS settings the SATA controller is running in the now obsolete IDE mode. When SATA was introduced over a decade ago, the IDE mode was needed to provide compatibility with existing drivers. Usually, the IDE mode is enabled by default on somewhat older motherboards.
Solution
In order to unlock the full performance potential of SSDs, the SATA controller needs to be switched to AHCI mode. As the first step the Windows registry needs to be adjusted in order to enable the AHCI driver provided by Windows. Please click here to jump directly to the instructions.
Marvell SATA controller running OEM drivers
Problem
Back when motherboard chipsets were still offering SATA-300 ports only, Marvell chips were added to premium motherboards in order to provide additional SATA-600 ports. Frequently, the same Marvell controllers were used on add-on SATA controller cards and for eSATA ports. While these chips by themselves are good SATA controllers, they will have compatibility issues if Marvell OEM drivers are used instead of the Windows’ built-in drivers, e.g. as provided on motherboard driver CDs. The problem is that these OEM drivers do not pass through any TRIM commands to the SSD. In addition, Marvell drivers simulate SATA drives as SCSI devices. This leads to severe difficulties in properly detecting an SSD as such a drive and to protect it from unnecessary defragmentation.
Solution A
One possible solution is to attach the SSD to a SATA port provided by the main motherboard chipset, if it is running in AHCI mode.
One rather common counter-argument is that the Marvell controller offers SATA-600 and thus is faster than SATA-300 provided by the main chipset. However, this is not correct: because the additional controller is attached by a narrow PCI Express x1 or x2 lane, the built-in chipset ports are not slower when measured against the usual benchmarks.
Solution B
The second solution is to use the Windows’ Standard AHCI drivers. Marvell controllers are fully compatible with the AHCI standard and if the controller is driven by standard Windows drivers, it does not show any negative performance impact. In order to use the built-in driver, the OEM driver must be replaced. This procedure is 100% safe and can be easily done using the Windows Device Manager. Please click here to jump directly to the instructions.
Your configuration is not listed?
The vast majority of compatibility problems are due to SSDs being attached to additional SATA controllers whose drivers do not pass through TRIM commands to the drive. As a rule of thumb, we recommend to replace the OEM driver with the Standard AHCI driver provided with Windows.
If our suggested solutions s did not improve the situation or if your configuration is not listed and you are in doubt as to what to do next, then please contact our technical support directly. We will be more than happy to assist you!
Which configurations are known to work?
We would like to present you a list of sample configurations which we have tested internally and which are compatible with TRIM optimizations. Please note that this list is by no means exhaustive, we provide it purely as an example of what a working configuration could look like.
|
SSD interface |
Controller |
SATA Mode |
Drivers |
Notes |
| SATA | SATA port on main chipset | AHCI | Standard AHCI drivers provided by Windows | — |
| SATA | SATA port on main chipset (Intel or AMD) | AHCI | Current version of manufacturer’s drivers | Chipset drivers must be up to date. |
| SATA | SATA port on additional controller (e.g. Marvell) | AHCI | Standard AHCI drivers provided by Windows | Sometimes OEM drivers are incompatible with TRIM. We suggest using the standard AHCI drivers. We suggest using the standard AHCI drivers. |
| SATA | SATA port on main chipset (Intel or AMD) | RAID | Current version of manufacturer’s drivers | SSD must be used as a single drive; RAID volumes consisting of SSDs are not supported. Chipset drivers must be up to date. |
| SATA | SAS host bus adapter (e.g. LSI Logic or Adaptec) | — | Firmware and drivers must be up to date. | Controller needs to implement SCSI ATA Translation Layer. |
| SAS | SAS host bus adapter | — | — | — |
Suggested Solutions for the most common cases
Switching from obsolete IDE mode to AHCI mode
Before you change the SATA mode in the computer’s BIOS, some preparatory steps are necessary. These steps are required to enable the AHCI SATA driver to start upon booting. If not carried out properly, the system will not be able to boot if switched to AHCI mode.
If you have changed the SATA mode to AHCI without first activating the appropriate drivers, the system will likely not boot. While this may be an unpleasant experience, there is a simple remedy. Simply switch the SATA mode back to IDE and execute the preparatory step and try again.
Windows Vista and Windows 7
The Windows registry needs to be modified for the Standard AHCI driver to load upon next boot:
[HKEY_LOCAL_MACHINE\SYSTEM\CurrentControlSet\services\msahci]
«Start»=dword:00000000
If you do not want to modify the registry by hand, you can also apply these changes automatically by importing this registry file. Please download the file to your computer and execute it by double-clicking.
Then you can safely switch the SATA mode to AHCI in the computer’s BIOS.
Windows 8 and Windows 8.1
The Windows registry needs to be modified for the Standard AHCI driver to load upon next boot. The necessary changes must be applied to two registry keys:
[HKEY_LOCAL_MACHINE\SYSTEM\CurrentControlSet\Services\storahci]
«Start»=dword:00000000
[HKEY_LOCAL_MACHINE\SYSTEM\CurrentControlSet\Services\storahci\StartOverride]
«0»=dword:00000000
If you do not want to modify the registry by hand, you can also apply these changes automatically by importing this registry file. Please download the file to your computer and execute it by double-clicking.
Then you can safely switch the SATA mode to AHCI in the computer’s BIOS.
Replacing an OEM SATA driver with the Windows’ Standard AHCI driver
If you are not sure how to replace an existing driver, please follow these instructions consisting of seven easy and safe steps:
- Please open the computer management app by running the file compmgmt.
 msc.
msc. - Please open the Device Manager and navigate to the category “SCSI and RAID controllers” or “Storage controllers”.
- Please select the appropriate controller and click “Update Driver Software” from the controller’s context menu.
- In the next dialog, please select “Browse my computer for driver software”.
- On the next page, please opt to select a driver manually.
- Windows will show you a list of compatible drivers installed on your system. Here, please select the “Standard AHCI SATA controller” and click “Next”.
- Windows will the replace the OEM driver with the standard driver provided by Microsoft. After the driver has been replaced successfully, you may be prompted to restart your computer. Upon next system start the controller will be running the Standard AHCI driver.
Top 15 Video Trimming Software: Free and Online Solutions
Video trimming is one of the important functions when editing a file. Sometimes this is enough to get the desired result — for example, to remove part of the video with unnecessary information. In this case, there is no need to install a multifunctional video editor on the laptop, it is enough to use the online application. If we are talking about a full-fledged clip or movie for which fragments of different formats are used, then you will have to not only cut the video, but also perform encoding, as well as gluing, sound overlay. The selected video trimming program should have these options.
The ability to cut a file into parts without losing the quality of fragments can be useful in various situations, even if you rarely work with video content. Therefore, it is worth having a proven editor at hand, in which you can quickly and accurately complete this task.
The Movavi team strives to provide only up-to-date and verified information. Here’s what we do:
-
All products in this article have been tested by the Movavi team.

-
In testing, we compare key parameters, including video and audio cropping, visual effects, stabilization, video quality adjustment, video saving, and other important characteristics.
How to crop video on a computer (Win/Mac)
Read the section below on how to trim video on a computer using various stationary programs.
A simple and convenient program for cutting video with a Russian-language interface, suitable for both experienced and novice users. Many functions for advanced editing, a large selection of titles, special effects, filters, transitions. Allows you to edit video and audio. The program includes rich collections of background music, backgrounds, screensavers and stickers.
How to trim video :
-
Download, install and run the program.
-
Import video via Add files –> Add video (you can simply drag and drop).
-
Drag video to Timeline at the bottom of the program.
-
Position the cursor at the cut point and click on the icon Scissors . Repeat with the second crop border. Click on the extra part and press the icon Baskets .
-
Open the tab Transitions , select the option you like and drag it to the border of two fragments.
-
Save the file on your computer in the required format or upload to YouTube. It is possible to export to formats that are supported by mobile devices.
Non-linear video editor with a wide range of options and the ability to crop video with high precision.
How to trim video :
-
Download and install the program.
-
Open and add a crop file.
-
Select the area to be deleted with the cursor and press the button Delete .
-
In the section Video effects select the necessary transition, set the timeline with millisecond precision, press the button Apply .

-
Save the video on any media or immediately export to social networks.
VideoPad
One of the fastest video editors with a Russian-language interface and an extensive set of options, color correction and the ability to create cyclic GIFs.
How to trim video :
-
Download and open the program.
-
Drag and drop a video file onto the working panel, trimming, highlighting an unnecessary fragment with cursors and deleting it.
-
Section Transitions select the desired effect, in the tabs Transition properties specify its parameters, and then add it to the working panel.
-
Save the video on the device or in the cloud, upload it to the social network.
Bandicut
A simple and intuitive program for cutting video frame by frame without quality loss. Works with videos of various formats.
How to trim video :
-
Download and open the program.
-
Add a cropping file to the working panel, specify its format in the settings when saving.
-
Using the cursor, select the area to be deleted or make marks along which the file will be cut, add transitions from the section Effects .
-
Save video to computer.
AVS Video Editor
Video cropping program with a package of additional effects — rotation, caching, combining files of various formats.
How to trim video :
-
Install and open the program.
-
Create a new project folder where to add the file to be processed.
-
Trim, open the Video Effects folder and select the transition, click on it and add it to the project folder, then drag it to the desktop.
-
Set output file format, save video.

Avidemux
A handy program for cropping and non-linear video processing with a large selection of filters, titles, transitions.
How to trim video :
-
Install and open the program.
-
Add a video file to the desktop, set its output parameters.
-
Trim using the cursor to place marks and select areas for deletion.
-
Select and add a transition from the effect gallery to the desktop.
-
Save the file in the selected format to the PC.
Boilsoft
A program with which you can quickly cut video without losing quality and without transcoding using direct streaming copy technology.
How to trim video :
-
Download and open the program.
-
Add a video file to the desktop.
-
Make a markup, view the selected clips to save, change the label if necessary, and then delete the extra parts of the video.
-
Save the file.
How to trim video online
Fastreel
An online video trimming application that allows you to remove unwanted fragments in a few clicks. Supports the ability to save intermediate results, guarantees the confidentiality of transmitted data.
How to trim video :
-
Upload video to the site using the button Add file .
-
Use the slider to mark the cut points, and then click on the scissors icon. Remove the unwanted part by clicking on Trash .
-
Select video options.
-
Save received file.
Online Video Cutter
Online video cutter up to 4 GB, with the ability to store videos on the server for several hours.
How to trim video :
-
Upload a video to the site.
-
Set the output video format and resolution.

-
Trim using the slider.
-
Get a link to the finished file.
Clideo
A program that allows you to quickly trim video online without losing quality.
How to trim video :
-
Add a file to the site.
-
Mark up the video using the sliders and click on Scissors .
-
Download the trimmed file to any device or cloud storage.
Video2edit
Online video editing program with the option of trimming files and converting clips to the required format.
How to trim video :
-
Upload a video file to the site (you can drag it from cloud storage or specify a URL).
-
Set timestamps for trimming in hours/minutes/seconds format, specify output video format.
-
Crop and save the file to any device or add to the cloud.
Inettools
A simple online video trimmer with minimal options and privacy guarantee. There are no file size limits.
How to trim video :
-
Upload a file to the site using explorer or drag and drop option.
-
Set marks and use scissors to remove unwanted parts of the video.
-
Save the file.
Videotang
Online application for cutting, converting and compressing videos. The files are processed in the browser without being uploaded to the server.
How to trim video :
-
Open file in browser.
-
Select trim option, set output video parameters.
-
Mark up the file and remove unnecessary fragments.
-
Save video to device.
Aconvert
Online video converter with track trimming option. The application allows you to use cloud storage and generates QR codes for downloading the processed video to mobile devices.
How to trim video :
-
Upload file to application.
-
Select a fragment to trim and set its time parameters in hours/minutes/seconds format.
-
Select the option Send and send the trimming data to the site.
-
Wait until the link or QR code is generated, and then download the video.
Vi-editor
Online video trimmer with the ability to copy fragments and undo the last action.
How to trim video :
-
Select tab Add file and upload video.
-
Use the slider to select the required video fragment on the scale and press the button Delete .
-
Use the button Download to download the cropped file to any device.
Most video cutting programs, especially when it comes to online work, do not have additional functions. But often, in addition to deleting individual fragments of a file, it is necessary to convert it, choose the optimal size for subsequent saving without loss of quality. You may also need tools such as cropping, video rotation, it is often useful to add stylish titles and transitions, various special effects. In this case, a win-win option is to install the universal Movavi Video Editor, which has a free trial period to evaluate all the benefits of this program.
Create videos. Create. Inspire.
* The free version of Movavi Video Editor has the following limitations: a 7-day trial period, a watermark on saved videos, and if you save the project as an audio file, the ability to save only ½ of the length of the audio. More
Have questions?
If you cannot find the answer to your question, please contact our support team.
Subscribe to the newsletter about discounts and promotions
By subscribing to the newsletter, you agree to receive promotional information from us by e-mail and to the processing of personal data in accordance with the Movavi Privacy Policy. You further acknowledge that you are free to express such consent. Read the Privacy Policy.
Thumbnail Engine Recommendations — Win32 apps
E-mail address
- Article
Please follow the guidelines below when submitting a sketch.
- Submit thumbnails that display well at 256 x 256 pixels in 32-bit color. A thumbnail of this size is used by the Windows Vista Reading Pane in the absence of a registered preview handler. However, the preview handler is the preferred option and should be provided whenever possible.
- When creating multiple images of different sizes, do not create small images from a larger size by cropping the page, frame, or image.
 Zoom out of the entire image.
 - Do not show multiple pages, frames or images at once; just use it. If the document is made up of multiple pages, such as a text document or a spreadsheet with multiple sheets, a cover page is often the best choice, but no matter which one is used, use only one. Don’t aggregate different pages which gives a cluttered look.
- Windows Vista is responsible for shrinking or downscaling sample images. If the processor requires a larger image than you have available, enter the nearest size. Don’t try to dynamically resize your own image.
- Always return a thumbnail from the handler instead of executing custom logic to return traditional icons. Under a certain size, Windows Vista automatically displays a traditional icon instead of a thumbnail. See section 9 for more information.0507 «Thumbnail cache and resizing » thumbnail processors.
- Always return a thumbnail with page, frame, or image aspect ratio. Don’t use alpha to complete the square.
 Windows Vista is responsible for placing the bad image correctly.
 - Do not add decorations to sketches. Windows Vista automatically applies shadows and other embellishments as appropriate. It also applies special decorations to certain file types such as images or videos.
- Do not overlay the file type or application information on the thumbnail. Windows Vista displays a type overlay in the lower right corner of the image. This overlay is based on the intended type, but can be set for individual file types.
- To improve performance, if the thumbnail is based on the content of the file — a page of the document, for example, save a preview image when the file is saved (and therefore likely changed) instead of calculating in real time. This must be done if the calculation is resource intensive (more than one or two seconds). If this is not done, views with a large number of files whose thumbnails are processed by different handlers will take some time to display — poor user experience.