How to Format Hard Drive/Disk using CMD
Updated to Troubleshooting Tips by Nancy on May 25, 2023 | Approved by Cesar C
It is crucial to format HDD before using. Irrespective of the operating system, there are several ways through which one can perform the formatting action. Among them, the easiest and most effective way is to use the Command prompt to format hard drive or format disk using CMD. However, every operating system has a different approach to manage the HDD, and only a formatted disk structure is recognizable. After formatting a hard drive, one can install the OS and create new partitions to store data.
- Quick Navigation
- Part #1: Step-by-step Guide for How to Format Disk using CMD
- Part #2: How to Recover Files after CMD to Format Drive
Part #1: Step-by-step Guide for How to Format Disk using CMD
The following is the procedure that helps anyone obtain the right answer to how to format hard drive using CMD. It is advisable to follow the steps carefully to avoid mistakes.
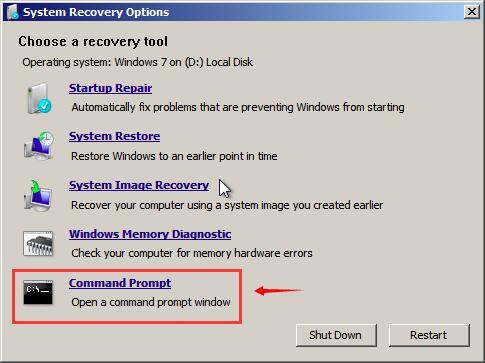
1. Type «cmd» in the search box, which is at the bottom left corner of the screen. The list will display Command Prompt as the matching application. Select the same, right click on it, and click on «Run as administrator».
2. Once the Command Prompt window opens, input «diskpart» and press enter.
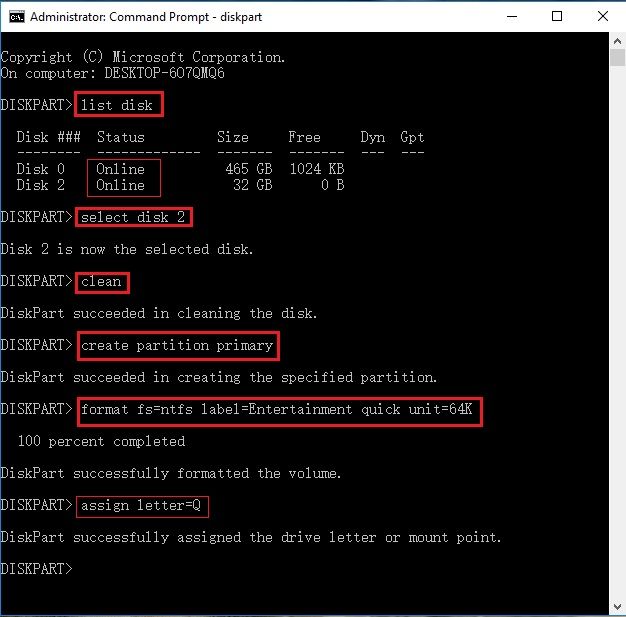
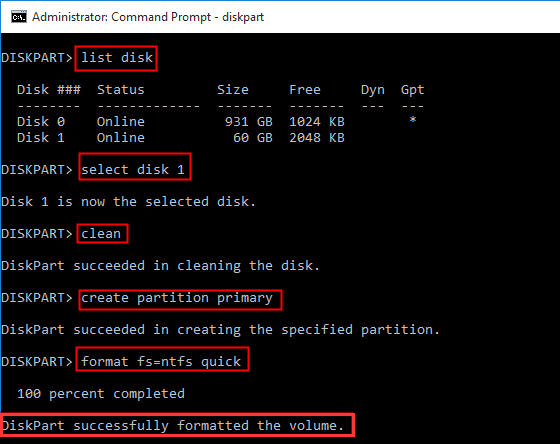
3. Input «list disk» and press enter. The command will display all the disk drives along with the partitions and external disk drives connected to the system.
5. Now, input «clean» in the command box. The step will help the computer to clean all the files and folder present on the disk, then you can successfully complete format hard disk using CMD.
4. Each of the drives has a particular disk number. Input «Select disk» with disk number. For example, «select disk 0.» The input is conveying the message to the system to select disk 0 and format the same.
5. Now, input «clean» in the command box. The step will help the computer to clean all the files and folder present on the disk, then you can successfully complete format drive using CMD.
6. Input «create partition primary» in the command box and press enter.
7. Once the diskpart command successfully creates the needed partition, input «format fs=ntfs or format fs=exfat» and hit the enter key. The command is telling the diskpart to format the new drive with either NTFS or exFAT file system.
8. Input «assign» and choose a drive letter to assign the same to the newly created partition or hard drive.
The above steps are simple and help anybody to format HDD using CMD or format external hard disk using CMD. However, the downside to the procedure is that it will erase complete data present on the hard drive or the selected partition on the hard drive.
Part #2: How to Recover Files after CMD to Format Drive
The Command prompt to format a hard drive is a simple process. But, recovering lost files after format disk using CMD requires the use of Command prompt format hard disk recovery software. At this point, the best tool to perform this action is iBeesoft Data Recovery. It possesses the great capability to restore the data even after people used command prompt to erase hard drive data.
iBeesoft Data Recovery software is a reliable program that helps in retrieving lost, corrupted or data from HDDs, USB drives, external hard disks after CMD format in a few simple steps. The software uses a robust algorithm that scans the selected drive and displays the recoverable files and folders. User can then proceed by choosing the records they wish to recover. The best element of the software is its strength to scan irrespective of the scenario under which there was a loss of data. Furthermore, it provides assistance to scan any hard disk and external hard drives and flash drives.
Guide to Recover Formatted Hard Drive using iBeesoft Data Recovery
Even after completing format hard drive from command prompt Windows 7, Windows 8, Windows 10 and Windows XP action, with the assistance of format recovery program, it is possible to get back the lost data after format drive using CMD in a few simple steps.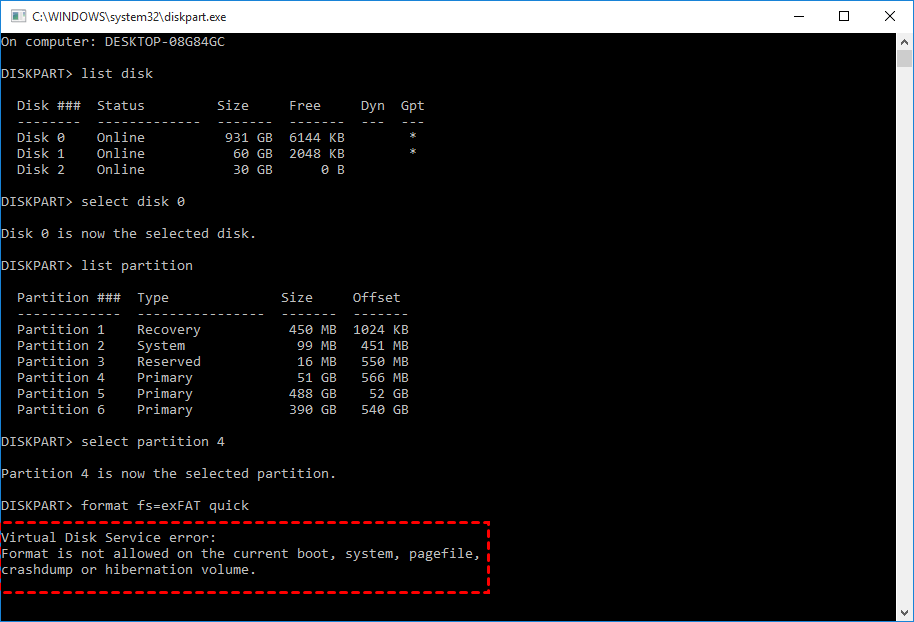
Step 1: The first step involves downloading and installing the software. Just click the DOWNLOAD button to get the software installation file. Upon clicking the execution file, one will complete the installation of the program and start to recover data after format hard disk using CMD.
Step 2: After completion, the program creates a shortcut on the desktop. Clicking the icon will launch the program.
Step 3: iBeesoft shows all the partitions of the hard drive including any external storage devices connected to the system. Users have to pick the location to allow the application to perform the scan and complete the action of recovering the data after format hard disk using CMD. Press the «Scan» button from the same screen to begin the scanning process. The time to complete the process depends on the amount of the data in the selected partition.
Step 4: After completion of the scan, the application will display them in a new window. The window consists of three columns – the left that shows the directory in tree formation, the center that shows the recoverable files, and the right that shows the thumbnails of the selected files. Users can pick the needed files from the center of the window or click an entire folder from the left side where the application places files according to their file system – pictures, videos, audio, documents, and so on. After completion of the selected files or folder, press the «Recover» button. The program will ask for a location on the system to begin the recovery process. Ensure to choose a different drive/location other than the formatted partition.
You can also follow this steps to recover deleted files from an external hard drive, HDD/SSD, card and more.
How to format hard drive on Windows 11
Here are all the ways to format a Hard Disk Drive (HDD) or Solid State Drive (SSD), whether it’s an internal storage or external USB drive connected to Windows 11.
Mauro Huc
@pureinfotech
On Windows 11, you can format an internal or external hard drive in multiple ways, and in this guide, you will learn how.:max_bytes(150000):strip_icc()/create-system-repair-disc-3a16c39480d14dce8854b0f7318f70d4.png) When connecting a new hard drive, it’s best to wipe out all the data and apply a file system to allow the operating system to read and write data. If you plan to retire the storage drive, you may want to format it to erase your files to prevent others from accessing your data. Also, the ability to format a drive on Windows 11 can help fix errors and other logical problems.
When connecting a new hard drive, it’s best to wipe out all the data and apply a file system to allow the operating system to read and write data. If you plan to retire the storage drive, you may want to format it to erase your files to prevent others from accessing your data. Also, the ability to format a drive on Windows 11 can help fix errors and other logical problems.
Although it might seem a tedious process, it’s not, and Windows 11 includes several ways to format a drive using the Settings app, File Explorer, Disk Management, and using commands from Command Prompt and PowerShell.
This guide will teach you the different ways to format an internal or USB external hard drive on Windows 11.
- Format hard drive on Windows 11 from Settings
- Format hard drive on Windows 11 from File Explorer
- Format hard drive on Windows 11 from Disk Management
- Format hard drive on Windows 11 from Command Prompt
- Format hard drive on Windows 11 from PowerShell
Format hard drive on Windows 11 from Settings
On Windows 11, depending on whether the HDD or SSD already has a partition or not, the format steps will be slightly different.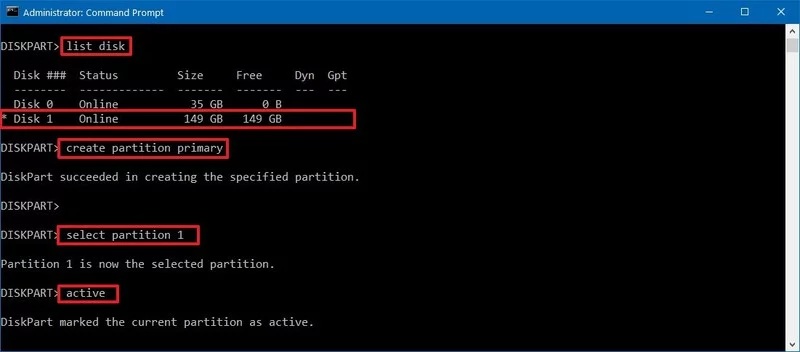
Format drive with existing partition
To format an internal or external drive with an existing partition on Windows 11, use these steps:
-
Open Settings.
-
Click on System.
-
Click the Storage tab.
-
Click on “Advanced storage settings.”
-
Click the “Disks & volumes” setting.
-
Select the hard drive from the list.
-
Click the Properties button.
-
Click the Format button.
-
Confirm a label for the storage drive (as it will appear on File Explorer).
-
Select the NTFS option for the “File System” setting.
Quick note: You can also use the FAT32 file system, but if you use the drive exclusively on Windows, it’s recommended to use NTFS.
-
(Optional) Check the “Enable file and folder compression” option to save space when storing files.
Quick note: Unless you are storing files that will benefit from compression, you don’t need to enable this feature.
-
Click the Format option.
Once you complete the steps, Windows 11 will format the drive and make it available through File Explorer.
Format drive without partition
To format a new drive without a partition, use these steps:
-
Open Settings.
-
Click on System.
-
Click the Storage tab.
-
Click on “Advanced storage settings.”
-
Click the “Disks & volumes” setting.
-
Select the hard drive.
-
Select the “Unallocated” space and click the Create volume button.

-
Confirm a label for the drive in the “Label” setting.
-
Select the drive letter to make it available on File Explorer in the “Drive Letter” setting.
-
Select the NTFS option in the “File System” setting.
-
(Optional) Specify how much storage to assign to the drive in the “Size” setting.
-
(Optional) Click on Advanced.
-
Check the “Perform a quick format” option. (If you don’t select this option, the operation could take a long time.)
-
(Optional) Check the “Enable file and folder compression” option to save space when storing files.
-
Click the Format option.
After you complete the steps, a new partition will be created and formatted using the specified settings.
Format hard drive on Windows 11 from File Explorer
To format an internal or USB drive through File Explorer, use these steps:
-
Open File Explorer.
-
Click on This PC from the left navigation pane.
-
Under the “Devices and drives” section, right-click the drive, and select the Format option.
-
Select the NTFS option in the “File System” setting.
-
Confirm the drive’s name in the “Volume label” setting.
-
Check the Quick Format option.
-
Click the Start button.
Once you complete the steps, the drive will be available in File Explorer.
If the hard drive doesn’t have a partition or drive letter, it won’t appear in File Explorer. In this case, you can use the new “Disks & volumes” settings or the legacy “Disk Management” tool to format the storage.
Format hard drive on Windows 11 from Disk Management
You can format a drive with or without a partition using the legacy Disk Management utility.
Format drive with partition
To format a hard drive with an existing partition with Disk Management, use these steps:
-
Open Start.
-
Search for Disk Management and click the top result to open the app.
-
Right-click the drive and select the Format option.
-
Confirm the drive’s name in the “Volume label” setting.
-
Select the NTFS option in the “File System” setting.
-
Check the “Perform a quick format” option.
-
(Optional) Check the “Enable file and folder compression” option to save space when storing files.
-
Click the OK button.
After you complete the steps, the existing partition (also referred to as a volume) will be re-formatted, deleting any previous data.
Format drive without partition
If the drive doesn’t have a partition, use the steps:
-
Open Start.

-
Search for Disk Management and click the top result to open the app.
-
Right-click the drive and select the “New Simple Volume” option.
-
Click the Next button.
-
(Optional) Specify how much storage to assign to the drive.
-
Click the Next button.
-
Select the “Assign the following driver” option and choose the letter for the drive.
-
Click the Next button.
-
Select the “Format this volume with the following settings” option.
-
Select the NTFS option in the “File System” setting.
-
Confirm the drive’s name in the “Volume label” setting.
-
Check the “Perform a quick format” option.
-
Click the Next button.
-
Click the Finish button.
Once you complete the steps, the tool will create a partition and format it using the specified file system.
Format hard drive on Windows 11 from Command Prompt
To format a drive with the Diskpart command-line tool, use these steps:
-
Open Start.
-
Search for Command Prompt, right-click the top result, and select the Run as administrator option.
-
Type the following command to open Diskpart and press Enter:
diskpart
-
Type the following command to determine the drive to format and press Enter:
list disk
-
Type the following command to select the storage and press Enter:
select disk 3
In the command, replace “3” with the number of the flash drive you want to use.
-
Type the following commands to delete everything from the USB thumb drive and press Enter:
clean
-
Type the following command to create a primary partition and press Enter:
create partition primary
-
Type the following command to select the new partition and press Enter:
select partition 1
-
Type the following command to make the selected partition active and press Enter:
active
-
Type the following command to make the hard drive bootable and press Enter:
format FS=NTFS quick
-
Type the following command to assign a volume and a drive letter for the USB flash drive and press Enter:
assign letter=X
In the command, change “X” for any available letter you want to use.

-
Type the following command to quit the tool and press Enter:
exit
After completing the steps, the drive will be erased, formatted, and mounted with the specified drive letter.
Format hard drive on Windows 11 from PowerShell
To format a hard drive with PowerShell commands on Windows 11, use the steps:
-
Open Start.
-
Search for PowerShell, right-click the result, and select the Run as administrator option.
-
Type the following command to identify the drive to repair and press Enter:
Get-Disk
-
Type the following command to wipe out the drive on Windows 11 and press Enter:
Get-Disk 3 | Clear-Disk -RemoveData
In the above command, change “3” with the disk number of the drive you want to format (see step 3).
 If you specify the number incorrectly, you could wipe out the wrong drive causing data loss.
 -
Type A to confirm that you want to wipe the specified drive and press Enter.
-
Type the following command to initialize the disk with the default GUID Partition Table (GPT) partition scheme and press Enter:
Initialize-Disk -Number 3
In the above command, change “3” with the disk number of the drive you want to format (see step 3).
Important: Although it’s recommended to use a GPT partition scheme, if required, you can use the Master Boot Record (MBR) scheme using this command:
Initialize-Disk -Number 1 -PartitionStyle MBR. -
Type the following command to format and create a new partition on the drive, and press Enter:
New-Partition -DiskNumber 3 -UseMaximumSize | Format-Volume -FileSystem NTFS -NewFileSystemLabel myDrive
In the above command, change “3” with the disk number of the drive you want to format on Windows 11 and “myDrive” with the name to use for the storage.

-
Type the following command to assign a drive letter to the disk drive and press Enter:
Get-Partition -DiskNumber 3 | Set-Partition -NewDriveLetter H
In the above command, change “3” with the disk number of the drive you want to format and “H” with the letter to assign to the storage. If you get the “Set-Partition: The requested access path is already in use” error message, run the command one more time or specify a different drive letter.
Once you complete the steps, the PowerShell commands will delete the current partition and create a new one with the file system and drive letter you specified.
Since you are here…
I’ve got a small favor to ask. This is an independent site, and producing content takes a lot of hard work. Although more people are reading Pureinfotech, many use adblocker. Thus advertising revenue is falling fast. And unlike many other sites, there is no paywall blocking readers here. So you can see why your help is needed. If everyone who finds this website useful and helps to support it, the future would be much more secure. Thank you.
If you use adblocker, please disable it for this site.
$125 raised so far by 11 people.
Donate
- How to create custom partition to install Windows 10
- How to always open Windows Terminal center on screen
We hate spam as much as you! Unsubscribe any time
Powered by follow.it (Privacy), our Privacy.
How to format a Windows 7 drive
Four different algorithms can be used to format a Windows 7 drive. Each of them has its own advantages and disadvantages, which we will display in the article.
Contents
- Standard method
- Command line
- Using the installation disk
- Third party software
Standard method
ing standard tools of the Windows operating system.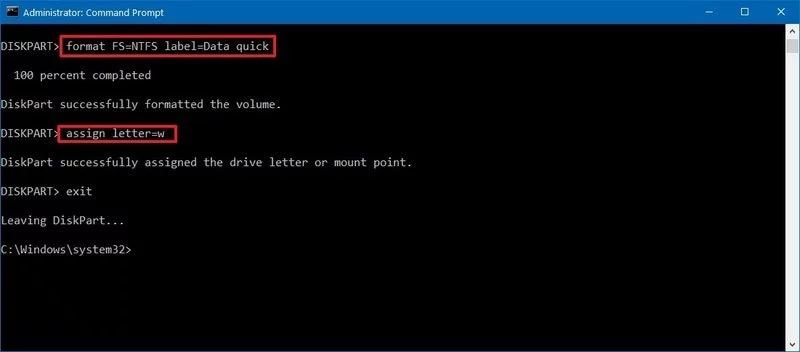 This method is the most convenient in terms of implementation, but the formatting process occurs in most cases according to fairly simple algorithms. This results in a superficial cleaning of your computer’s hard drive and simplifies the task of data recovery.
To implement the method, proceed as follows.
- Open «My Computer». (for Windows 7)
- Select the drive you plan to format.
- Right-click on it and select «Service» — «Format» (Service-Format)
- Do not forget that formatting completely deletes information from your computer and it can only be restored using special applications. By agreeing to the pop-up message you will start the formatting process.
- For various reasons, pressing the right button may not bring up the service submenu. With this problem, go to «Control Panel» — «Administrative Tools» — «Disk Management». In this window, you can perform the same actions starting from step 3.
Command line
Method 2. Using the Windows console window for formatting. The advantage of this method will be the simplification of the action to achieve the final result. Of the minuses, you can list all the same disadvantages as the first method, since the formatting method is the same.
- Go to «Start» — «Run». And we type the cmd command to open the console window.
- We type «C:» (or the letter of another drive that needs to be formatted).
- Enter the command «format c:» (or another drive letter).
- We confirm the complete deletion of information.
The Windows format command, like most service commands of the Windows operating system, has a number of additional parameters and attributes. To call the full list, you can enter «format /?» in the console window.
The most significant parameters include the «format / FS: filesystem» command for explicitly setting the disk file system after formatting the computer and the «format / X» command for forcibly disabling all connected descriptors. This is necessary to get full access to the disk and execute all algorithms of the format command.
Using the installation disc
Method three: Format the computer drive using the windows installation disc. This method has the same standard shortcomings in the small depth of information formatting as the format command, but it allows processing any disk and partition, including the system one.
To start the procedure, it is necessary to start the computer with the installed Windows disk and the option to start the system from CD-Rom in the BIOSf settings. When starting the installation process, you will be prompted to format the disk before installing the system. By selecting this item, it is enough to simply perform a quick format of the desired partition.
But you should be careful. If you use the first three methods, when you try to format a drive with the Windows operating system installed on it, a warning will appear with a prohibition of actions. In this case, this prohibition will not occur and it is enough to simply delete important information and disrupt the operation of the entire operating system.
When you run format, you will be prompted to choose one of two ways to format your computer: quick and full. A quick format removes information, but does not fix system errors and check physical space, which can be critical for a Windows installation.
Third-party software
Method 4: Use ancillary software for Windows OS. There are a huge number of specially designed applications with which you can carry out this operation on your computer. Their advantages include the highest possible level of disk cleaning and the use of complex formatting algorithms. Of the minuses, this is the fact that the almost universal requirement to pay a certain amount in order to obtain the full functionality of the program. We will not describe these applications because of their diversity.