|
Thermaltake
I
Specifications
-Here
-Here
The
-Here
All
-Here
The
Nice
Using
The
The
The
Nice
With
Here
The
Conclusion The
Pros
+
Tweets by @modsynergy
|
|
|
 While opening the package, you will
 The included manual is very
 Does it have any lights? You bet. The Thermaltake
 Is this the
 What this does is inform you if all of a sudden one
 Other than that, the HardCano
Thermaltake Hardcano 13 — Bjorn3D.
 com
com
Bjorn3D.com Reviewer
May 31, 2005
Hardware, Reviews & Articles
Leave a comment
Summer time equals warmer weather, and this weather not only has an affect on our bodies, but on our PCs aswell. Being able to control the fans in your PC can help to keep the summer heat out of your case. Thermaltake’s Hardcano 13 can help with this task.
Introduction
Sure you have a whole armada of fans to keep your rig cool, but what good are they if you are not fully in control of them? Out of control fans tend to be louder than we would like, and may even be hurting the cooling inside our cases. Thermaltake has been providing the means for taking control of these unruly fans for many years, and now provides us with their latest version, the Hardcano 13. The Hardcano 13 is capable of controling up to four case fans, each with its own thermal probe for monitoring the temperature around the fan. Follow along to see how well the Hardcano 13 performs when faced with the task of monitoring and controlling PC fans.
Features and Specs
Features
- Large back-lit LCD display (8 selectable colors)
- 6-in-1 card reader
- Precision electronic button control
- 4 temperature probes
- 4 fan speed controls
- Clock
- Alarm feature
- Celsius/Fahrenheit measurement
- Auto/Manual modes
Specs
|
$$ FIND THE BEST PRICES FOR Thermaltake Gear AT PRICEGRABBER $$ |
Detailed Look
Packaging
The box that contains the Hardcano 13 does a great job of showing-off the features of the device. The features and specifications are listed on the box to provide a wealth of knowledge to potential customers. Once the box was opened, I found the Hardcano secured nicely in a foam “frame” to keep it from being damaged. The extra contents of the box, such as the USB cable, thermal probes, 3-pin to 4-pin adapters and extension cables are all nicely packaged into their own respective bags.
Hardcano 13
From the front, the Hardcano 13 is a very nice looking piece of hardware. Thermaltake’s choice of a black and silver theme really looks great when installed in a black case such as their Shark. The well-designed control dial and buttons all work together to provide a high-tech, yet efficient way of managing your computer’s temperature. Each of the three buttons surrounding the control dial is adorned with a different function on each end. These buttons toggle from one side to the other to allow each button to serve two functions. The control dial rotates both clockwise and counter-clockwise and has the same type of “clicks” that you find on most mouse scroll wheels. This knob also works as a button that is used to help set the time on the Hardcano.
The LCD screen on the Hardcano is just the right size to display all of the information available in the unit. The display is crisp and has a very good viewing radius that LCD displays can sometimes have problems with. A cool feature about the back-lit LCD is that you can manually switch between eight different colors, or even let the Hardcano rotate between the colors automatically. In the upper left of the screen is where the current fan and temperature probe is displayed. Just below the fan indicator is the area that shows if the Hardcano 13 is in Auto or Manual mode. At the bottom left there is a display area to show what type of flash card is currently in use. In the opposite right top is the current speed of the fan, which is measured in RPM. In the bottom right corner is the alarm temperature indicator. This value can be set in increments of 10 degrees Celsius, between 40 degrees and 70 degrees. At the heart of the Hardcano 14’s LCD display is the current temperature of the thermal probe associated with each fan. This can be toggled between Celsius and Fahrenheit, and uses large numbers for easy recognition.
Just below the LCD display is the memory card reader. There are only four slots to insert media into, but the Hardcano 13 supports six types. SD, MMC, Compact Flash, Smart Media, MS, and Memory Stick Pro are all welcome in the Hardcano, and are all piped to the PC via a USB cable that attaches to the motherboard.
The shell of the Hardcano 13 is made from steel and is painted with a nice black finish that complements the front bezel. At the rear of the unit are all of the connections for the fans and thermal probes. The fan connections are of the standard 3-pin kind, and Thermaltake has included 3-pin to 4-pin adapters so that a variety of fans can be utilized.
|
$$ FIND THE BEST PRICES FOR Thermaltake Gear AT PRICEGRABBER $$ |
Installation
Installing the Hardcano is very simple. After attaching the drive rails of the Thermaltake Shark case to the unit, the Hardcano slid right into place. By routing all fan leads to the front and top of the case, I was able to minimize the clutter of wires that were visible. Attaching the fan leads to their connectors is no different than connecting them to a motherboard header. The same is true for the thermal probes.
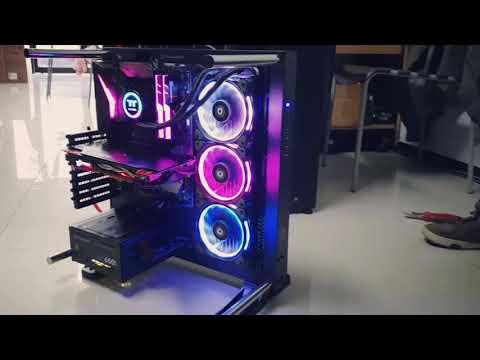
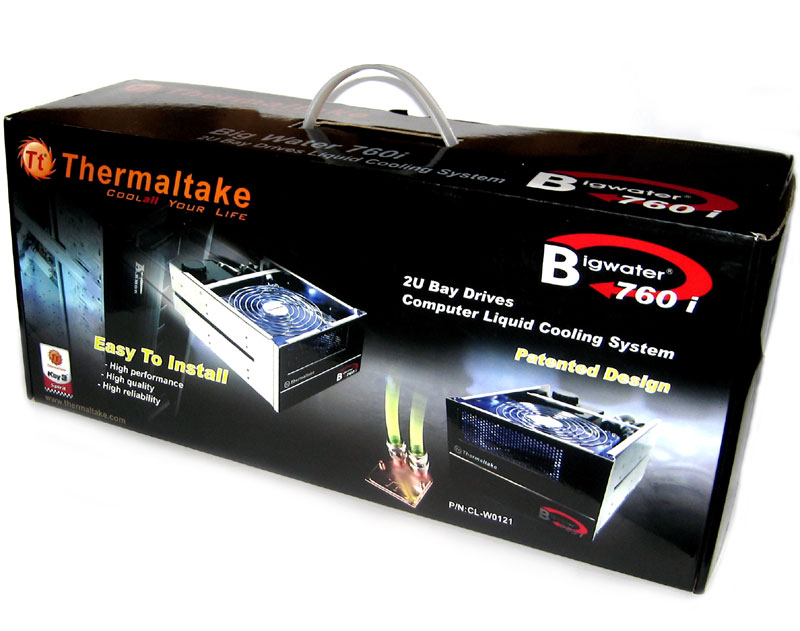
I chose to setup my fans and thermal probes in the order in which the air flows through my case. “Fan 1” controls the intake fan at the front of my case and reads the temperature from the probe placed just behind the fan. This gives me a general idea of my intake temperature. “Fan 2” does not have a fan connected to it, but does have a thermal probe that reads the temperature of the middle of the case. The final connections reside on “Fan 3.” This screen controls the radiator fan for the Thermaltake BigWater, and shows the exhaust temperature of the air that is flowing through the radiator.
|
$$ FIND THE BEST PRICES FOR Thermaltake Gear AT PRICEGRABBER $$ |
Testing
Firing up my PC for the first time with the Hardcano 13 installed was pretty exciting for me. I was so used to letting my case fans spin at whatever RPM they felt like. Knowing that I would soon be able to control their speeds had me all giddy inside. The first thing I noticed about the Hardcano when it was on was how crisp and clear the LDC was. All of the characters displayed were easy to read and stood out well from the blue background. Cycling through all eight colors brought me right back to my favorite; the dark blue. This color matches the rest of my case’s lighting effects. Those with other color “themes” will surely find that one of the colors will work well for them, or they may end up setting the LCD to cycle through the various eight colors on its own.
Adjustment of the Hardcano 13 is very easy. By selecting the fan to be controlled using the “Fan” button, I was able to rotate the control knob to generate the desired fan RPM. Once the fan speed was set, I then selected the appropriate alarm temperature using the “Alarm” button. Each temperature probe has its own alarm setting. This can be handy in determining what part of the case needs to have better cooling, or to find the location of a cooling malfunction. When testing the alarm feature, I devised a very “unique” way of reaching the temperature threshold for the temperature probe. I ended up placing hot water from the faucet in a pan and “dipping” a thermal probe into the water just enough to trip the alarm. Rest assured that this alarm will get your attention, even if you are sleeping. The sound that came from this little piece of hardware had me blowing on the probe just to make it stop. Needless to say, the alarm function works great.
The only downside to the alarm feature is that the temperature increments are very broad. A 10 degree celsius change between each setting is quite a large gap. I would have liked to have seen increments of one degree.
Having a clock on the Hardcano can be handy when playing games that take up the full screen and remove the default clock that Windows features from view. For those in different regions, the “C/F” button will aid in reading temperatures in a more familiar way.
Another “issue” that I have had with the Hardcano 13 is that the batteries that were included with the unit seem to have been near dead. That or the Hardcano likes to eat batteries for breakfast. Any settings that were made to the unit will be erased if the battery dies or is removed. It would have been a nice feature to be able to swap out batteries or not even use one. A brand new, store bought, battery has been installed and seems to be working fine. I will update this reivew if the same results occur with a new battery.
Conclusion
The Hardcano 13 has been an awesome tool in providing control over my case fans. I no longer have to suffer from 2000 rpm fans whining the whole time my computer is on. I now have peace and quiet; not only from the reduced noise, but from knowing that if temperatures get out of hand, the Hardcano will let me know. Thermaltake has been improving on the Hardcano design for years, and they keep creating a better product every time.
Pros
- Looks great
- Ability to control four fans
- Four separate thermal probes
- Built-in card reader
- Easy to configure and use
Cons
- Alarm temperature increments
- Battery required for memory
The Thermaltake Hardcano 13 has lived up to its expectations as a great fan controller. Not only does it control fans, but it also gives up to four thermal readings, as well as functioning as a memory card reader. I am proud to give the Thermaltake Hardcano 13 8.5 out of 10 and the Bjorn3D Seal of Approval.
|
$$ FIND THE BEST PRICES FOR Thermaltake Gear AT PRICEGRABBER $$ |
Previous Intel Pentium D Processor 820, Pentium 4 Processor 670 and 945 Express Chipsets
Next PowerColor Bravo X700 PCI-e
Check Also
One advantage a stationary computer has over a laptop is that you can usually keep …
Valve is an interesting company that seems to try to be a lot of things at the same time.