Download Display Driver Uninstaller 7.0.8.3 for Windows
Warning
According to our internal quality system, this program could host potentially malicious or unwanted bundled software. When you click on the Download button, you accept downloading the software at your own risk and FileHippo does not bear any responsibility related to this action. As such, we recommend that you consider these available alternatives.
Advertisement
What is Display Driver Uninstaller?
Display Driver Uninstaller by Wagnard is a powerful graphics driver removal utility which helps to completely delete all remnants of Microsoft, ATI, and Nvidia graphics card drivers from your computer. These devices are quite popular because they are the most widely used graphics options available in any Windows-based operating system. This program can safely, speed up, and generally improve the performance of your PC as well. For those who use the Windows Vista operating system, the uninstall feature of this tool is particularly useful to remove unwanted drivers with pre-installed video errors, blue screen errors, etc. Moreover, if you want to run many different graphical programs at the same time, this tool can also be useful for speeding up your PC.
Windows Display Driver Uninstaller first uninstalls all graphics card drivers, then deletes all redundant files it finds. It then gives you the opportunity to select from a large number of settings that Windows refers to as a part of your graphic card’s drivers. With a few clicks, the program will automatically uninstall all drivers; however, if you want it to perform a bulk operation, there is an optional shortcut which you can click to do so. You can also opt to create a backup copy of all files just in case things go wrong during the installation process.
You can download Windows Display Driver Uninstaller in the Internet if you have a Windows operating system on your personal computer. However, if you already have a version of Windows, the program may not work properly for you. The good thing is that this program can be downloaded free of charge, but it will not be free of charge in any way. That is, in order to support its continued operation, it requires a small amount of donation every month. A complete list of all current versions of Windows Display Driver Uninstaller can be obtained by visiting the official website of the software at the link below.
Advertisement
Technical
- Title:
- Display Driver Uninstaller 7.0.8.3 for Windows
- Requirements:
-
- Windows 10
- Language:
- English
- License:
- Free
- Latest update:
- Saturday, September 11th 2021
- Author:
- Wagnard
https://www.
 wagnardsoft.com
 - SHA-1:
- 05e914b72880dd60ff149460aa1de2f9990a7afc
- Filename:
- DDU_v17.0.8.3.exe
Changelog
We don’t have any change log information yet for version 7.0.8.3 of Display Driver Uninstaller. Sometimes publishers take a little while to make this information available, so please check back in a few days to see if it has been updated.
Can you help?
If you have any changelog info you can share with us, we’d love to hear from you! Head over to ourContact pageand let us know.
Explore Apps
-
MobileGo
-
JPEG to Word Converter
-
MoboMarket
-
Axife Mouse Recorder
-
Task Manager DeLuxe
-
ClipX
-
Razer Synapse 3
-
ApowerPDF
-
PDF Password Remover
-
Auto Clicker by Shocker
-
EaseUS CleanGenius
-
EasyClicks Macros
Related Software
-
Wagnardsoft Tools
Wagnardsoft Tools is a free application that cleans up your computer by erasing temporary files and current browser data.
 It also helps restore corrupted Windows system files and collaborates with the
 -
IObit Uninstaller
IObit Uninstaller is a free software that uninstalls programs and cleans up their leftovers seamlessly. The amount of available space on devices is important and determines the devices’ functionality.
-
Revo Uninstaller Pro
Revo Uninstaller Pro, made by VS Revo Group, uninstalls everything that is on your computer, even the most annoying of files. It also provides support for removing any unwanted programs. Also, it boos
-
Revo Uninstaller
REVO Uninstaller is a very popular, and effective, program to completely remove programs from your computer. It not only removes any leftover programs from your computer, but it also completely remove
-
Intel Wireless Display
Intel Wireless Display enables you to stream media such as videos from your current WiDi enabled laptop to your new WiDi enabled TV.
 This is an excellent technology to make the most of when you need t
 -
Geek Uninstaller
Geek Uninstaller for Windows is a free app for quickly uninstalling programs from your PC. You may not realise it, but when you uninstall a program, it can leave file fragments on your PC. Sometimes,
-
Wise Program Uninstaller
Wise Program Uninstaller is a handy tool that helps you uninstall applications from your computer and delete leftover files. It has some extra features under the hood in comparison to the default Add
-
Display Tuner
If you are using an old computer that doesn’t have a Display Port or doesn’t have a very good graphics card, you may not be able to see all the information on your monitor very well. Using the keyboar
-
Easy uninstaller
Easy Uninstaller for windows XP Home Edition is a powerful tool for removing programs which are installed on your windows system.
 The program will scan your computer and locate the program files that
How to use Display Driver Uninstaller (D… ⛑️
In this article we’ll go over what DDU is and how to use it to cleanly remove and install new GPU drivers.
What is DDU?
DDU, short for Display Driver Uninstaller, is a Freeware tool developed by Ghislain Harvey known as «Wagnard». This tool is used to completely and fully uninstall drivers from Windows machines, focusing mostly on GPU drivers with Audio drivers being a work-in-progress. Originating from the era when drivers conflicts lead to users being unable to install a card from one brand if a card from another brand has been used previously, it’s able to remove the drivers themselves, and the traces they leave. Regularly updated, it currently supports Windows Vista SP2 up to Windows 10 2104 (21h2), Nvidia, AMD and Intel drivers.
Official Sources
DDU is released on Wagnardsoft official website as well as Guru3D forums, where several download links are available at the bottom of the page.
Additional Preparations
In order to cleanly install new driver after using DDU, you also need to download the driver preemptively.
Nvidia
Use Advanced search to download Nvidia drivers, set parameters as following:
- Product Type: GeForce
- Product Series: Generation of GPUs you’re using. If multiple are used, select the oldest.
- Operating System should be Windows 10, 64-bit
- Windows Driver Type: DCH
- Recommended/Beta: Recommended/Certified
Click search, then choose the recent «GeForce Game Ready Driver». Do note the current preferred version is 512.77 as the 512.95 and newer ones block LHR unlocking mechanisms. On the next page, click «Download», then «Download» again.
With DCH driver type selected, to use the control panel, it needs to be installed separately, available here from Microsoft Store.
For AMD systems it’s typically recommended not to update to the most recent released driver, but to install a tested one. Here are a few of the recommended version you may want to try, with the order being most tested to least tested.
- 20.8.1, suitable for GPUs before the 6000 series
- 21.1.1, suitable for 6800, 6800XT and 6900XT cards as well as the older models
- 21.3.1, for 6700XT and older GPUs.
You can use the Drivers page, and enter the oldest GPU you’re planning to use in this rig’s name into the «search all products» menu for the most up-to-date drivers.
Using DDU
It is often recommended to disable networking or turn off windows updates to prevent Windows from installing the driver itself.
You should stop mining activities, have all your work saved and be ready to reboot the system when using this. It will also close some applications, like MSI Afterburner and others, which are able to interfere with the de-installation and installation processes.
Extract the downloaded archive with DDU. Then run «DDU v….» executable, it will ask where you want to extract it — stick to the default entry, press «Extract». In the same folder as the «DDU v…» file you will find a folder named the same. Open it, then launch «Display Driver Uninstaller.exe».
Here, DDU will warn you if it closed any applications, if that happens — simply press OK.
Next warning is if you are not in Safe Boot Mode. If you want to use it — make sure you’re able to enter and leave it normally, otherwise it’s possible to get stuck in Safe Mode, so for the process in this guide, we will not be using it, so simply press OK.
Next, click the «Options» located top-left. In the options, click the checkbox near «Show offers from our partners», make sure the option «Prevent downloads of drivers from Windows Update when Windows search for a driver for a device» is marked too, and press Close.
Select device type (GPU) and Select device (whichever you want to remove).
For moving from AMD to Nvidia or from Nvidia to AMD, choose «Clean and shutdown», otherwise select «Clean and restart». Wait for the process to finish, DDU will automatically remove the drivers and reboot your machine.
Installing new driver
The installation process should be done as usual, however, as extra precaution, we can select «Do not upgrade to new version» if prompted about it, and de-select any unnecessary tools, like AMD ReLive, or Nvidia Geforce Experience, or PhysX, HDMI HD Audio, as those are not needed for mining.
You can also click «Clean install» checkbox to make the driver installer use default settings. Normally, there isn’t anything left for the driver installer tool to remove, but this is done as a pre-caution anyway.
Improve your mining operation with minerstat
It’s easy and free to get started
Sign up now
How to Use Display Driver Uninstaller on Windows 10
by Aqsa
The display driver serves as a link amid software program on your device and the hardware e.g. the graphics card. Software engineers are continually improving and upgrading their programs, introducing new features, and streamlining the codebase. These upgrades may frequently produce visual abnormalities or conflict with outdated display drivers. Upgrading the display drivers guarantees that your graphics card is compatible with the latest software versions as well as improves performance within graphics-intensive apps. Upgrading the visual driver is a little more complicated than installing standard software. Uninstalling outdated drivers is a smart idea to verify that the new driver documents wouldn’t clash with earlier versions. However, uninstalling outdated drivers isn’t as straightforward as running an uninstall program. Failure to erase all remnants of the previous driver might result in incompatible settings, release incompatibility, poor graphics card efficiency, or the inability to load fresh drivers. These can, in some of the worst scenarios, result in a complete system crash.
Windows Display Driver Uninstaller
For all those afraid about missing a document or registry key when manually uninstalling the old driver, DDU will save the day. DDU (Display Driver Uninstaller) is a freeware tool that allows you to remove obsolete GPU drivers without keeping any residues on your computer. And if you’re not a PC expert, it’s simple to use.
Download Display Driver Uninstaller
Display Driver Uninstaller is open and may be found on a variety of websites. If you need the most recent stable release, then recommend downloading from its main site. The link is given as follows:
https://www.wagnardsoft.com/display-driver-uninstaller-ddu-
The downloaded package can be found in the Downloads folder of your computer. Or, you can check the location of the downloaded Display Driver Uninstaller from the Downloads menu of your browser.
You may unzip the components of the DDU bundle into a specific folder when you’ve obtained it. Since the extraction procedure does not generate an icon on the desk or even in the windows Menu bar, make a note of where this folder is located. Right-click on the downloaded file, and tap on the Extract here option. The following dialogue box will appear asking for the location where the extracted data will be saved. We have chosen the “D” drive of our system. Now tap on the button “Extract” to unzip the data.
Now the extracted data files have been shown in the folder mentioned in the path. You can see the extracted files and folders in your mentioned specific location. Now open the Application file “Display Driver Uninstaller” by double-clicking on it.
A new dialogue box will appear with the name “Display Driver Uninstaller” saying that you are not in a safe mode. Whenever we don’t begin DDU in Safe Mode, a notice will appear advising users to do so. You may do this by exiting the app and checking the Support Safe Mode box, otherwise, you may hit the Options icon on the top-left side and tick the box.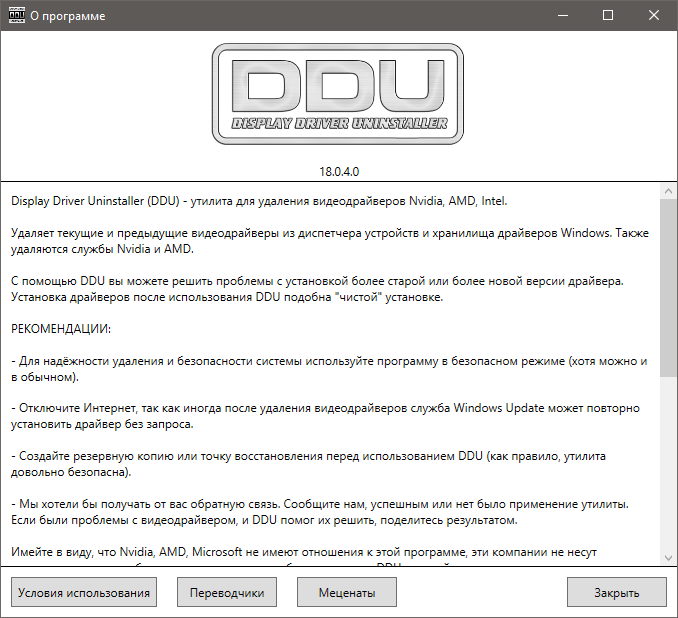 So, for better cleanup of the display driver, you need to reboot via Safe Mode. Hence, click on the “OK” button to continue using Display Driver Uninstaller.
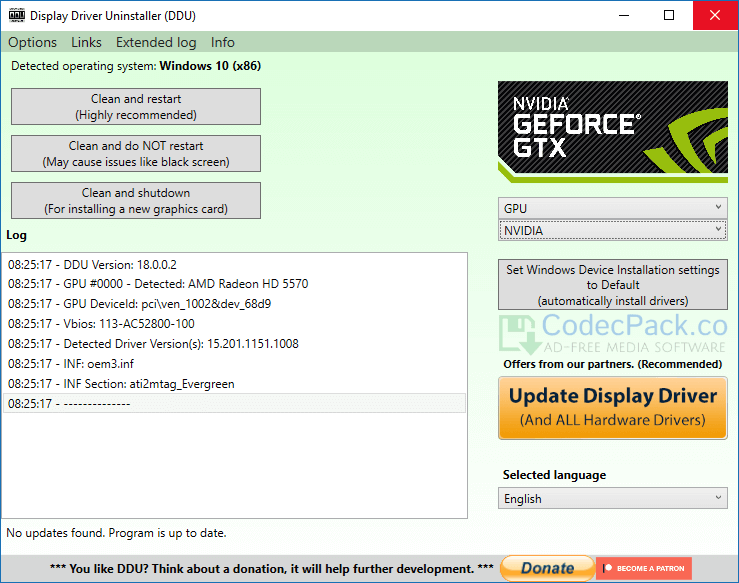
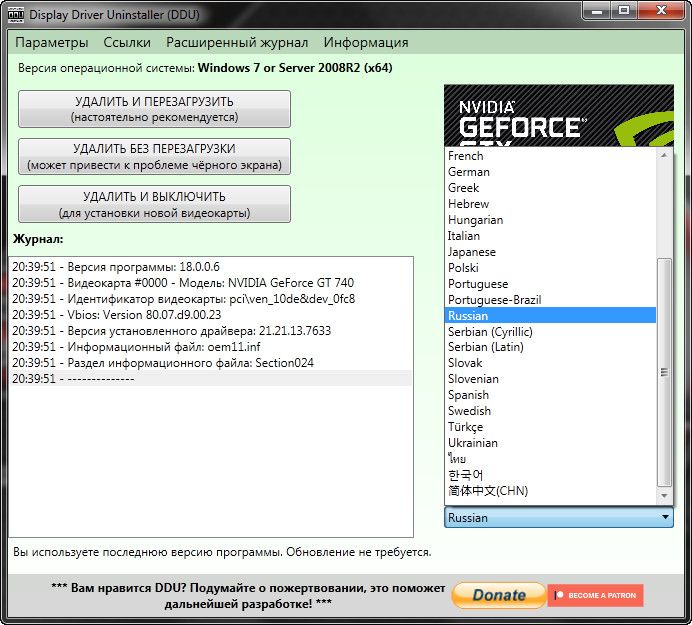
Now the Display Driver Uninstaller Application has been opened on your screen without a safe mode as shown in the below image. To change DDU’s behavior, go to Options at the top-left corner of the Display Driver Uninstaller window.
Throughout the Launch of the Options selection box, You will find many options and settings to be updated e.g. General options, Specific Options (regarding every type of driver), and Advanced Options. Navigate towards the Advanced Options (Change at your own risk). Now choose Enable Safe Mode (Recommended) to avoid any inconvenience later on by check-marking the checkbox. Afterward, select Restart to Safe Mode from the menu. Your system will reboot in Safe Mode as a result of this action. If you don’t want to reboot in safe mode, just leave it as it is.
On reboot, a dialogue box will appear asking you to update the Display Driver Uninstaller from its official website. Click on “Yes” if you want to update it, otherwise tap on the “No” button to continue without updating. You can also click on the “Cancel” button to stop opening Display Driver Uninstaller Application.
Another dialogue box will appear asking you to check the new version of Display Driver Uninstaller before reporting any bug. Click on the “OK” button to continue using Display Driver Uninstaller.
Now the Display Driver Uninstaller Launch terminal has been opened. Choose “Normal” if you wish to keep working in Normal mode. Choose “Safe Mode” if you want to work on the safe side. DU is effective. Now click on the “Launch” button to launch Display Driver Uninstaller.
Now the Display Driver Application has been opened, you can start uninstalling the Display Driver of your Windows 10 along with its log files. At the right side of the Display Driver Uninstaller Application, you will find the type of driver you want to uninstall. You can select any one of them by a drop-down list. You can see we have Nvidia, AMD, and Intel Display Drivers in our system. Below this Dropdown list, we have a button named “Set Windows Device Installation Settings to Default (automatically install drivers)”. Click on this button to automatically install drivers of your choice after selecting the type of driver.
On the left side of the Application, you can see different options for the installation or removal of a Display driver as below. Choose any one of them that best suits your system.
You can also update your already installed Display Driver by clicking on the button “Update Display Driver” at the right side of the application.
In this guide, we have discussed how to install Display Driver Uninstaller, and how to use it on your Windows 10 system.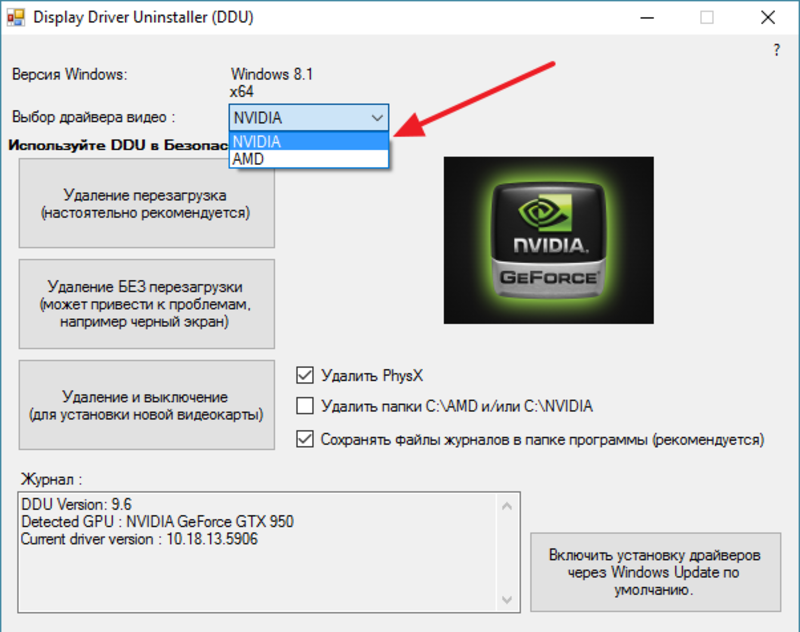 Although your driver’s certified uninstaller program might leave installation packages, registry entries, and obsolete settings behind, which might lead to hardware troubles. We’re also not discussing minor difficulties here.
How to remove drivers from a computer on Windows 7 and 10
In a Windows environment, such a procedure as removing drivers is usually not necessary. The system in most cases gets along with the drivers of the changeable peripherals. Yes, and when changing the internal stuffing of the computer, the latest versions of Windows 8.1 and 10, as a rule, start up quietly for themselves, without going into BSOD , which happens with Windows 7 (and older versions) when replacing the processor or motherboard. New versions of the system usually reset the binding to the hardware themselves and automatically install everything they need.
However, cases of driver conflicts do occur and sometimes it may be a question of removing them with our user intervention.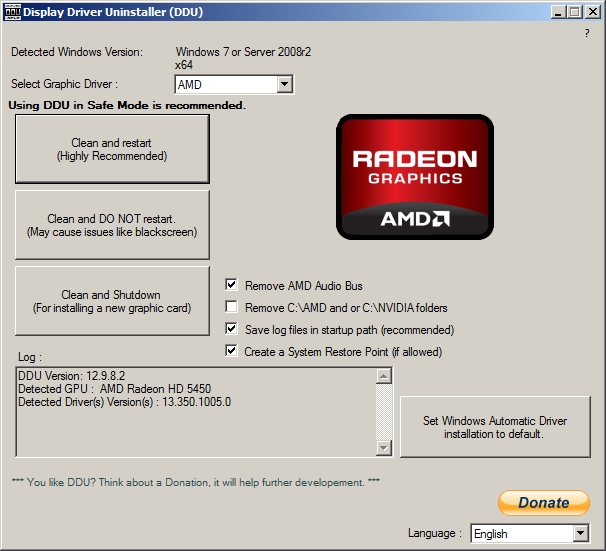 Another reason for this procedure is experimental purposes. So, how to remove drivers from Windows environment?
Removing obsolete versions
The manufacturer can update device instructions, and the OS developer can implement new features. As a result, the driver, like any software, becomes obsolete over time. The user, receiving automatic updates, does not even notice how the replacement takes place. The ideal picture of interaction is spoiled due to the fact that the system «neatly» stores, rather than removes unnecessary. Microsoft has placed the solution of this problem in the hands of the user.
Windows 7
There are no special tools to remove old drivers. However, the user has this option. Let’s go to the control panel.
The item marked on the screenshot opens the menu for managing installed software and system components. Device drivers fall into the second category.
You can simplify your search by sorting by publisher. When you know the manufacturer of a device that is no longer needed, you can find it and mark it in the drop-down list. The system will leave in the window only the software released by him.
Once you have decided on the components, you can begin to remove drivers from the Windows 7 system. Using this button, you will receive a warning about the consequences of your actions.
Confirming our decision, we pass the “last line of defense”. The selected component will be removed and the associated device will no longer be available for use.
Windows 10
In the latest version of the OS, Microsoft took a step towards users and provided special tools that allow you to remove unnecessary drivers in Windows 10. They are located in the Disk Cleanup menu.
Having opened it, select the marked item that allows you to work with system files.
After the components are checked for relevance, we will get the following window. As you can see, the system itself is unable to remove unnecessary drivers, but it can detect obsolete versions and prompt the user to get rid of them.
The easiest way to uninstall the video card driver
The video card driver should be kept up to date because the manufacturer is constantly improving them. This process cannot be followed. It is not always possible to update the driver for the video card, so you have to delete it and install it again. This method is the most well-known and does not require any special knowledge. Before you get started, be sure to create a system restore point.
Then go to the Control Panel and select Uninstall Programs.
In the menu that opens, you need to find everything related to the name of your video card driver (for example, NVidia) and delete it through the appropriate settings. To do this, just double-click on each selected item.
Then follow the instructions displayed by the uninstall wizard and restart your computer.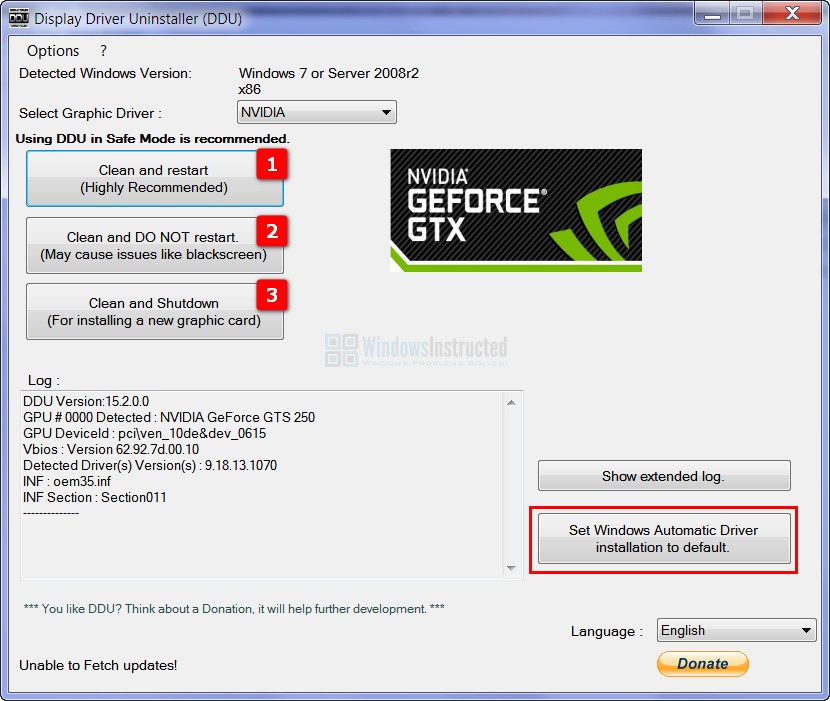
Remove devices
We have dealt with unnecessary and outdated software. However, the situation may develop so that in the presence of current versions of the software, the device hopelessly fails. In some cases, to ensure the correct operation of the new, the old must be completely removed from the system. Let’s go back to the control panel.
Select the marked item and go to the PC device management menu.
Everything is grouped here by application. Accordingly, you can find and remove the device driver that is no longer needed or does not work correctly. Let’s choose a «victim» and see what needs to be done in this case. Let’s try, for example, to remove the sound card driver.
Expand the device group and select the one to be deactivated. We call the context menu and find the item that allows you to delete it. The system will display a warning dialog box.
Put a tick in the indicated place and confirm your choice.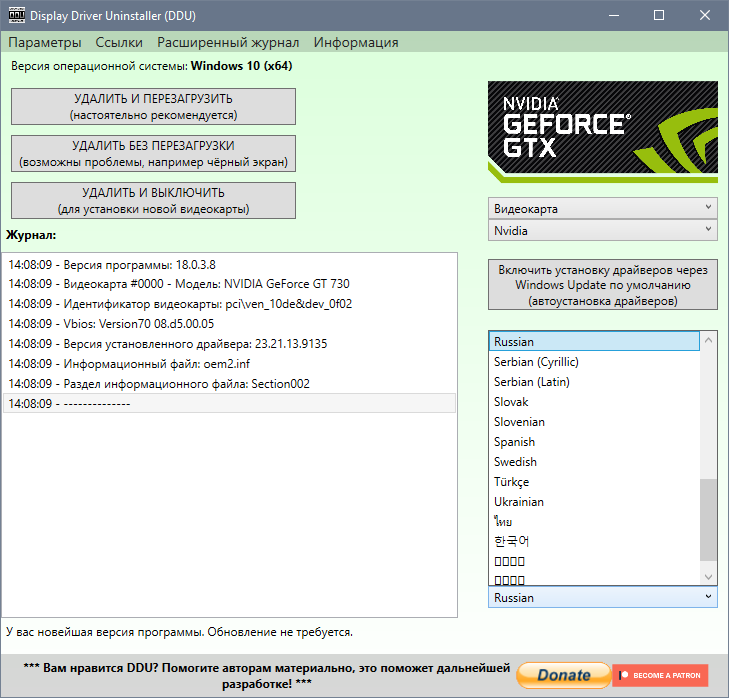 As a result, the device will be completely removed from the list of used equipment, and the system will clear the software that controls it.
Method 3: Application section
In some cases, most often with graphics adapters and sound cards, software is installed on the computer that is related to drivers, but may have a graphical interface and will be considered a full-fledged application displayed in the corresponding menu . Then, when it is removed, the drivers will also be cleaned, which allows you to achieve the desired goal. You can check the presence of such tools and uninstall them as follows:
- Open Start and go to Settings.
- In the new window, select the Applications category.
- Wait for the list to load and start searching. For example, in the screenshot below, you see software related to the NVIDIA driver, and removing it will cause the adapter to completely or partially stop working.
- Roughly the same applies to software from Realtek, which is associated with sound cards built into motherboards.
 Having found the desired line, just click on it with the left mouse button.
 - Next, click on the «Delete» button that appears and wait for the branded uninstall window to load.
Usually, in the uninstall window that opens, simply follow the instructions and carefully read the various footnotes to know what components are being removed and where it will lead. When finished, remember to restart your computer to update the information. In most situations, this can be done directly from the uninstaller window.
Command line
In especially advanced cases, you can remove the driver from a computer on Windows 7 or 10 using the command line. For example, when the device is no longer there, and it is impossible to get rid of the components that control it using the described methods. This method is officially documented by Microsoft and is allowed for use by users with administrative rights. Using it, you can completely remove the driver from the system.
Windows, taking care of users, saves «memory» about all devices connected to the computer. Drivers are placed in a special storage and wait in the wings, which will come when they are used again. To begin with, let’s create a list of stored components that is easy to study.
With the above command, we will force the PnP service to save the list of drivers to a text file and place it on the user’s desktop. The user can now view it in Notepad to find the component to remove.
Let’s continue to struggle with the PC audio system and see how to remove the sound driver found in the list. Now that we know his name published in the system, we will again use the command line in administrator mode.
The screenshot shows what to do when the OS refuses to delete, referring to the use of the device. We add the «-f» parameter, which means the command is forced to execute and achieve the desired result.
Method 4: Print Management Application
As the name suggests, this method is only for users who wish to uninstall their printer drivers. Windows 10 has a separate classic application that allows you not only to view a list of all files associated with printing equipment, but also to delete unnecessary ones in just a few clicks. Sometimes this method is more effective than the previous ones, because it erases any mention of the printer in the system.
- To open the Print Management application, expand Start and enter its name in the search.
- In the window that opens, in the left pane, expand the Print Servers section.
- Expand the Drivers category.
- Review the list of available files and select the appropriate one.
- From the More Actions menu, select Remove Driver Package.
- Confirm your intentions to uninstall.
- Wait for this process to complete. The screen will show the progress and all the necessary details.
- After the message «Driver package removed» appears, you can close the current window.

In the same way, any drivers associated with printing equipment and scanners that were connected to the computer with further installation of the corresponding software are cleared.
Third party software
When Microsoft does not want or forgets to give the user a tool to perform any action, this niche is immediately occupied by third-party software manufacturers. In our case, we are talking about programs for uninstalling drivers or updating them automatically. There are a lot of them, so let’s focus on three that are quite popular among users.
Driver Sweeper
Distributed free of charge and supports a dozen languages, including Russian.
As you can see in the screenshot, the latest version was released in 2011. It’s not even worth talking about the relevance of the device database. By launching Driver Sweeper, we select manufacturers known to the program and start the system analysis.
As a result of a short search, we get a list of drivers offered for removal.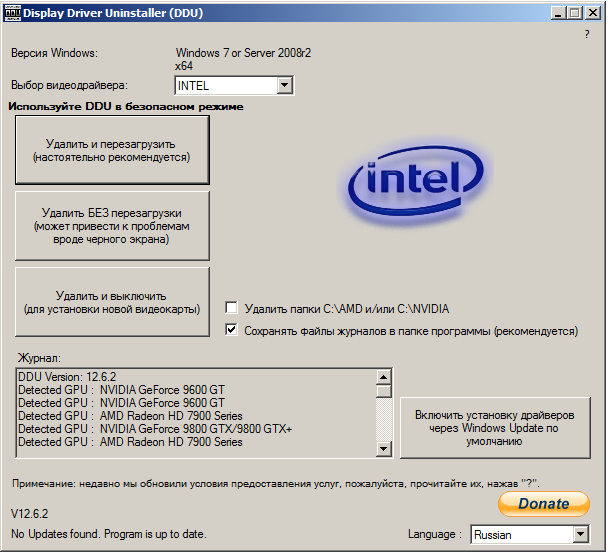
When we try to run the update, the notification of which appears in the top line, we get to the home page of the next «candidate» — Treexy Driver Fusion.
Treexy Driver Fusion
Such an interesting behavior that we encountered forces us to check the version and license agreement after installing the program.
The version is fresh, but the “OK” button is confusing. Let’s see what this software offers us by examining the settings.
Almost all the tried and tested «drivers» search items lead to nothing. At the same time, we are frankly and obtrusively pointed out to the limitations of the free version.
The painful impression of the possibilities of this program leads to the idea that the experience that the developers talk about will be directly related to the installation of Windows.
Driver Genius
Manufacturer Driver Genius does not indulge us in Russian. The interface in the latest version of the software is completely in English.
Suggestions for cleaning the disk from «wrong» drivers come down to scanning the storage. We created a list of its contents on the command line.
As a result of the program’s actions, we are offered to free «as many» nine megabytes of disk space.
Method 1: Third-Party Software
I would like to start by looking at third-party tools that allow you to clean the OS of unnecessary drivers. This method will be optimal for the most novice users who are not confident in their abilities or just want to simplify the uninstallation process as much as possible. There are many different applications whose functionality is focused on removing software. Unfortunately, we will not be able to consider them all, however, we suggest using the example of one program called Driver Fusion to analyze the general principles of uninstallation.
- Click on the link above to go to a detailed review of Driver Fusion and download the program from the official site.
 After the installation of the free or full version is completed, launch the software and go to the “Driver Cleaner” section through the left panel.
 - View the list of equipment categories here. Select the one that includes hardware with unnecessary or incorrect drivers.
- After selecting an accessory or individual device, you can view a list of installed files. To clear them, click on the dedicated button located in the center at the top of the window.
- Confirm the uninstallation by selecting Yes.
- When using the trial version, you will be notified that some of their files cannot be deleted. Getting rid of them will happen only after acquiring a premium assembly, which is the disadvantage of Driver Fusion.
If the shortcomings of the application discussed above are critical for you or it does not suit you for some other reason, we advise you to study the review of other popular thematic solutions on our website, where the author describes in detail the pros and cons of all representatives of such software. This review will help you choose the right software and quickly get rid of unnecessary drivers.
Read more: Driver Uninstallers
Step Two: Logging into the PC in Safe Mode
To manually uninstall the graphics card driver, it is recommended that you log into the device in Safe Mode. To do this, the user will need to perform the following manipulations:
- Turn off the PC while holding the «Shift» key.
- When the computer is turned on, a blue «Select Action» dialog box will appear on the monitor. The user needs to go to the «Troubleshooting» section, select the menu item «Add. Options” and from the “Advanced Options” window go to “Boot Options” (the menu is located in the lower right corner of the screen).
- The system will prompt the user to select one of the available download options. To later uninstall old video card drivers, you will need to select the «Enable safe mode» option. To do this, tap on the «F4» button or on the number «4» from the keyboard, after which the PC will automatically turn on in protected mode.

- You can start the uninstall process.
Threexy Driver Fusion
The program is designed to work with drivers on computers with Windows 7 and newer operating systems from Microsoft.
Switching to Russian is highly discouraged, because it is easier to work with the English-language interface than with the machine translated into Russian.
- Go to «Driver family».
- Select the type of device whose drivers we want to remove.
- Select the manufacturer of the equipment whose drivers you want to remove, and click «Delete».
- Click «Yes» and restart Windows 7.
The disadvantage of the utility is the lack of a list of programs installed on the PC to manage the operation of devices, which makes removing unnecessary software a chore.
How to update the video driver on windows 7 for free? Step-by-step instructions
Hello dear readers.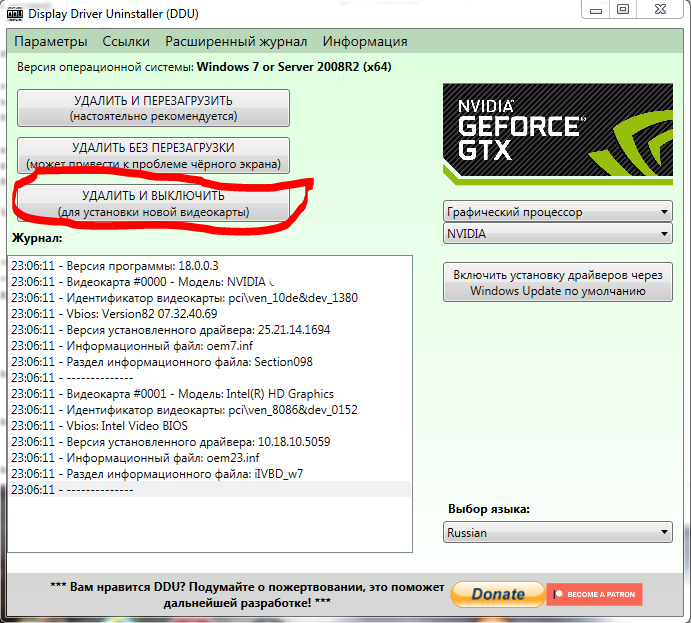
Computer hardware manufacturers are trying to constantly release new software that is designed to correct the errors of previous versions. In addition, the new products use improved options for interacting with other elements of equipment, which allows you to achieve acceleration in work. Later in the article I will tell you how to update the video driver on Windows 7 for free in different ways. Choose the one that suits you.
Contents of the article
Recovery point
Drivers for a computer, and in particular a video card, are important elements that are responsible for the normal functioning of the device. Therefore, before making any changes to the operating system, it is best to create a restore point.
In case the new software does not work as expected, users can always revert to a previous version that performs its functions stably.
To do this, in the « Start » in the search bar, you need to write the appropriate combination and select the appropriate option.
Updating Nvidia using the standard method
There are various ways to install new software for Nvidia devices. And the simplest is to use the scheme provided by the operating system:
- We call the context menu on the icon « Computer «. Select « Properties «.
- A new window will appear, on the left side of which we find « Device Manager «.
- Go to « Video Adapters «. Now we call » Properties » on the component we need.
- Go to « Driver «. We are interested in the items « Design date » and « Version «.
- There is also a button that allows you to update the software.
- A new form will open, in which we are interested in « Automatic search … «.
As a result, the system should have the latest version of the driver. Or a message will appear that there is already one.
Official Nvidia website
In addition, you can upgrade to the latest version through the manufacturer’s main website. The fact is that developers offer improved software, and it appears in the Windows lists only after some time. Therefore, in this matter, sometimes standard methods are not suitable. To achieve the goal, do the following:
- We go to the appropriate site. We are interested in the menu « Drivers «. Further « Download «.
- We will see the field « Product type «. You must specify the full name of the installed element, the operating system used (it is important to pay attention to the bit depth — 64 or 32 bits). It is also worth choosing a language and clicking « Search «.
- Now you need to make sure that the new item is suitable for the item installed on your laptop or PC. To do this, go to « Supported Products «. We are looking for the name of our card.
 If it is there, click « Download now «. We agree with the license and save it to our local drive.
 - Next, run the distribution kit, thereby proceeding directly to the installation process itself.
- Compatibility check starts.
- After the end of the process, we go to « Device Manager » and check the driver version.
If you intend to automatically place the appropriate elements in the system in the future, the developers recommend installing the GeForce Experience program. This software, during the startup of the computer, independently accesses the official resource and compares the information received with what is already there.
If necessary, the latest version is downloaded and installed online.
Update via AMD Radeon
In general, installing new drivers for AMD Radeon devices using Windows is exactly the same as for other products.
Therefore, we will immediately go to the point where it is proposed to download the distribution kit from the official website and do everything yourself:
- We go to the manufacturer’s web resource.
 We are interested in « Drivers and Support «. Here we go to the corresponding submenu.
 - Select « Manual selection «. Next, specify the platform where the component is installed, the family, the operating system, its bit depth and click « Show results «. We find the appropriate one and download it to our device.
- Run the installer.
- Compatibility check of current hardware and new software will be tested.
- After we specify the language and mark the quick installation.
Now we are waiting for the end and enjoy the new software.
It is worth noting that on such Internet resources you can download everything you need even without registration, which greatly speeds up the process.
Carambis Driver Updater
This solution allows you to automatically not only find new software, but also installs it in the right place. And this applies to all elements used, including a Samsung monitor, a Canon printer, or the same card for displaying a picture.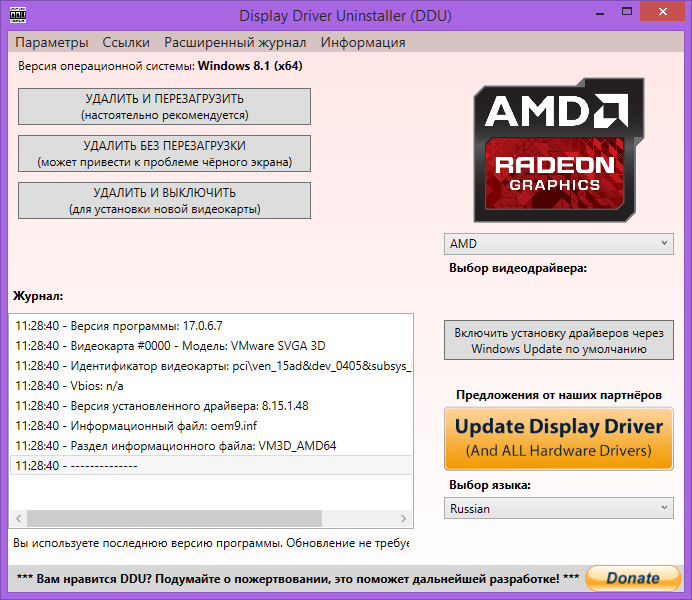
The app stands out from the competition with its intuitive interface. In addition, it is possible to configure the execution of prescribed functions in the background. This will allow you to forget about constantly checking for updates.
The application takes up minimal disk and RAM space. Therefore, it practically does not affect the speed of the computer.
As always, thematic video:
I hope this article will help you achieve your goal. Subscribe and you will learn a lot more interesting for yourself.
Uninstall, disable, rollback, update device drivers in Windows 10/8/7
Drivers
The Device Manager in Windows allows you to view the hardware installed on your computer, as well as its properties. It allows you to change hardware settings, define device drivers for each device, view and change settings and properties, and install, remove, update, rollback, enable, disable drivers.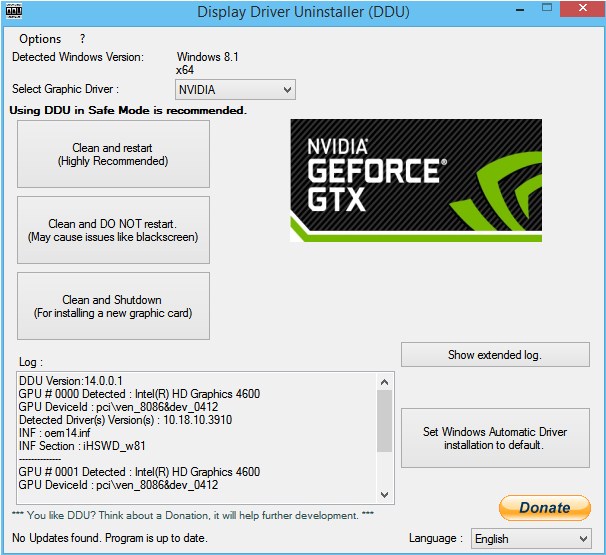
While you can use the free Driver Updater software, this article will guide you on how to backup, delete, disable, rollback, update device drivers using Device Manager in Windows 10/8/7.
Contents
- Windows Device Manager
- Remove drivers
- Update drivers
- Roll back, disable, enable drivers
Device Manager in Windows
While on the Windows 10/8 desktop, press Win + W , type Device Manager and find it in settings. Click on Device Manager to open it. In Windows 7, type Device Manager at the start of the search and press Enter to open it.
Find the driver and right click it. You will see options:
- Driver software update
- Uninstall driver software.
- Install drivers
Remove drivers
If you want to uninstall the driver, click Uninstall.
Uninstalling Display Driver will help you completely uninstall AMD, INTEL, NVIDIA drivers.
Read . Where to download drivers for Windows 10.
Driver update
If you want to check for updates and update the driver, click Update Driver. The wizard will open and offer you two options:
- To search the Internet automatically
- To view driver software on your computer
Select and click on the option you wish to continue. This post will show you in detail how to update your graphics drivers.
TIP . Check out the DriverFix review. This driver update software can automatically detect corrupted or outdated device drivers and prompt you to update them to the latest versions.
Roll back, disable, enable drivers
The right-click context menu will also allow you to open the properties of the driver. Click Properties to open the Properties window. Select the Driver tab.
Here you will see more options:
-
Driver update .
 The Hardware Update Wizard will start.
- Roll back driver . This will uninstall the most recently updated driver and roll back your configuration to an earlier version. You may need to roll back the driver if you find your device is crashing after updating the driver.
- Disable (or enable) driver . This will disable the driver until you enable it again.
- Remove Driver : This will completely remove the driver files and registry settings for the selected hardware.
This post shows you how to back up and restore drivers on Windows 10. You can also export and back up device drivers using PowerShell.
If you are looking for more information on this subject, you can find it here:
- Download, update, install the latest Intel drivers using the Intel Driver Update Utility
- How to Update Bluetooth Drivers
- Update AMD Drivers with AutoDetect Driver
- Detection of programs, features, drivers slowing down fast startup, shutdown or hibernation
- Stop Windows from automatically installing drivers
- Detect and troubleshoot unknown devices in Windows
- Let Windows automatically download the latest drivers and icons for your devices
- Tips for Troubleshooting Common Driver Problems in Windows
- Resolving Windows Driver Problems with Driver Verifier Manager
- Use Double Driver to Backup and Restore Drivers in Windows
- Install or update graphics drivers
- Download Surface Drivers and Firmware
- Download Realtek HD Audio driver
- Download TAP-Windows adapter drivers
-
Download NVIDIA drivers.

How to uninstall NVIDIA video card drivers: completely and permanently
Good afternoon everyone! Today I will tell you how to completely uninstall old NVIDIA graphics card drivers. We will consider both standard methods through Windows and the use of third-party programs. The disadvantage of the standard options is that after uninstallation, some files, libraries or registry entries may remain in the system. Because of this, problems or errors may occur when installing a new driver.
If you installed a new video card in your computer or laptop, then we remove it only with the help of programs. I advise you to use «Display Driver Uninstaller». If you just want to demolish the driver and then install a new one, then you can use the «Control Panel» or «Device Manager».
ATTENTION! After uninstalling, be sure to read the instructions — how to properly install the drivers for the video card.
I advise you to download drivers only from the official website of the manufacturer of your graphics hardware.
Content
- Method 1: Specialized utility
- Method 2: Development Programs
- CCleaner
- Revo Uninstaller
- Method 3: through the control panel
- Method 4: through the device manager
- to the author of the article
Method 1: Specialized utility
If you want to completely remove the NVIDIA driver so that there are no unnecessary tails, small utilities and registry entries left, then it is best to use the third-party Display Driver Uninstaller program. That is why I am talking about her in the very first way. Yes, we can try to delete everything through the «Control Panel» or through the «Device Manager», but there will definitely be some traces or residual files in the form of a cache.
And when installing a new vidyuhi — this is quite critical.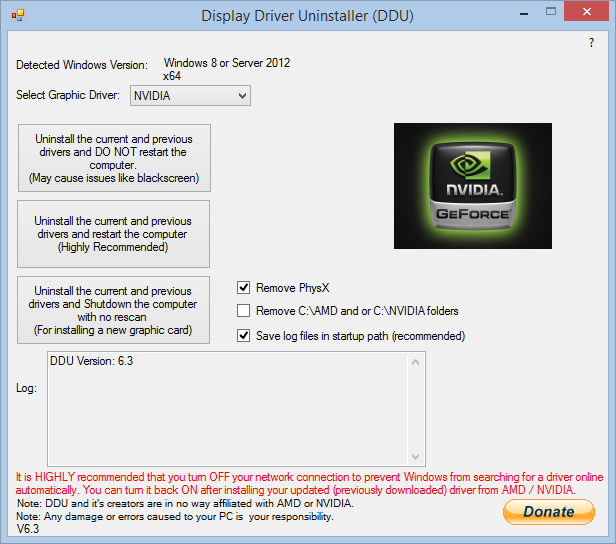 In this case, the blue screen of death may fly out at work, or error artifacts will begin to appear. Just in case, let’s delete everything using DDU.
- Download the program from here.
- Unpack the application.
- Run by clicking on the shortcut.
- First, select our manufacturer in the «Selected graphics driver» line.
- Click on the «Clean and Restart» button.
- We are waiting for the procedure to end.
Method 2: Uninstall programs
Read also — how to completely remove any program.
CCleaner
Another great and free program that allows you to perform a complete removal of almost anything. But the Internet is full of opponents of this software, although I still cannot understand why and for what. Everything works simply. Download, install and run the program. After that, go to the «Tools» — «Uninstall programs» section. To view only NVIDIA applications, click once on the name of the first column «Uninstallers» to sort the list by name.
Now select each NVIDIA program and click on the «Uninstall» button.
After removal, do not restart the computer, but try to clean the «Registry» — first we analyze, then we correct errors and wipe unnecessary entries. And after that, you can already reboot. But you can still, just in case, perform a «Standard Cleanup».
Revo Uninstaller
One of the best utilities that allows you to completely remove any software. Leaves no trace even in the registry. You can download the program from the official website. Works exactly the same as CCleaner. After starting, we find all Nvidia applications and simply delete them.
Method 3: Through the control panel
You can also remove old NVIDIA video card drivers using built-in tools. That is, through «Programs and Features» and «Device Manager». The downside is that in this case, some traces remain in the system in the registry, and the deletion is not complete.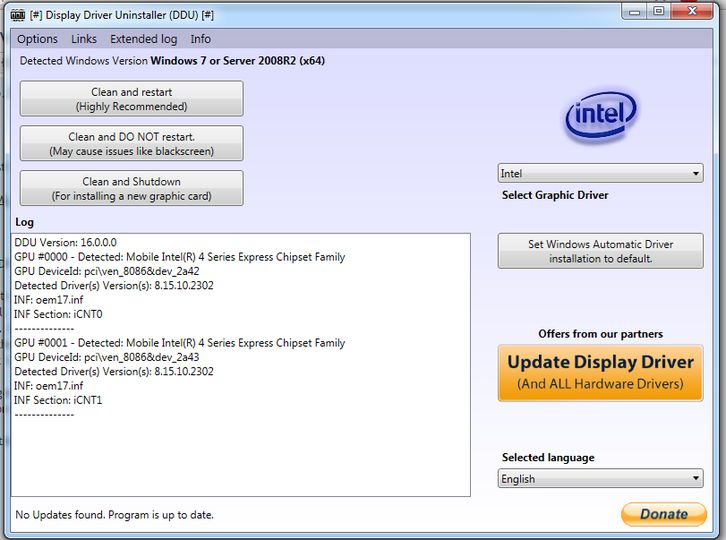 But if you just want to install later on over the driver on the same card, then this option will suit you.
NOTE! If you changed the graphics processor, it is better to use other methods.
- Open the control panel — you can find the application through the search. Or use the magic buttons + R and the command:
control
- Set the view mode to see all sections separately, and then go to Programs and Features.
- Sort all applications alphabetically by clicking once with the left mouse button on «Name» in the first column. Now scroll down to see all applications from NVIDIA.
- Right-click and select Uninstall/Change.
- Then proceed according to the removal instructions. At the very end, refuse to reboot to remove ALL of these applications.
- Once everything is deleted, restart the computer.
